By Stephen Sanwo
In order to build a working full-stack application, there are so many moving parts to think about. And you'll need to make many decisions that will be critical to the success of your app.
For example, what language will you use and what platform will you deploy on? Are you going to deploy a containerised software on a server, or make use of serverless functions to handle the backend? Do you plan to use third-party APIs to handle complex parts of your application, like authentication or payments? Where do you store the data?
In addition to all this, you'll also need to think about the user interface, design and usability of your application, and much more.
This is why complex large applications require a multifunctional development team collaborating to build the app.
One of the best ways to learn how to develop full stack applications is to build projects that cover the end-to-end development process. You'll go through designing the architecture, developing the API services, developing the user interface, and finally deploying your application.
So this tutorial will take you through the process of building an AI chatbot to help you learn these concepts in depth.
Some of the topics we will cover include:
- How to build APIs with Python, FastAPI, and WebSockets
- How to build real-time systems with Redis
- How to build a chat User Interface with React
Important Note:This is an intermediate full stack software development project that requires some basic Python and JavaScript knowledge.
I've carefully divided the project into sections to ensure that you can easily select the phase that is important to you in case you do not wish to code the full application.
You can download the full repository on My Github here.
Table of Contents
Section 1
- Application Architecture
- How to Set Up the Development Environment
Section 2
- How to Build a Chat Server with Python, FastAPI, and WebSockets
- How to Set Up the Python Environment
- FastAPI Server Setup
- How to Add Routes to the API
- How to Generate a Chat Session Token with UUID
- How to Test the API with Postman
- Websockets and Connection Manager
- Dependency Injection in FastAPI
Section 3
- How to build Real-Time Systems with Redis
- Redis and Distributed Messaging Queues
- How to Connect to a Redis Cluster in Python with a Redis Client
- How to Work with Redis Streams
- How to Model the Chat Data
- How to Work with Redis JSON
- How to Update the Token Dependency
Section 4
- How to Add Intelligence to Chatbots with AI models
- How to Get Started with Huggingface
- How to Interact with the Language Model
- How to Simulate Short-term Memory for the AI Model
- Stream Consumer and Real-timeDdata Pull from the Message Queue
- How to Update the Chat Client with the AI Response
- Refresh Token
- How to Test the Chat with Multiple Clients in Postman
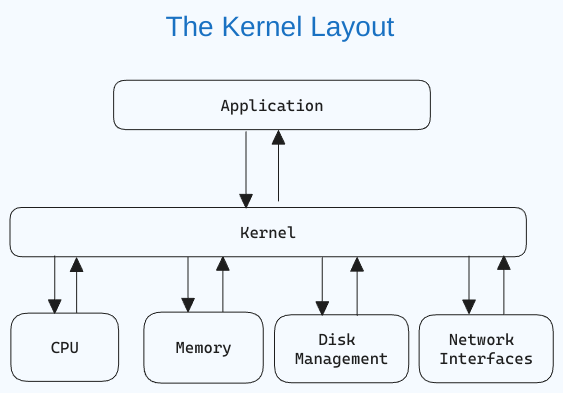
Application Architecture
Sketching out a solution architecture gives you a high-level overview of your application, the tools you intend to use, and how the components will communicate with each other.
I have drawn up a simple architecture below using draw.io:
 Fullstack chatbot architecture
Let's go over the various parts of the architecture in more detail:
Client/User Interface
We will use React version 18 to build the user interface. The Chat UI will communicate with the backend via WebSockets.
GPT-J-6B and Huggingface Inference API
GPT-J-6B is a generative language model which was trained with 6 Billion parameters and performs closely with OpenAI's GPT-3 on some tasks.
I have chosen to use GPT-J-6B because it is an open-source model and doesn’t require paid tokens for simple use cases.
Huggingface also provides us with an on-demand API to connect with this model pretty much free of charge. You can about GPT-J-6B and Hugging Face Inference API.
Redis
When we send prompts to GPT, we need a way to store the prompts and easily retrieve the response. We will use Redis JSON to store the chat data and also use Redis Streams for handling the real-time communication with the huggingface inference API.
Redis is an in-memory key-value store that enables super-fast fetching and storing of JSON-like data. For this tutorial, we will use a managed free Redis storage provided by Redis Enterprise for testing purposes.
Web Sockets and the Chat API
To send messages between the client and server in real-time, we need to open a socket connection. This is because an HTTP connection will not be sufficient to ensure real-time bi-directional communication between the client and the server.
We will be using FastAPI for the chat server, as it provides a fast and modern Python server for our use. Check out the FastAPI documentation) to learn more about WebSockets.
How to Set Up the Development Environment
You can use your desired OS to build this app – I am currently using MacOS, and Visual Studio Code. Just make sure you have Python and NodeJs installed.
To set up the project structure, create a folder namedfullstack-ai-chatbot. Then create two folders within the project called clientand server. The server will hold the code for the backend, while the client will hold the code for the frontend.
Next within the project directory, initialize a Git repository within the root of the project folder using the "git init" command. Then create a .gitignore file by using "touch .gitignore":
git inittouch .gitignoreIn the next section, we will build our chat web server using FastAPI and Python.
How to Build a Chat Server with Python, FastAPI and WebSockets
In this section, we will build the chat server using FastAPI to communicate with the user. We will use WebSockets to ensure bi-directional communication between the client and server so that we can send responses to the user in real-time.
How to Set Up the Python Environment
To start our server, we need to set up our Python environment. Open the project folder within VS Code, and open up the terminal.
From the project root, cd into the server directory and run python3.8 -m venv env. This will create a virtual environmentfor our Python project, which will be named env. To activate the virtual environment, run source env/bin/activate
Next, install a couple of libraries in your Python environment.
pip install fastapi uuid uvicorn gunicorn WebSockets python-dotenv aioredisNext create an environment file by running touch .envin the terminal. We will define our app variables and secret variables within the .envfile.
Add your app environment variable and set it to "development" like so: export APP_ENV=development. Next, we will set up a development server with a FastAPI server.
FastAPI Server Setup
At the root of the server directory, create a new file named main.pythen paste the code below for the development sever:
from fastapi import FastAPI, Requestimport uvicornimport osfrom dotenv import load_dotenvload_dotenv()api = FastAPI()@api.get("/test")async def root(): return { "msg": "API is Online"}if __name__ == "__main__": if os.environ.get('APP_ENV') == "development": uvicorn.run("main:api", host="0.0.0.0", port=3500, workers=4, reload=True) else: passFirst we import FastAPIand initialize it as api. Then we import load_dotenvfrom the python-dotenvlibrary, and initialize it to load the variables from the .envfile,
Then we create a simple test route to test the API. The test route will return a simple JSON response that tells us the API is online.
Lastly, we set up the development server by using uvicorn.runand providing the required arguments. The API will run on port 3500.
Finally, run the server in the terminal with python main.py. Once you see Application startup completein the terminal, navigate to the URL http://localhost:3500/test on your browser, and you should get a web page like this:
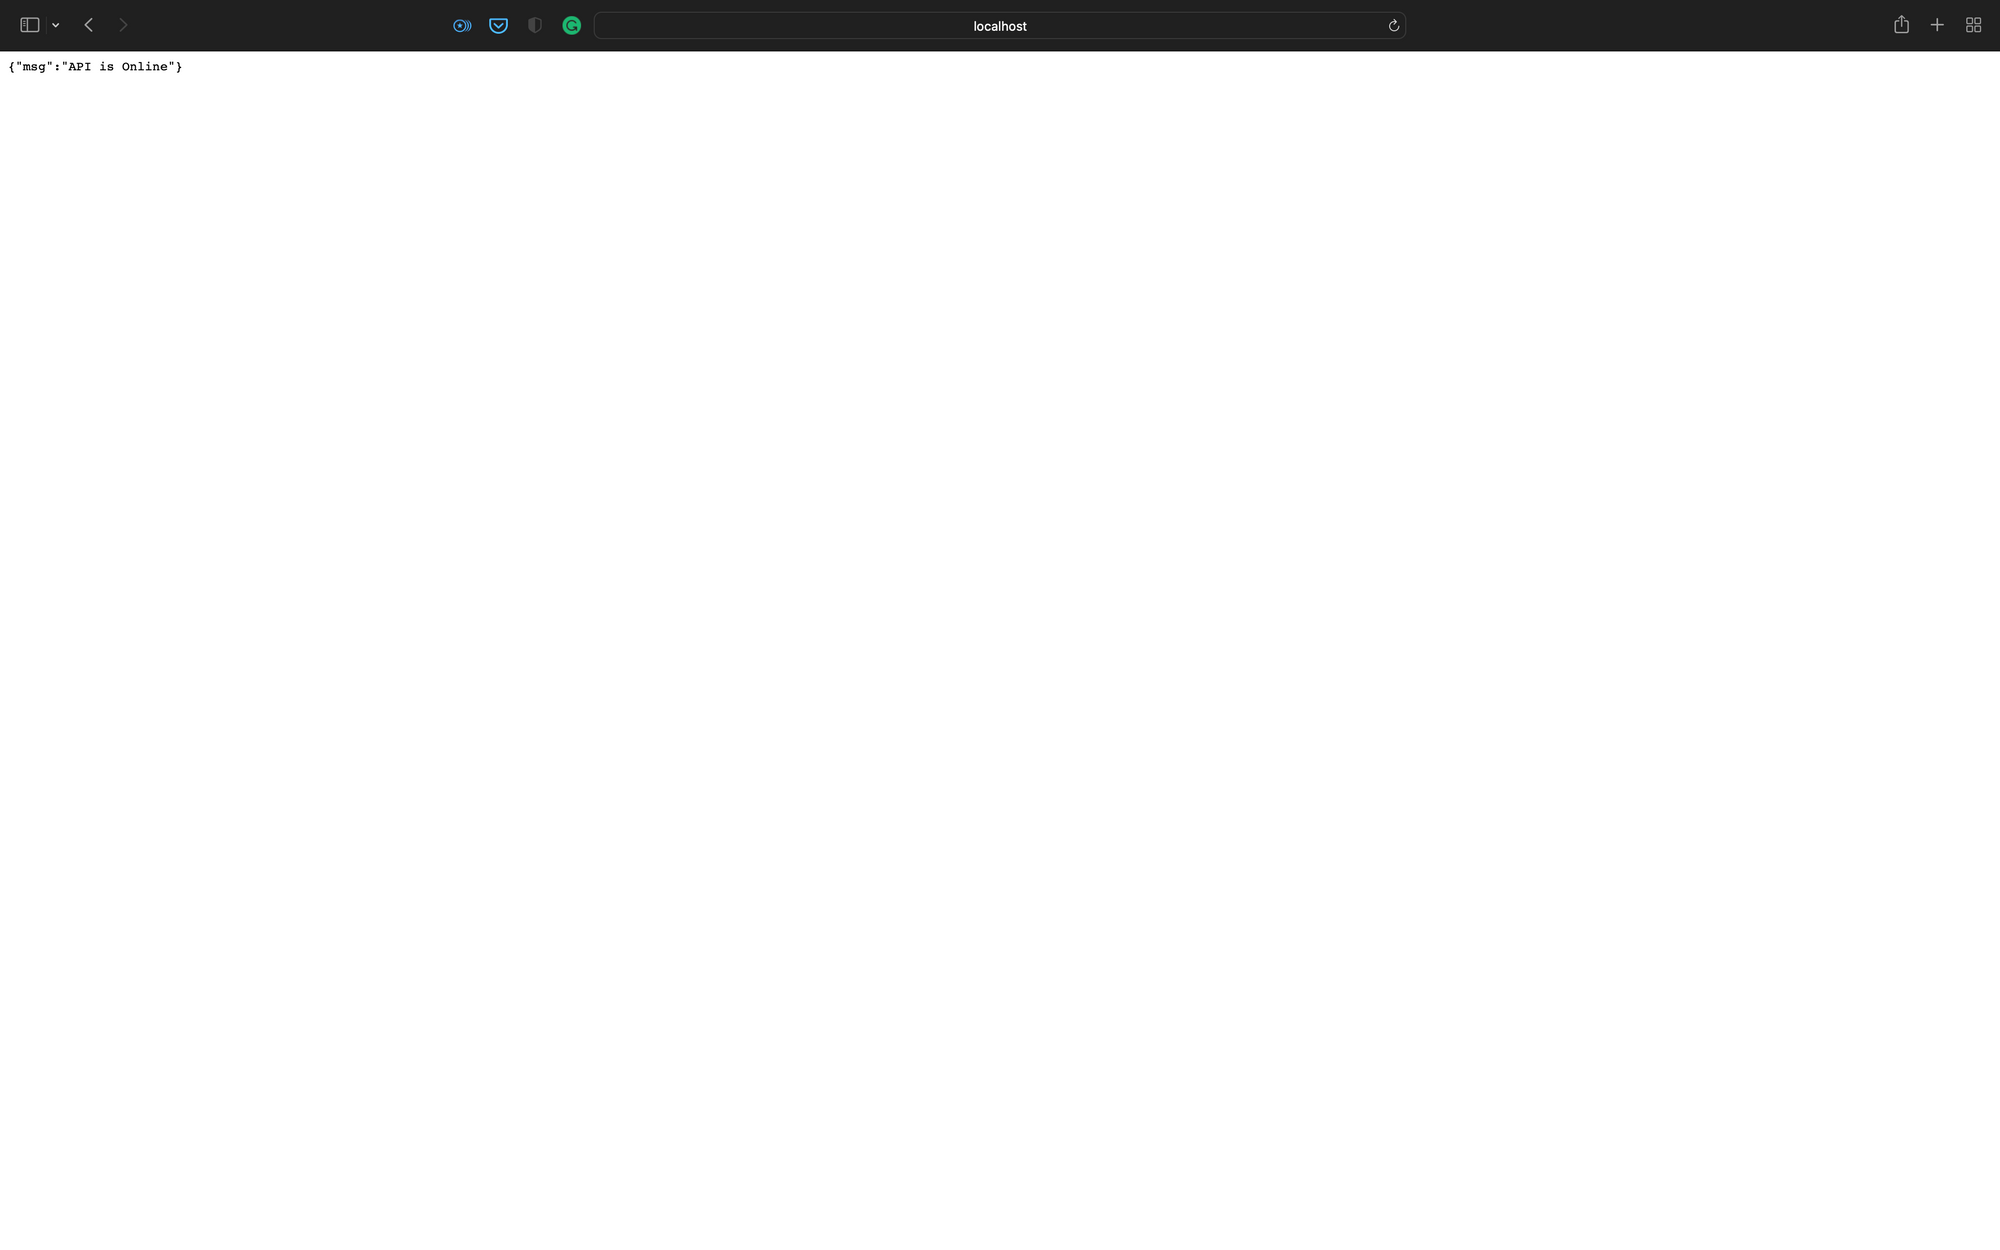 API Test Page
How to Add Routes to the API
In this section, we will add routes to our API. Create a new folder named src. This is the directory where all our API code will live.
Create a subfolder named routes, cd into the folder, create a new file named chat.pyand then add the code below:
import osfrom fastapi import APIRouter, FastAPI, WebSocket, Requestchat = APIRouter()# @route POST /token# @desc Route to generate chat token# @access [email protected]("/token")async def token_generator(request: Request): return None# @route POST /refresh_token# @desc Route to refresh token# @access [email protected]("/refresh_token")async def refresh_token(request: Request): return None# @route Websocket /chat# @desc Socket for chatbot# @access [email protected]("/chat")async def websocket_endpoint(websocket: WebSocket = WebSocket): return NoneWe created three endpoints:
/tokenwill issue the user a session token for access to the chat session. Since the chat app will be open publicly, we do not want to worry about authentication and just keep it simple – but we still need a way to identify each unique user session./refresh_tokenwill get the session history for the user if the connection is lost, as long as the token is still active and not expired./chatwill open a WebSocket to send messages between the client and server.
Next, connect the chat route to our main API. First we need to import chat from src.chatwithin our main.pyfile. Then we will include the router by literally calling an include_routermethod on the initialized FastAPIclass and passing chat as the argument.
Update your api.pycode as shown below:
from fastapi import FastAPI, Requestimport uvicornimport osfrom dotenv import load_dotenvfrom routes.chat import chatload_dotenv()api = FastAPI()api.include_router(chat)@api.get("/test")async def root(): return { "msg": "API is Online"}if __name__ == "__main__": if os.environ.get('APP_ENV') == "development": uvicorn.run("main:api", host="0.0.0.0", port=3500, workers=4, reload=True) else: passHow to Generate a Chat Session Token with UUID
To generate a user token we will use uuid4to create dynamic routes for our chat endpoint. Since this is a publicly available endpoint, we won't need to go into details about JWTs and authentication.
If you didn't install uuidinitially, run pip install uuid. Next in chat.py, import UUID, and update the /tokenroute with the code below:
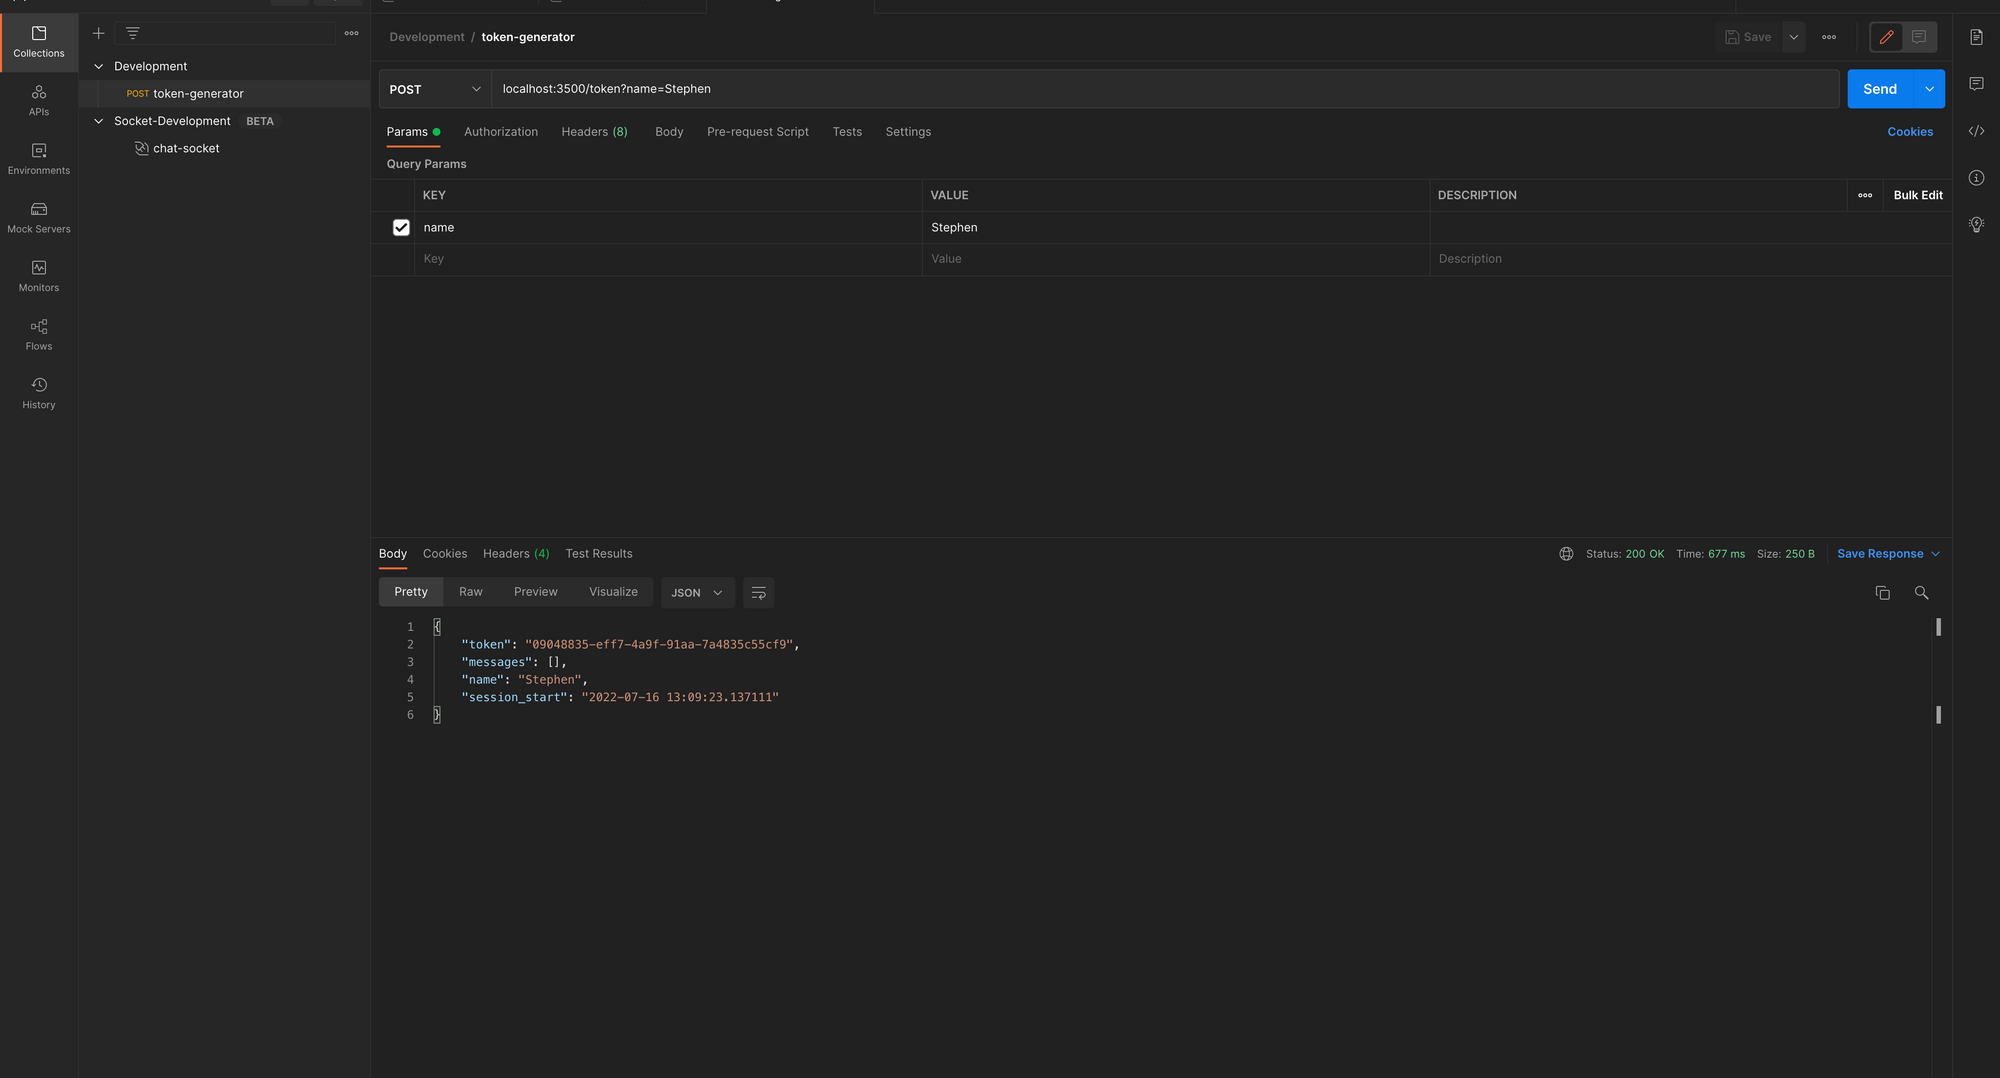
from fastapi import APIRouter, FastAPI, WebSocket, Request, BackgroundTasks, HTTPExceptionimport uuid# @route POST /token# @desc Route generating chat token# @access [email protected]("/token")async def token_generator(name: str, request: Request): if name == "": raise HTTPException(status_code=400, detail={ "loc": "name", "msg": "Enter a valid name"}) token = str(uuid.uuid4()) data = { "name": name, "token": token} return dataIn the code above, the client provides their name, which is required. We do a quick check to ensure that the name field is not empty, then generate a token using uuid4.
The session data is a simple dictionary for the name and token. Ultimately we will need to persist this session data and set a timeout, but for now we just return it to the client.
How to Test the API with Postman
Because we will be testing a WebSocket endpoint, we need to use a tool like Postman that allows this (as the default swagger docs on FastAPI does not support WebSockets).
In Postman, create a collection for your development environment and send a POST request to localhost:3500/tokenspecifying the name as a query parameter and passing it a value. You should get a response as shown below:
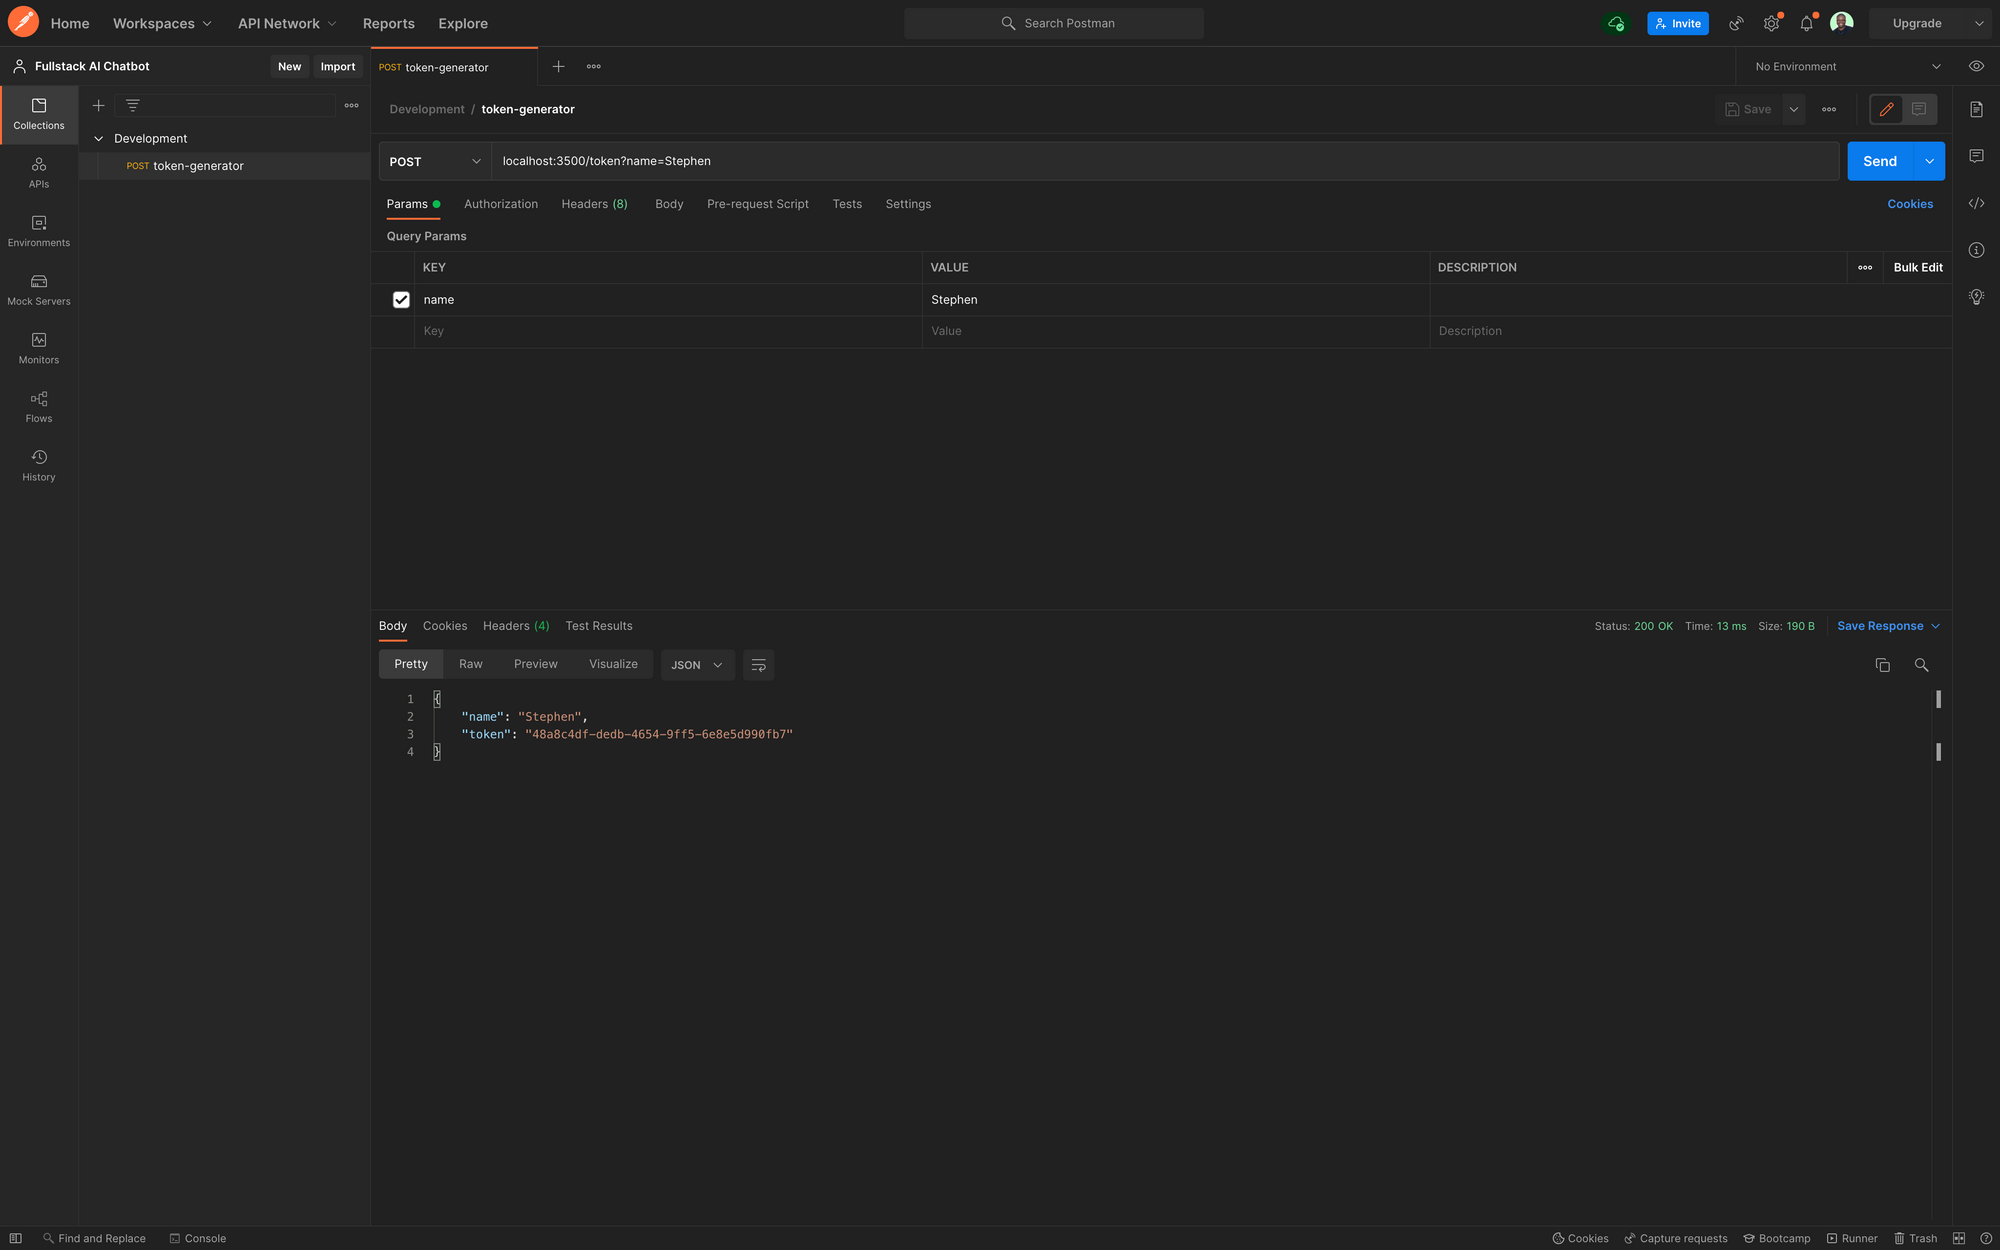 Token Generator Postman
Websockets and Connection Manager
In the src root, create a new folder named socketand add a file named connection.py. In this file, we will define the class that controls the connections to our WebSockets, and all the helper methods to connect and disconnect.
In connection.pyadd the code below:
from fastapi import WebSocketclass ConnectionManager: def __init__(self): self.active_connections: List[WebSocket] = [] async def connect(self, websocket: WebSocket): await websocket.accept() self.active_connections.append(websocket) def disconnect(self, websocket: WebSocket): self.active_connections.remove(websocket) async def send_personal_message(self, message: str, websocket: WebSocket): await websocket.send_text(message)The ConnectionManagerclass is initialized with an active_connectionsattribute that is a list of active connections.
Then the asynchronous connectmethod will accept a WebSocketand add it to the list of active connections, while the disconnectmethod will remove the Websocketfrom the list of active connections.
Lastly, the send_personal_messagemethod will take in a message and the Websocketwe want to send the message to and asynchronously send the message.
WebSockets are a very broad topic and we only scraped the surface here. This should however be sufficient to create multiple connections and handle messages to those connections asynchronously.
You can about FastAPI Websockets and Sockets Programming.
To use the ConnectionManager, import and initialize it within the src.routes.chat.py, and update the /chatWebSocket route with the code below:
from ..socket.connection import ConnectionManagermanager = ConnectionManager()@chat.websocket("/chat")async def websocket_endpoint(websocket: WebSocket): await manager.connect(websocket) try: while True: data = await websocket.receive_text() print(data) await manager.send_personal_message(f"Response: Simulating response from the GPT service", websocket) except WebSocketDisconnect: manager.disconnect(websocket)In the websocket_endpointfunction, which takes a WebSocket, we add the new websocket to the connection manager and run a while Trueloop, to ensure that the socket stays open. Except when the socket gets disconnected.
While the connection is open, we receive any messages sent by the client with websocket.receive_test()and print them to the terminal for now.
Then we send a hard-coded response back to the client for now. Ultimately the message received from the clients will be sent to the AI Model, and the response sent back to the client will be the response from the AI Model.
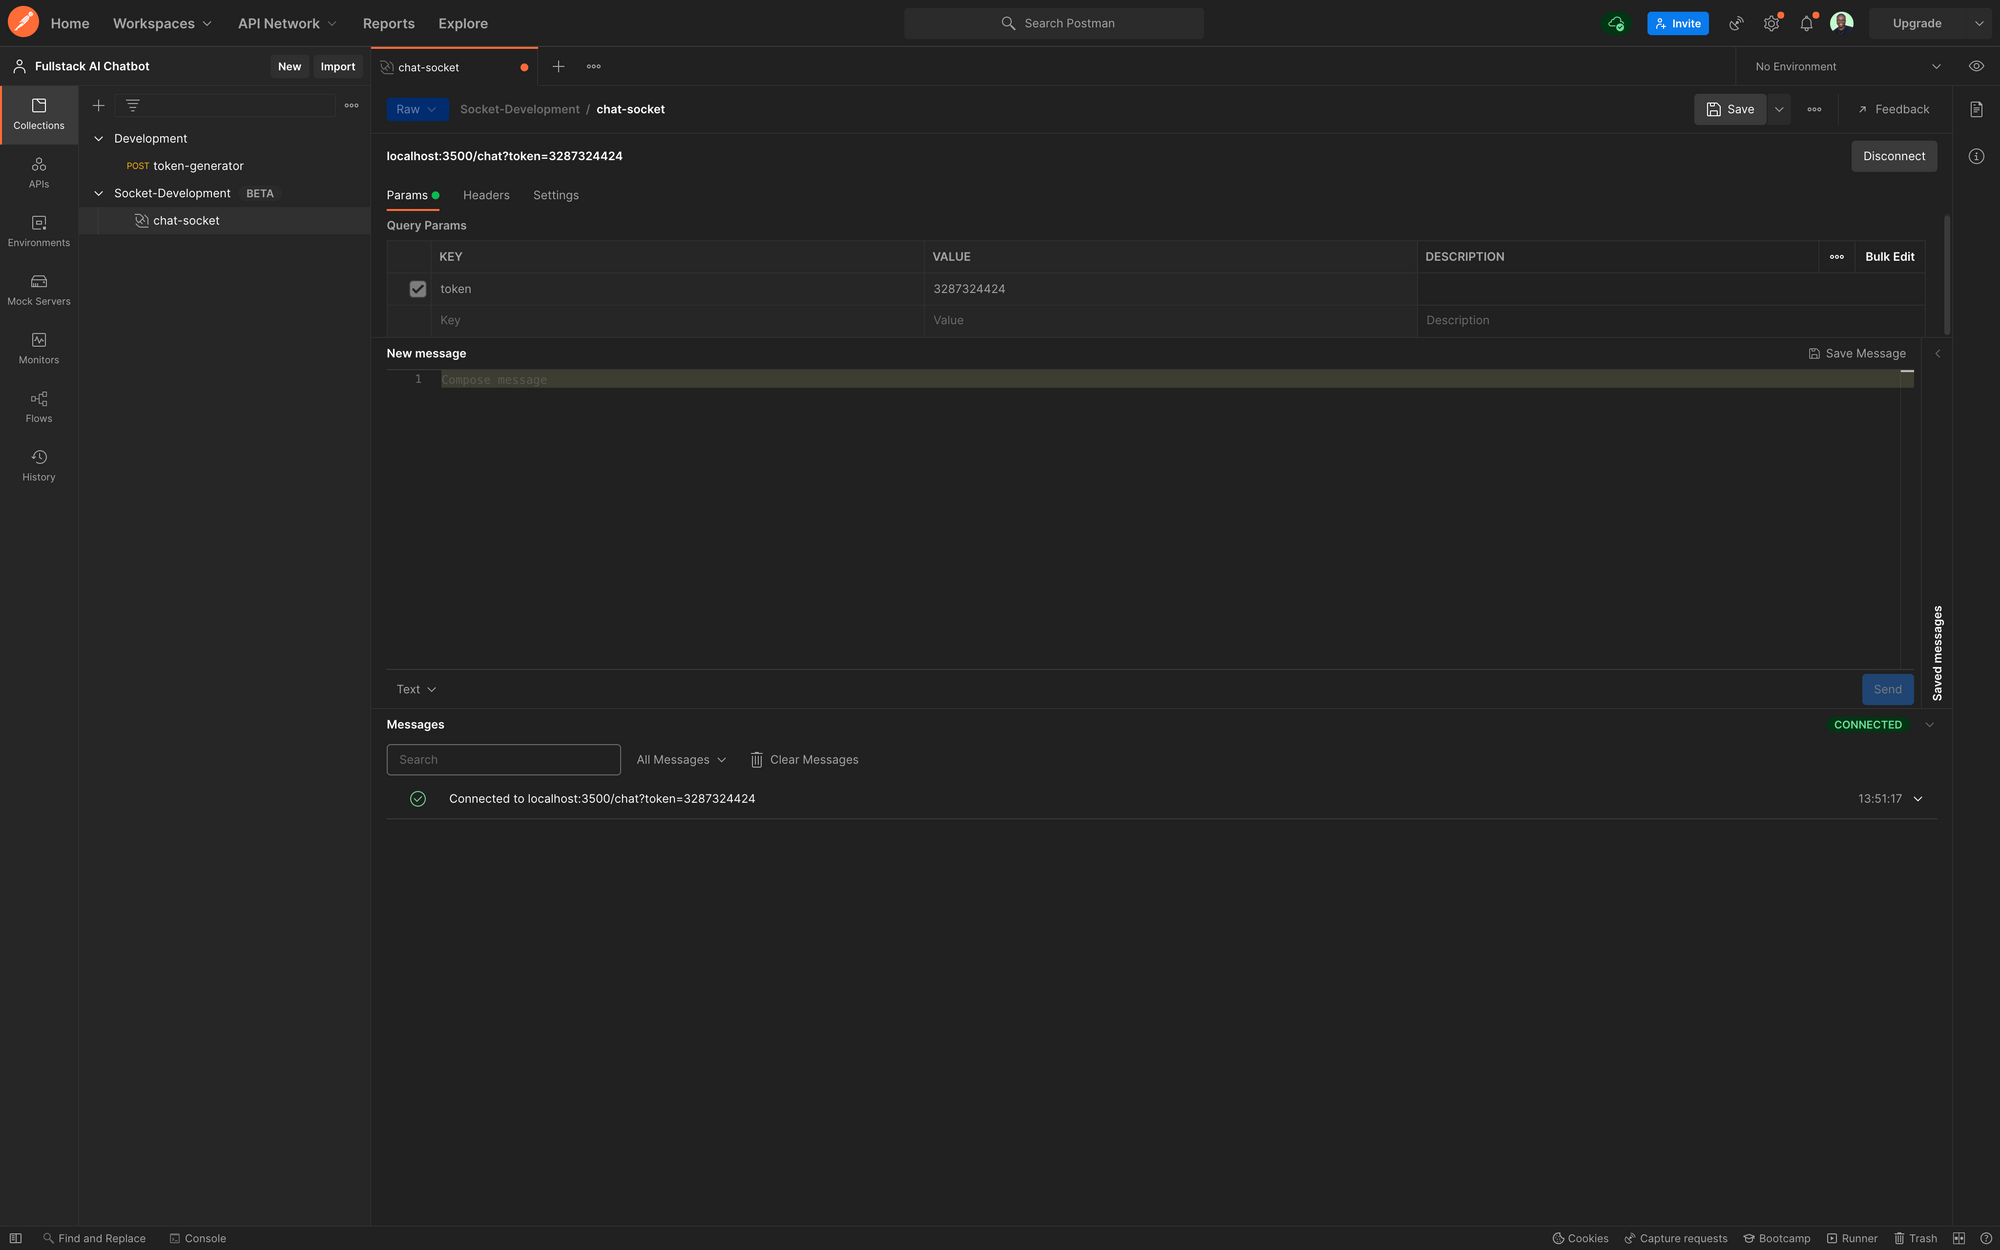
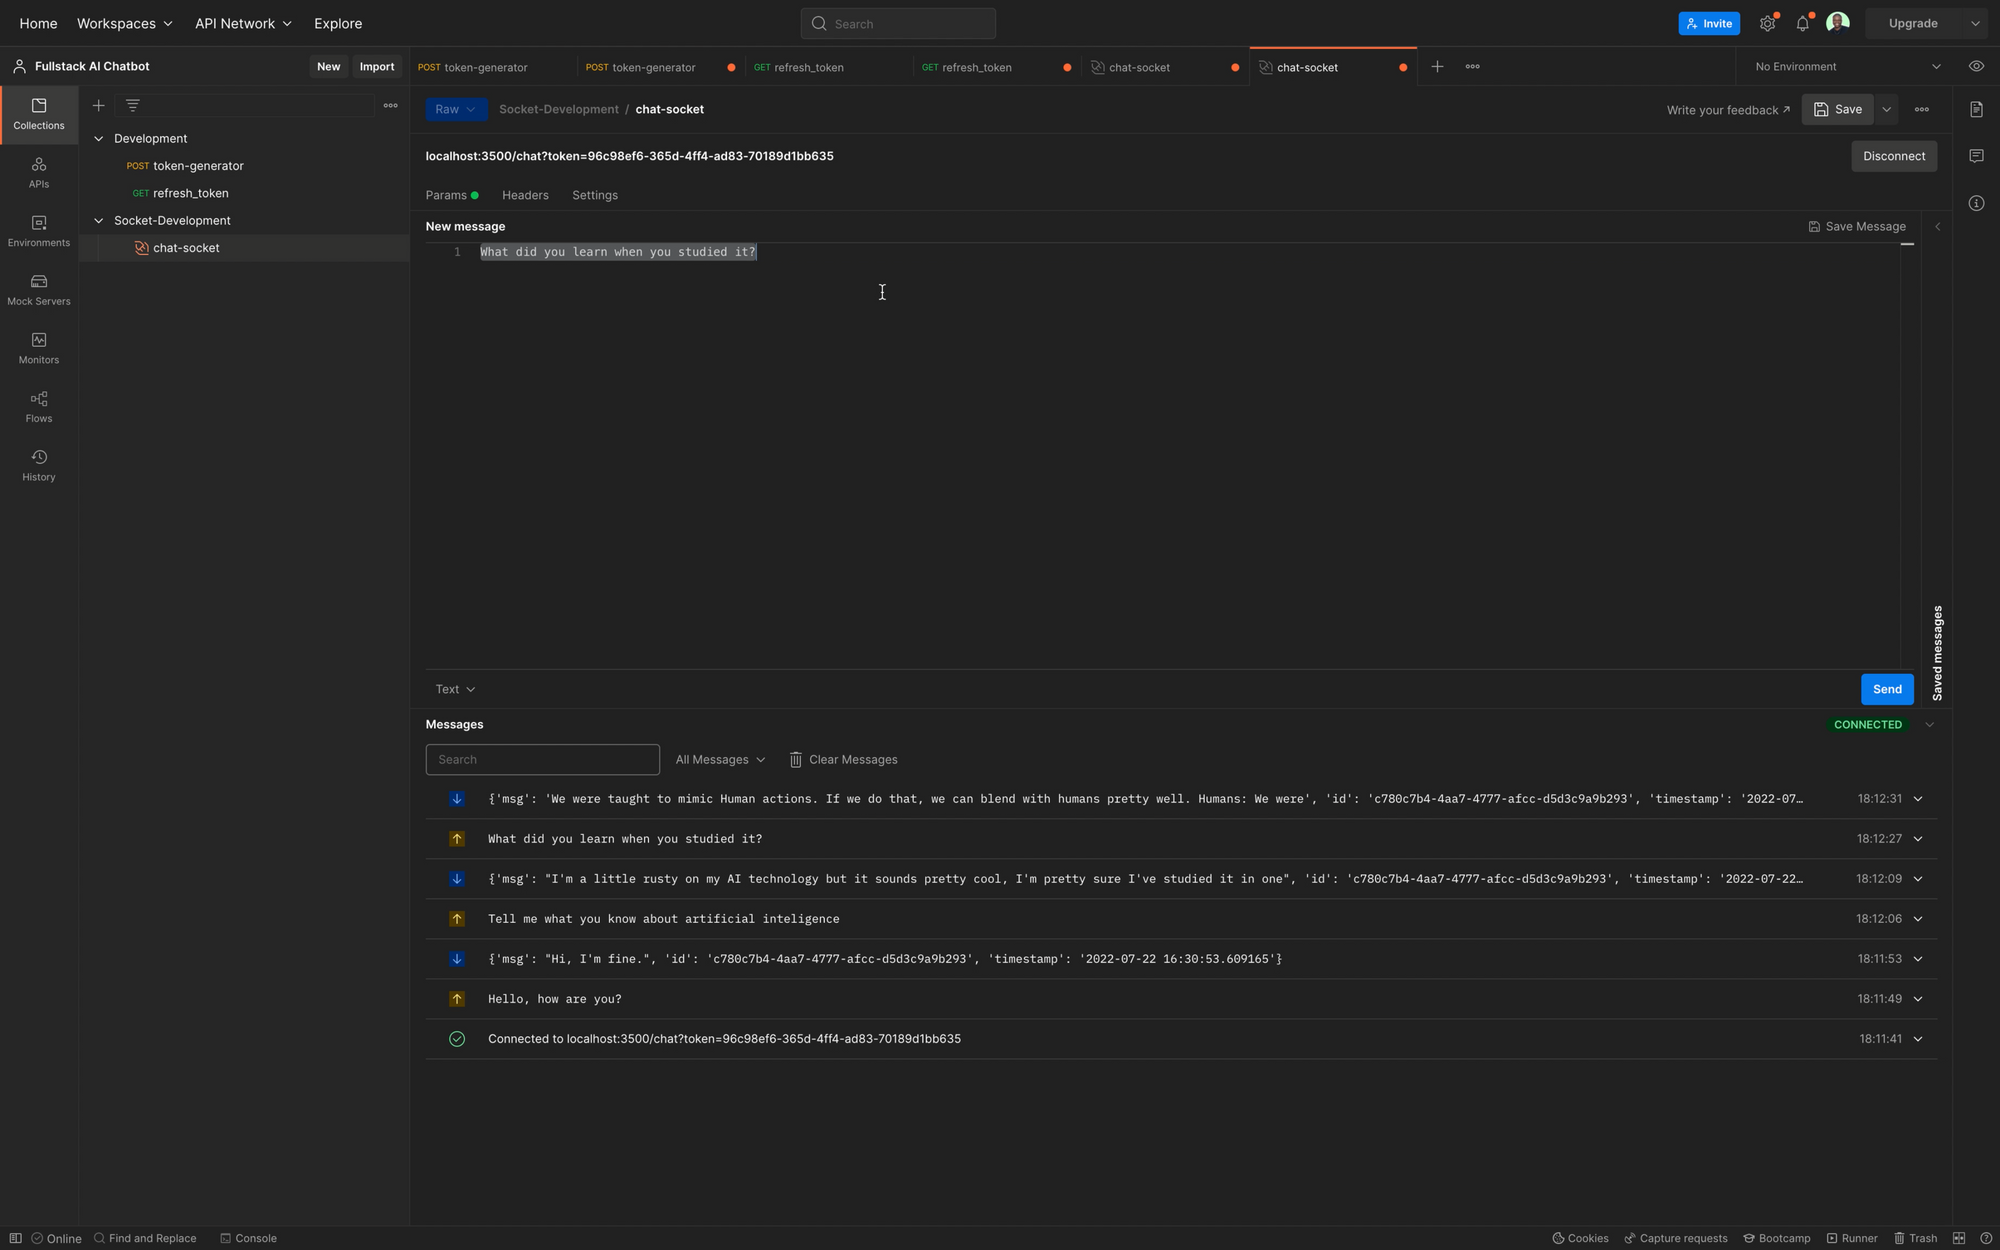
In Postman, we can test this endpoint by creating a new WebSocket request, and connecting to the WebSocket endpoint localhost:3500/chat.
When you click connect, the Messages pane will show that the API client is connected to the URL, and a socket is open.
To test this, send a message "Hello Bot" to the chat server, and you should get an immediate test response "Response: Simulating response from the GPT service" as shown below:
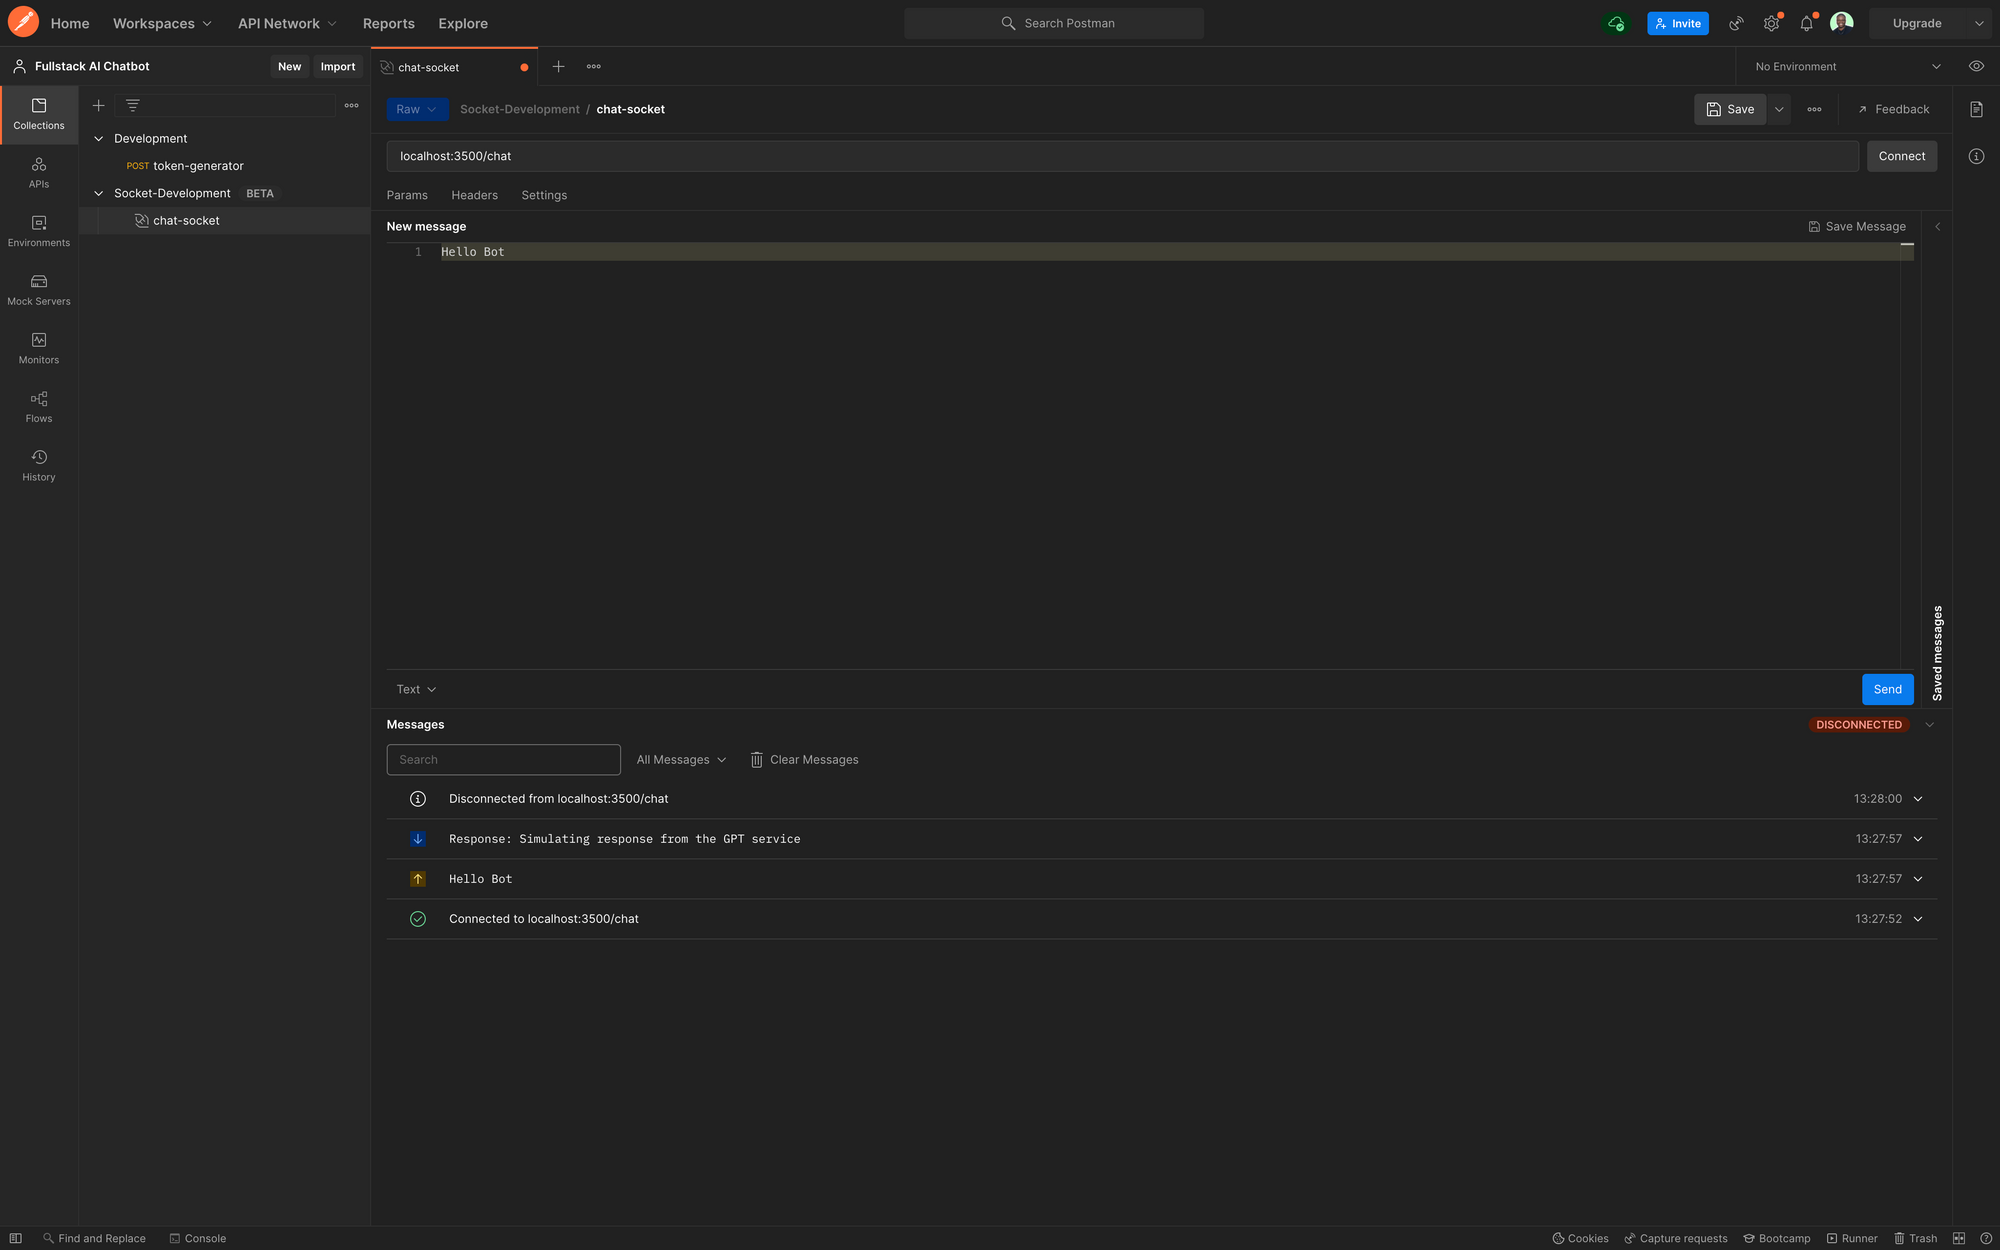 Postman Chat Test
Dependency Injection in FastAPI
To be able to distinguish between two different client sessions and limit the chat sessions, we will use a timed token, passed as a query parameter to the WebSocket connection.
In the socket folder, create a file named utils.pythen add the code below:
from fastapi import WebSocket, status, Queryfrom typing import Optionalasync def get_token( websocket: WebSocket, token: Optional[str] = Query(None),): if token is None or token == "": await websocket.close(code=status.WS_1008_POLICY_VIOLATION) return tokenThe get_token function receives a WebSocket and token, then checks if the token is None or null.
If this is the case, the function returns a policy violation status and if available, the function just returns the token. We will ultimately extend this function later with additional token validation.
To consume this function, we inject it into the /chatroute. FastAPI provides a Depends class to easily inject dependencies, so we don't have to tinker with decorators.
Update the /chatroute to the following:
from ..socket.utils import [email protected]("/chat")async def websocket_endpoint(websocket: WebSocket, token: str = Depends(get_token)): await manager.connect(websocket) try: while True: data = await websocket.receive_text() print(data) await manager.send_personal_message(f"Response: Simulating response from the GPT service", websocket) except WebSocketDisconnect: manager.disconnect(websocket)Now when you try to connect to the /chatendpoint in Postman, you will get a 403 error. Provide a token as query parameter and provide any value to the token, for now. Then you should be able to connect like before, only now the connection requires a token.
 Postman Chat Test with Token
Congratulations on getting this far! Your chat.pyfile should now look like this:
import osfrom fastapi import APIRouter, FastAPI, WebSocket, WebSocketDisconnect, Request, Depends, HTTPExceptionimport uuidfrom ..socket.connection import ConnectionManagerfrom ..socket.utils import get_tokenchat = APIRouter()manager = ConnectionManager()# @route POST /token# @desc Route to generate chat token# @access [email protected]("/token")async def token_generator(name: str, request: Request): token = str(uuid.uuid4()) if name == "": raise HTTPException(status_code=400, detail={ "loc": "name", "msg": "Enter a valid name"}) data = { "name": name, "token": token} return data# @route POST /refresh_token# @desc Route to refresh token# @access [email protected]("/refresh_token")async def refresh_token(request: Request): return None# @route Websocket /chat# @desc Socket for chatbot# @access [email protected]("/chat")async def websocket_endpoint(websocket: WebSocket, token: str = Depends(get_token)): await manager.connect(websocket) try: while True: data = await websocket.receive_text() print(data) await manager.send_personal_message(f"Response: Simulating response from the GPT service", websocket) except WebSocketDisconnect: manager.disconnect(websocket)In the next part of this tutorial, we will focus on handling the state of our application and passing data between client and server.
How to Build Real-Time Systems with Redis
Our application currently does not store any state, and there is no way to identify users or store and retrieve chat data. We are also returning a hard-coded response to the client during chat sessions.
In this part of the tutorial, we will cover the following:
- How to connect to a Redis Clusterin Python and set up a Redis Client
- How to store and retrieve data with Redis JSON
- How to set up Redis Streamsas message queues between a web server and worker environment
Redis and Distributed Messaging Queues
Redis is an open source in-memory data store that you can use as a database, cache, message broker, and streaming engine. It supports a number of data structures and is a perfect solution for distributed applications with real-time capabilities.
Redis Enterprise Cloudis a fully managed cloud service provided by Redis that helps us deploy Redis clusters at an infinite scale without worrying about infrastructure.
We will be using a free Redis Enterprise Cloud instance for this tutorial. You can Get started with Redis Cloud for free here and follow This tutorial to set up a Redis database and Redis Insight, a GUI to interact with Redis.
Once you have set up your Redis database, create a new folder in the project root (outside the server folder) named worker.
We will isolate our worker environment from the web server so that when the client sends a message to our WebSocket, the web server does not have to handle the request to the third-party service. Also, resources can be freed up for other users.
The background communication with the inference API is handled by this worker service, through Redis.
Requests from all the connected clients are appended to the message queue (producer), while the worker consumes the messages, sends off the requests to the inference API, and appends the response to a response queue.
Once the API receives a response, it sends it back to the client.
During the trip between the producer and the consumer, the client can send multiple messages, and these messages will be queued up and responded to in order.
Ideally, we could have this worker running on a completely different server, in its own environment, but for now, we will create its own Python environment on our local machine.
You might be wondering – why do we need a worker?Imagine a scenario where the web server also creates the request to the third-party service. This means that while waiting for the response from the third party service during a socket connection, the server is blocked and resources are tied up till the response is obtained from the API.
You can try this out by creating a random sleep time.sleep(10)before sending the hard-coded response, and sending a new message. Then try to connect with a different token in a new postman session.
You will notice that the chat session will not connect until the random sleep times out.
While we can use asynchronous techniques and worker pools in a more production-focused server set-up, that also won't be enough as the number of simultaneous users grow.
Ultimately, we want to avoid tying up the web server resources by using Redis to broker the communication between our chat API and the third-party API.
Next open up a new terminal, cd into the worker folder, and create and activate a new Python virtual environment similar to what we did in part 1.
Next, install the following dependencies:
pip install aiohttp aioredis python-dotenvHow to Connect to a Redis Cluster in Python with a Redis Client
We will use the aioredis client to connect with the Redis database. We'll also use the requests library to send requests to the Huggingface inference API.
Create two files .env, and main.py. Then create a folder named src. Also, create a folder named redisand add a new file named config.py.
In the .envfile, add the following code – and make sure you update the fields with the credentials provided in your Redis Cluster.
export REDIS_URL=<REDIS URL PROVIDED IN REDIS CLOUD>export REDIS_USER=<REDIS USER IN REDIS CLOUD>export REDIS_PASSWORD=<DATABASE PASSWORD IN REDIS CLOUD>export REDIS_HOST=<REDIS HOST IN REDIS CLOUD>export REDIS_PORT=<REDIS PORT IN REDIS CLOUD>In config.py add the Redis Class below:
import osfrom dotenv import load_dotenvimport aioredisload_dotenv()class Redis(): def __init__(self): """initialize connection """ self.REDIS_URL = os.environ['REDIS_URL'] self.REDIS_PASSWORD = os.environ['REDIS_PASSWORD'] self.REDIS_USER = os.environ['REDIS_USER'] self.connection_url = f"redis://{ self.REDIS_USER}:{ self.REDIS_PASSWORD}@{ self.REDIS_URL}" async def create_connection(self): self.connection = aioredis.from_url( self.connection_url, db=0) return self.connectionWe create a Redis object and initialize the required parameters from the environment variables. Then we create an asynchronous method create_connectionto create a Redis connection and return the connection pool obtained from the aioredismethod from_url.
Next, we test the Redis connection in main.py by running the code below. This will create a new Redis connection pool, set a simple key "key", and assign a string "value" to it.
from src.redis.config import Redisimport asyncioasync def main(): redis = Redis() redis = await redis.create_connection() print(redis) await redis.set("key", "value")if __name__ == "__main__": asyncio.run(main())Now open Redis Insight (if you followed the tutorial to download and install it) You should see something like this:
 Redis Insight Test
How to Work with Redis Streams
Now that we have our worker environment setup, we can create a producer on the web server and a consumer on the worker.
First, let's create our Redis class again on the server. In server.srccreate a folder named redisand add two files, config.pyand producer.py.
In config.py, add the code below as we did for the worker environment:
import osfrom dotenv import load_dotenvimport aioredisload_dotenv()class Redis(): def __init__(self): """initialize connection """ self.REDIS_URL = os.environ['REDIS_URL'] self.REDIS_PASSWORD = os.environ['REDIS_PASSWORD'] self.REDIS_USER = os.environ['REDIS_USER'] self.connection_url = f"redis://{ self.REDIS_USER}:{ self.REDIS_PASSWORD}@{ self.REDIS_URL}" async def create_connection(self): self.connection = aioredis.from_url( self.connection_url, db=0) return self.connectionIn the .env file, also add the Redis credentials:
export REDIS_URL=<REDIS URL PROVIDED IN REDIS CLOUD>export REDIS_USER=<REDIS USER IN REDIS CLOUD>export REDIS_PASSWORD=<DATABASE PASSWORD IN REDIS CLOUD>export REDIS_HOST=<REDIS HOST IN REDIS CLOUD>export REDIS_PORT=<REDIS PORT IN REDIS CLOUD>Finally, in server.src.redis.producer.pyadd the following code:
from .config import Redisclass Producer: def __init__(self, redis_client): self.redis_client = redis_client async def add_to_stream(self, data: dict, stream_channel): try: msg_id = await self.redis_client.xadd(name=stream_channel, id="*", fields=data) print(f"Message id { msg_id} added to { stream_channel} stream") return msg_id except Exception as e: print(f"Error sending msg to stream => { e}")We created a Producer class that is initialized with a Redis client. We use this client to add data to the stream with the add_to_streammethod, which takes the data and the Redis channel name.
The Redis command for adding data to a stream channel is xaddand it has both high-level and low-level functions in aioredis.
Next, to run our newly created Producer, update chat.pyand the WebSocket /chatendpoint like below. Notice the updated channel name message_channel.
from ..redis.producer import Producerfrom ..redis.config import Redischat = APIRouter()manager = ConnectionManager()redis = Redis()@chat.websocket("/chat")async def websocket_endpoint(websocket: WebSocket, token: str = Depends(get_token)): await manager.connect(websocket) redis_client = await redis.create_connection() producer = Producer(redis_client) try: while True: data = await websocket.receive_text() print(data) stream_data = { } stream_data[token] = data await producer.add_to_stream(stream_data, "message_channel") await manager.send_personal_message(f"Response: Simulating response from the GPT service", websocket) except WebSocketDisconnect: manager.disconnect(websocket)Next, in Postman, create a connection and send any number of messages that say Hello. You should have the stream messages printed to the terminal like below:
 Terminal Channel Messages Test
In Redis Insight, you will see a new mesage_channelcreated and a time-stamped queue filled with the messages sent from the client. This timestamped queue is important to preserve the order of the messages.
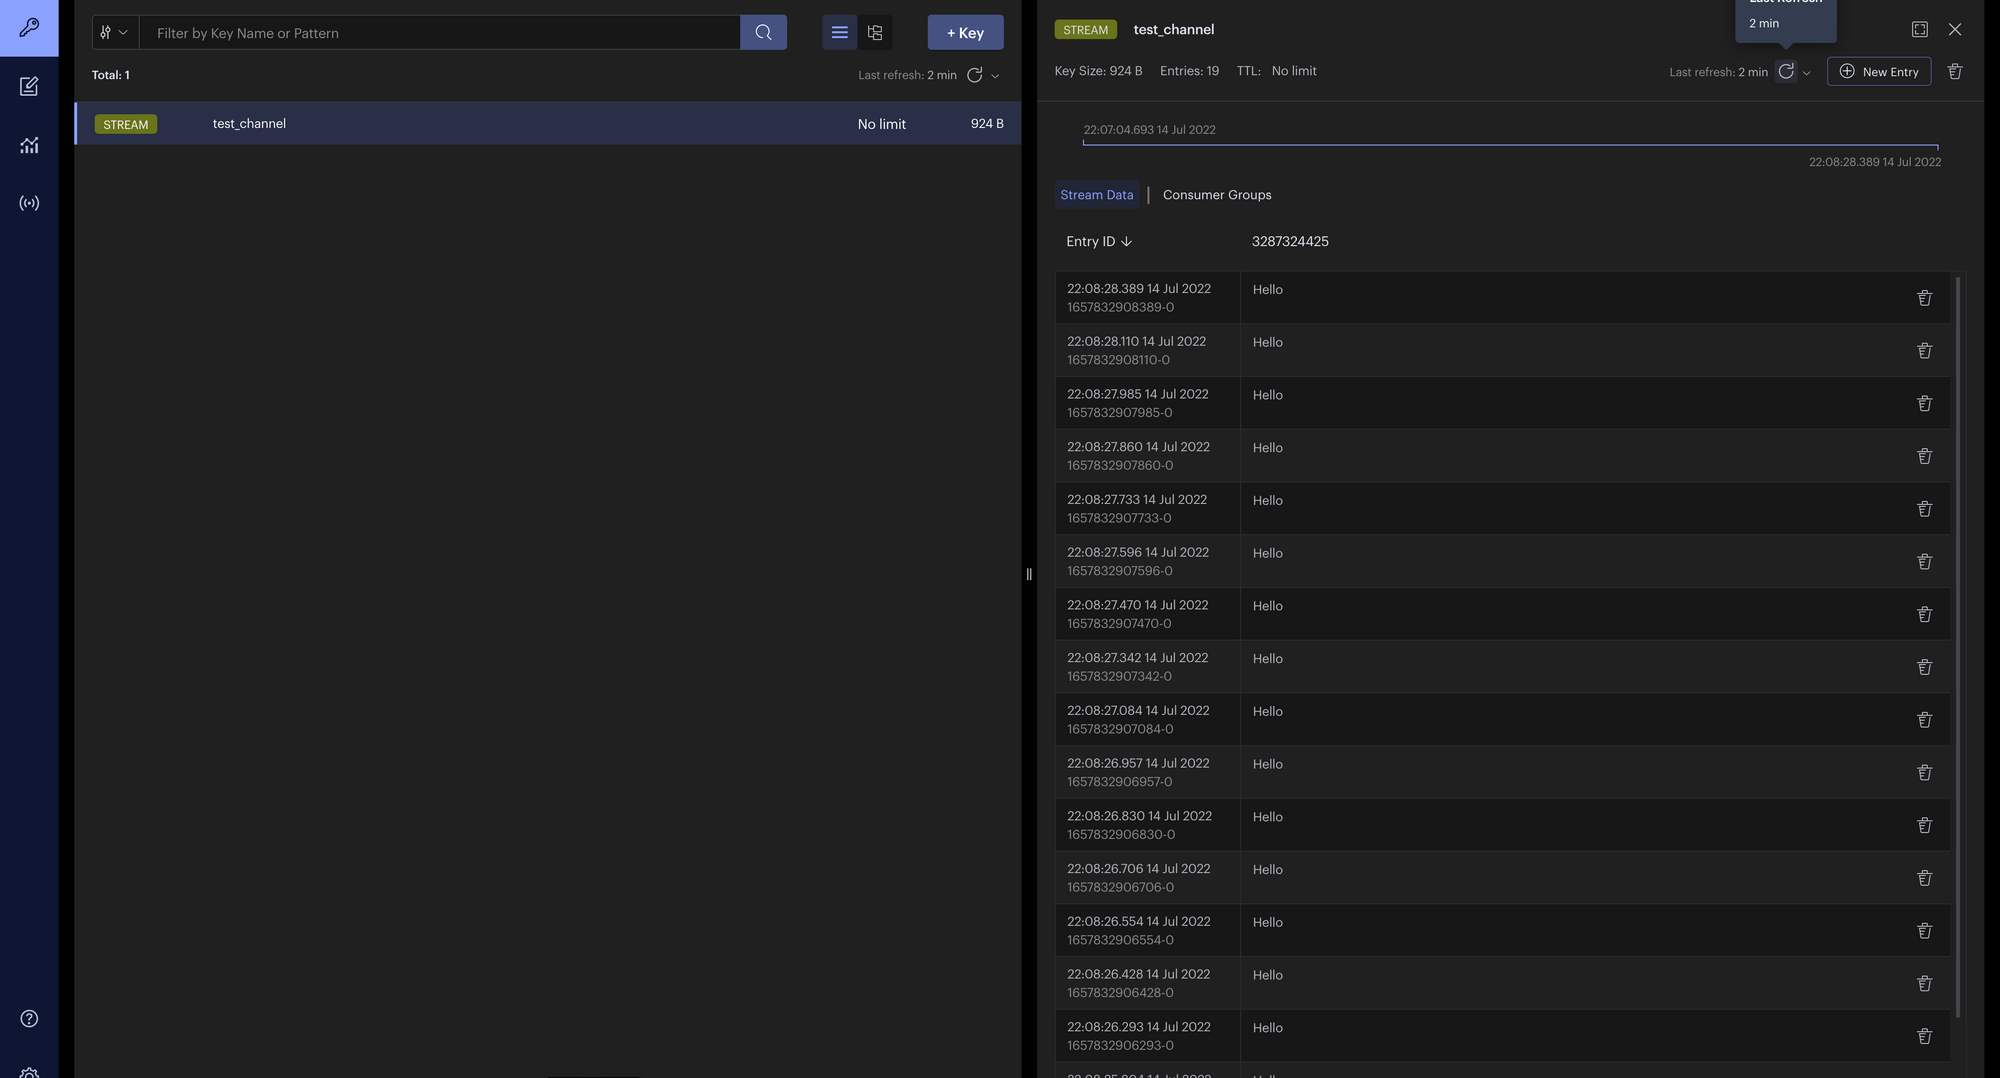 Redis Insight Channel
How to Model the Chat Data
Next, we'll create a model for our chat messages. Recall that we are sending text data over WebSockets, but our chat data needs to hold more information than just the text. We need to timestamp when the chat was sent, create an ID for each message, and collect data about the chat session, then store this data in a JSON format.
We can store this JSON data in Redis so we don't lose the chat history once the connection is lost, because our WebSocket does not store state.
In server.srccreate a new folder named schema. Then create a file named chat.pyin server.src.schemaadd the following code:
from datetime import datetimefrom pydantic import BaseModelfrom typing import List, Optionalimport uuidclass Message(BaseModel): id = uuid.uuid4() msg: str timestamp = str(datetime.now())class Chat(BaseModel): token: str messages: List[Message] name: str session_start = str(datetime.now())We are using Pydantic's BaseModelclass to model the chat data. The Chatclass will hold data about a single Chat session. It will store the token, name of the user, and an automatically generated timestamp for the chat session start time using datetime.now().
The messages sent and received within this chat session are stored with a Messageclass which creates a chat id on the fly using uuid4. The only data we need to provide when initializing this Messageclass is the message text.
How to Work with Redis JSON
In order to use Redis JSON's ability to store our chat history, we need to install rejson provided by Redis labs.
In the terminal, cd into serverand install rejson with pip install rejson. Then update your Redisclass in server.src.redis.config.pyto include the create_rejson_connectionmethod:
import osfrom dotenv import load_dotenvimport aioredisfrom rejson import Clientload_dotenv()class Redis(): def __init__(self): """initialize connection """ self.REDIS_URL = os.environ['REDIS_URL'] self.REDIS_PASSWORD = os.environ['REDIS_PASSWORD'] self.REDIS_USER = os.environ['REDIS_USER'] self.connection_url = f"redis://{ self.REDIS_USER}:{ self.REDIS_PASSWORD}@{ self.REDIS_URL}" self.REDIS_HOST = os.environ['REDIS_HOST'] self.REDIS_PORT = os.environ['REDIS_PORT'] async def create_connection(self): self.connection = aioredis.from_url( self.connection_url, db=0) return self.connection def create_rejson_connection(self): self.redisJson = Client(host=self.REDIS_HOST, port=self.REDIS_PORT, decode_responses=True, username=self.REDIS_USER, password=self.REDIS_PASSWORD) return self.redisJsonWe are adding the create_rejson_connectionmethod to connect to Redis with the rejson Client. This gives us the methods to create and manipulate JSON data in Redis, which are not available with aioredis.
Next, in server.src.routes.chat.pywe can update the /tokenendpoint to create a new Chatinstance and store the session data in Redis JSON like so:
@chat.post("/token")async def token_generator(name: str, request: Request): token = str(uuid.uuid4()) if name == "": raise HTTPException(status_code=400, detail={ "loc": "name", "msg": "Enter a valid name"}) # Create new chat session json_client = redis.create_rejson_connection() chat_session = Chat( token=token, messages=[], name=name ) # Store chat session in redis JSON with the token as key json_client.jsonset(str(token), Path.rootPath(), chat_session.dict()) # Set a timeout for redis data redis_client = await redis.create_connection() await redis_client.expire(str(token), 3600) return chat_session.dict()NOTE: Because this is a demo app, I do not want to store the chat data in Redis for too long. So I have added a 60-minute time out on the token using the aioredis client (rejson does not implement timeouts). This means that after 60 minutes, the chat session data will be lost.
This is necessary because we are not authenticating users, and we want to dump the chat data after a defined period. This step is optional, and you don't have to include it.
Next, in Postman, when you send a POST request to create a new token, you will get a structured response like the one below. You can also check Redis Insight to see your chat data stored with the token as a JSON key and the data as a value.
 Token Generator Updated
How to Update the Token Dependency
Now that we have a token being generated and stored, this is a good time to update the get_tokendependency in our /chatWebSocket. We do this to check for a valid token before starting the chat session.
In server.src.socket.utils.pyupdate the get_tokenfunction to check if the token exists in the Redis instance. If it does then we return the token, which means that the socket connection is valid. If it doesn't exist, we close the connection.
The token created by /tokenwill cease to exist after 60 minutes. So we can have some simple logic on the frontend to redirect the user to generate a new token if an error response is generated while trying to start a chat.
from ..redis.config import Redisasync def get_token( websocket: WebSocket, token: Optional[str] = Query(None),): if token is None or token == "": await websocket.close(code=status.WS_1008_POLICY_VIOLATION) redis_client = await redis.create_connection() isexists = await redis_client.exists(token) if isexists == 1: return token else: await websocket.close(code=status.WS_1008_POLICY_VIOLATION, reason="Session not authenticated or expired token")To test the dependency, connect to the chat session with the random token we have been using, and you should get a 403 error. (Note that you have to manually delete the token in Redis Insight.)
Now copy the token generated when you sent the post request to the /tokenendpoint (or create a new request) and paste it as the value to the token query parameter required by the /chatWebSocket. Then connect. You should get a successful connection.
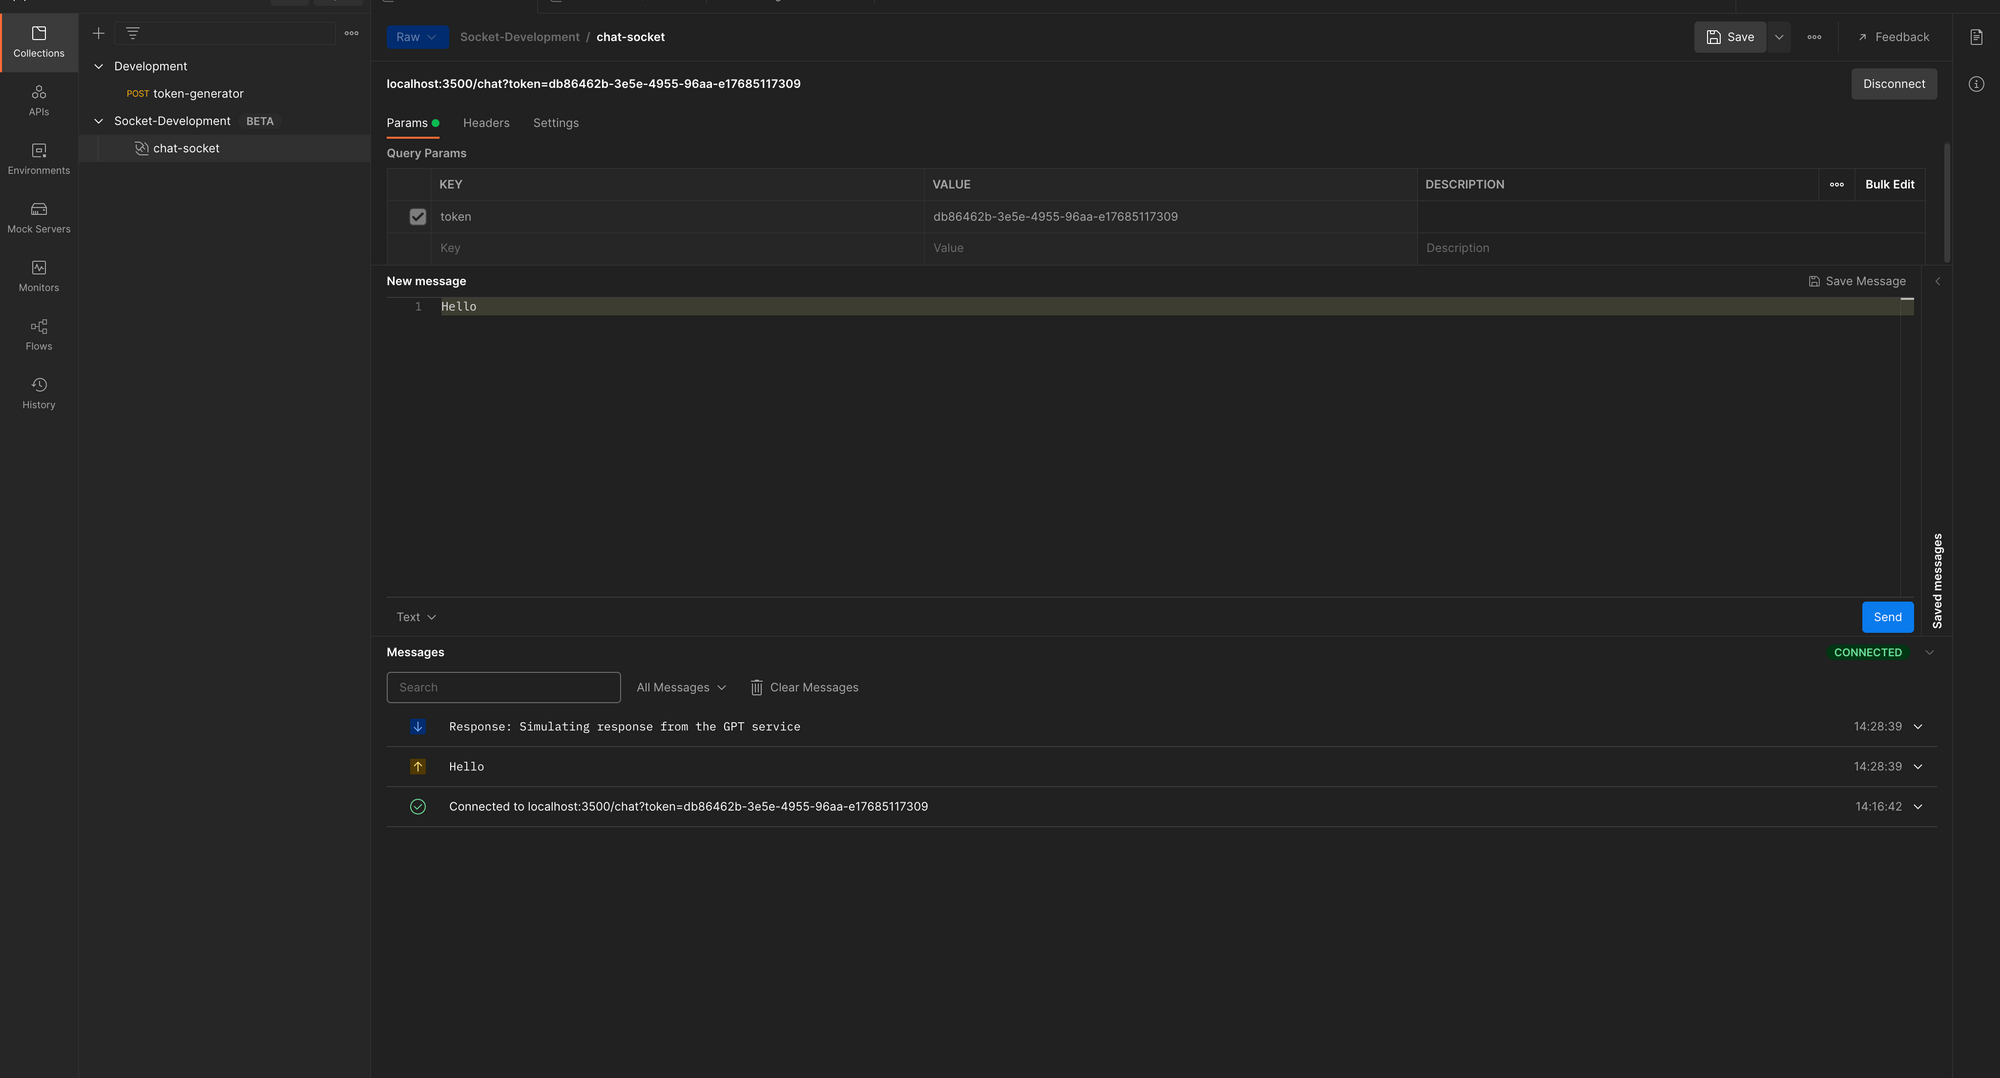 Chat Session with Token
Bringing it all together, your chat.py should look like the below.
import osfrom fastapi import APIRouter, FastAPI, WebSocket, WebSocketDisconnect, Request, Dependsimport uuidfrom ..socket.connection import ConnectionManagerfrom ..socket.utils import get_tokenimport timefrom ..redis.producer import Producerfrom ..redis.config import Redisfrom ..schema.chat import Chatfrom rejson import Pathchat = APIRouter()manager = ConnectionManager()redis = Redis()# @route POST /token# @desc Route to generate chat token# @access [email protected]("/token")async def token_generator(name: str, request: Request): token = str(uuid.uuid4()) if name == "": raise HTTPException(status_code=400, detail={ "loc": "name", "msg": "Enter a valid name"}) # Create nee chat session json_client = redis.create_rejson_connection() chat_session = Chat( token=token, messages=[], name=name ) print(chat_session.dict()) # Store chat session in redis JSON with the token as key json_client.jsonset(str(token), Path.rootPath(), chat_session.dict()) # Set a timeout for redis data redis_client = await redis.create_connection() await redis_client.expire(str(token), 3600) return chat_session.dict()# @route POST /refresh_token# @desc Route to refresh token# @access [email protected]("/refresh_token")async def refresh_token(request: Request): return None# @route Websocket /chat# @desc Socket for chat bot# @access [email protected]("/chat")async def websocket_endpoint(websocket: WebSocket, token: str = Depends(get_token)): await manager.connect(websocket) redis_client = await redis.create_connection() producer = Producer(redis_client) json_client = redis.create_rejson_connection() try: while True: data = await websocket.receive_text() stream_data = { } stream_data[token] = data await producer.add_to_stream(stream_data, "message_channel") await manager.send_personal_message(f"Response: Simulating response from the GPT service", websocket) except WebSocketDisconnect: manager.disconnect(websocket)Well done on reaching it this far! In the next section, we will focus on communicating with the AI model and handling the data transfer between client, server, worker, and the external API.
How to Add Intelligence to Chatbots with AI Models
In this section, we will focus on building a wrapper to communicate with the transformer model, send prompts from a user to the API in a conversational format, and receive and transform responses for our chat application.
How to Get Started with Huggingface
We will not be building or deploying any language models on Hugginface. Instead, we'll focus on using Huggingface's accelerated inference API to connect to pre-trained models.
The model we will be using is the GPT-J-6B Model provided by EleutherAI. It's a generative language model which was trained with 6 Billion parameters.
Huggingface provides us with an on-demand limited API to connect with this model pretty much free of charge.
To get started with Huggingface, Create a free account. In your settings, generate a new access token. For up to 30k tokens, Huggingface provides access to the inference API for free.
You can Monitor your API usage here. Make sure you keep this token safe and don't expose it publicly.
Note: We will use HTTP connections to communicate with the API because we are using a free account. But the PRO Huggingface account supports streaming with WebSockets see parallelism and batch jobs.
This can help significantly improve response times between the model and our chat application, and I'll hopefully cover this method in a follow-up article.
How to Interact with the Language Model
First, we add the Huggingface connection credentials to the .env file within our worker directory.
export HUGGINFACE_INFERENCE_TOKEN=<HUGGINGFACE ACCESS TOKEN>export MODEL_URL=https://api-inference.huggingface.co/models/EleutherAI/gpt-j-6BNext, in worker.srccreate a folder named modelthen add a file gptj.py. Then add the GPT class below:
import osfrom dotenv import load_dotenvimport requestsimport jsonload_dotenv()class GPT: def __init__(self): self.url = os.environ.get('MODEL_URL') self.headers = { "Authorization": f"Bearer { os.environ.get('HUGGINFACE_INFERENCE_TOKEN')}"} self.payload = { "inputs": "", "parameters": { "return_full_text": False, "use_cache": True, "max_new_tokens": 25 } } def query(self, input: str) -> list: self.payload["inputs"] = input data = json.dumps(self.payload) response = requests.request( "POST", self.url, headers=self.headers, data=data) print(json.loads(response.content.decode("utf-8"))) return json.loads(response.content.decode("utf-8"))if __name__ == "__main__": GPT().query("Will artificial intelligence help humanity conquer the universe?")The GPTclass is initialized with the Huggingface model url, authentication header, and predefined payload. But the payload input is a dynamic field that is provided by the querymethod and updated before we send a request to the Huggingface endpoint.
Finally, we test this by running the query method on an instance of the GPT class directly. In the terminal, run python src/model/gptj.py, and you should get a response like this (just keep in mind that your response will certainly be different from this):
[{ 'generated_text': ' (AI) could solve all the problems on this planet? I am of the opinion that in the short term artificial intelligence is much better than human beings, but in the long and distant future human beings will surpass artificial intelligence.\n\nIn the distant'}]Next, we add some tweaking to the input to make the interaction with the model more conversational by changing the format of the input.
Update the GPTclass like so:
class GPT: def __init__(self): self.url = os.environ.get('MODEL_URL') self.headers = { "Authorization": f"Bearer { os.environ.get('HUGGINFACE_INFERENCE_TOKEN')}"} self.payload = { "inputs": "", "parameters": { "return_full_text": False, "use_cache": False, "max_new_tokens": 25 } } def query(self, input: str) -> list: self.payload["inputs"] = f"Human: { input} Bot:" data = json.dumps(self.payload) response = requests.request( "POST", self.url, headers=self.headers, data=data) data = json.loads(response.content.decode("utf-8")) text = data[0]['generated_text'] res = str(text.split("Human:")[0]).strip("\n").strip() return resif __name__ == "__main__": GPT().query("Will artificial intelligence help humanity conquer the universe?")We updated the input with a string literal f"Human: { input} Bot:". The human input is placed in the string and the Bot provides a response. This input format turns the GPT-J6B into a conversational model. Other changes you may notice include
- use_cache: you can make this False if you want the model to create a new response when the input is the same. I suggest leaving this as True in production to prevent exhausting your free tokens if a user just keeps spamming the bot with the same message. Using cache does not actually load a new response from the model.
- return_full_text: is False, as we do not need to return the input – we already have it. When we get a response, we strip the "Bot:" and leading/trailing spaces from the response and return just the response text.
How to Simulate Short-term Memory for the AI Model
For every new input we send to the model, there is no way for the model to remember the conversation history. This is important if we want to hold context in the conversation.
But remember that as the number of tokens we send to the model increases, the processing gets more expensive, and the response time is also longer.
So we will need to find a way to retrieve short-term history and send it to the model. We will also need to figure out a sweet spot - how much historical data do we want to retrieve and send to the model?
To handle chat history, we need to fall back to our JSON database. We'll use the tokento get the last chat data, and then when we get the response, append the response to the JSON database.
Update worker.src.redis.config.pyto include the create_rejson_connectionmethod. Also, update the .env file with the authentication data, and ensure rejson is installed.
Your worker.src.redis.config.pyshould look like this:
import osfrom dotenv import load_dotenvimport aioredisfrom rejson import Clientload_dotenv()class Redis(): def __init__(self): """initialize connection """ self.REDIS_URL = os.environ['REDIS_URL'] self.REDIS_PASSWORD = os.environ['REDIS_PASSWORD'] self.REDIS_USER = os.environ['REDIS_USER'] self.connection_url = f"redis://{ self.REDIS_USER}:{ self.REDIS_PASSWORD}@{ self.REDIS_URL}" self.REDIS_HOST = os.environ['REDIS_HOST'] self.REDIS_PORT = os.environ['REDIS_PORT'] async def create_connection(self): self.connection = aioredis.from_url( self.connection_url, db=0) return self.connection def create_rejson_connection(self): self.redisJson = Client(host=self.REDIS_HOST, port=self.REDIS_PORT, decode_responses=True, username=self.REDIS_USER, password=self.REDIS_PASSWORD) return self.redisJsonWhile your .env file should look like this:
export REDIS_URL=<REDIS URL PROVIDED IN REDIS CLOUD>export REDIS_USER=<REDIS USER IN REDIS CLOUD>export REDIS_PASSWORD=<DATABASE PASSWORD IN REDIS CLOUD>export REDIS_HOST=<REDIS HOST IN REDIS CLOUD>export REDIS_PORT=<REDIS PORT IN REDIS CLOUD>export HUGGINFACE_INFERENCE_TOKEN=<HUGGINGFACE ACCESS TOKEN>export MODEL_URL=https://api-inference.huggingface.co/models/EleutherAI/gpt-j-6BNext, in worker.src.rediscreate a new file named cache.pyand add the code below:
from .config import Redisfrom rejson import Pathclass Cache: def __init__(self, json_client): self.json_client = json_client async def get_chat_history(self, token: str): data = self.json_client.jsonget( str(token), Path.rootPath()) return dataThe cache is initialized with a rejson client, and the method get_chat_historytakes in a token to get the chat history for that token, from Redis. Make sure you import the Path object from rejson.
Next, update the worker.main.pywith the code below:
from src.redis.config import Redisimport asynciofrom src.model.gptj import GPTfrom src.redis.cache import Cacheredis = Redis()async def main(): json_client = redis.create_rejson_connection() data = await Cache(json_client).get_chat_history(token="18196e23-763b-4808-ae84-064348a0daff") print(data)if __name__ == "__main__": asyncio.run(main())I have hard-coded a sample token created from previous tests in Postman. If you don't have a token created, just send a new request to /tokenand copy the token, then run python main.pyin the terminal. You should see the data in the terminal like so:
{ 'token': '18196e23-763b-4808-ae84-064348a0daff', 'messages': [], 'name': 'Stephen', 'session_start': '2022-07-16 13:20:01.092109'}Next, we need to add an add_message_to_cachemethod to our Cacheclass that adds messages to Redis for a specific token.
async def add_message_to_cache(self, token: str, message_data: dict): self.json_client.jsonarrappend( str(token), Path('.messages'), message_data)The jsonarrappendmethod provided by rejson appends the new message to the message array.
Note that to access the message array, we need to provide .messagesas an argument to the Path. If your message data has a different/nested structure, just provide the path to the array you want to append the new data to.
To test this method, update the main function in the main.py file with the code below:
async def main(): json_client = redis.create_rejson_connection() await Cache(json_client).add_message_to_cache(token="18196e23-763b-4808-ae84-064348a0daff", message_data={ "id": "1", "msg": "Hello", "timestamp": "2022-07-16 13:20:01.092109" }) data = await Cache(json_client).get_chat_history(token="18196e23-763b-4808-ae84-064348a0daff") print(data)We are sending a hard-coded message to the cache, and getting the chat history from the cache. When you run python main.pyin the terminal within the worker directory, you should get something like this printed in the terminal, with the message added to the message array.
{ 'token': '18196e23-763b-4808-ae84-064348a0daff', 'messages': [{ 'id': '1', 'msg': 'Hello', 'timestamp': '2022-07-16 13:20:01.092109'}], 'name': 'Stephen', 'session_start': '2022-07-16 13:20:01.092109'}Finally, we need to update the main function to send the message data to the GPT model, and update the input with the last 4messages sent between the client and the model.
First let's update our add_message_to_cachefunction with a new argument "source" that will tell us if the message is a human or bot. We can then use this arg to add the "Human:" or "Bot:" tags to the data before storing it in the cache.
Update the add_message_to_cachemethod in the Cache class like so:
async def add_message_to_cache(self, token: str, source: str, message_data: dict): if source == "human": message_data['msg'] = "Human: " + (message_data['msg']) elif source == "bot": message_data['msg'] = "Bot: " + (message_data['msg']) self.json_client.jsonarrappend( str(token), Path('.messages'), message_data)Then update the main function in main.py in the worker directory, and run python main.pyto see the new results in the Redis database.
async def main(): json_client = redis.create_rejson_connection() await Cache(json_client).add_message_to_cache(token="18196e23-763b-4808-ae84-064348a0daff", source="human", message_data={ "id": "1", "msg": "Hello", "timestamp": "2022-07-16 13:20:01.092109" }) data = await Cache(json_client).get_chat_history(token="18196e23-763b-4808-ae84-064348a0daff") print(data)Next, we need to update the main function to add new messages to the cache, read the previous 4 messages from the cache, and then make an API call to the model using the query method. It'll have a payload consisting of a composite string of the last 4 messages.
You can always tune the number of messages in the history you want to extract, but I think 4 messages is a pretty good number for a demo.
In worker.src, create a new folder schema. Then create a new file named chat.pyand paste our message schema in chat.py like so:
from datetime import datetimefrom pydantic import BaseModelfrom typing import List, Optionalimport uuidclass Message(BaseModel): id = str(uuid.uuid4()) msg: str timestamp = str(datetime.now())Next, update the main.py file like below:
async def main(): json_client = redis.create_rejson_connection() await Cache(json_client).add_message_to_cache(token="18196e23-763b-4808-ae84-064348a0daff", source="human", message_data={ "id": "3", "msg": "I would like to go to the moon to, would you take me?", "timestamp": "2022-07-16 13:20:01.092109" }) data = await Cache(json_client).get_chat_history(token="18196e23-763b-4808-ae84-064348a0daff") print(data) message_data = data['messages'][-4:] input = ["" + i['msg'] for i in message_data] input = " ".join(input) res = GPT().query(input=input) msg = Message( msg=res ) print(msg) await Cache(json_client).add_message_to_cache(token="18196e23-763b-4808-ae84-064348a0daff", source="bot", message_data=msg.dict())In the code above, we add new message data to the cache. This message will ultimately come from the message queue. Next we get the chat history from the cache, which will now include the most recent data we added.
Note that we are using the same hard-coded token to add to the cache and get from the cache, temporarily just to test this out.
Next, we trim off the cache data and extract only the last 4 items. Then we consolidate the input data by extracting the msg in a list and join it to an empty string.
Finally, we create a new Message instance for the bot response and add the response to the cache specifying the source as "bot"
Next, run python main.pya couple of times, changing the human message and id as desired with each run. You should have a full conversation input and output with the model.
Open Redis Insight and you should have something similar to the below:
 Conversational Chat
Stream Consumer and Real-time Data Pull from the Message Queue
Next, we want to create a consumer and update our worker.main.pyto connect to the message queue. We want it to pull the token data in real-time, as we are currently hard-coding the tokens and message inputs.
In worker.src.rediscreate a new file named stream.py. Add a StreamConsumerclass with the code below:
class StreamConsumer: def __init__(self, redis_client): self.redis_client = redis_client async def consume_stream(self, count: int, block: int, stream_channel): response = await self.redis_client.xread( streams={ stream_channel: '0-0'}, count=count, block=block) return response async def delete_message(self, stream_channel, message_id): await self.redis_client.xdel(stream_channel, message_id)The StreamConsumerclass is initialized with a Redis client. The consume_streammethod pulls a new message from the queue from the message channel, using the xreadmethod provided by aioredis.
Next, update the worker.main.pyfile with a while loop to keep the connection to the message channel alive, like so:
from src.redis.config import Redisimport asynciofrom src.model.gptj import GPTfrom src.redis.cache import Cachefrom src.redis.config import Redisfrom src.redis.stream import StreamConsumerimport osfrom src.schema.chat import Messageredis = Redis()async def main(): json_client = redis.create_rejson_connection() redis_client = await redis.create_connection() consumer = StreamConsumer(redis_client) cache = Cache(json_client) print("Stream consumer started") print("Stream waiting for new messages") while True: response = await consumer.consume_stream(stream_channel="message_channel", count=1, block=0) if response: for stream, messages in response: # Get message from stream, and extract token, message data and message id for message in messages: message_id = message[0] token = [k.decode('utf-8') for k, v in message[1].items()][0] message = [v.decode('utf-8') for k, v in message[1].items()][0] print(token) # Create a new message instance and add to cache, specifying the source as human msg = Message(msg=message) await cache.add_message_to_cache(token=token, source="human", message_data=msg.dict()) # Get chat history from cache data = await cache.get_chat_history(token=token) # Clean message input and send to query message_data = data['messages'][-4:] input = ["" + i['msg'] for i in message_data] input = " ".join(input) res = GPT().query(input=input) msg = Message( msg=res ) print(msg) await cache.add_message_to_cache(token=token, source="bot", message_data=msg.dict()) # Delete messaage from queue after it has been processed await consumer.delete_message(stream_channel="message_channel", message_id=message_id)if __name__ == "__main__": asyncio.run(main())This is quite the update, so let's take it step by step:
We use a while Trueloop so that the worker can be online listening to messages from the queue.
Next, we await new messages from the message_channel by calling our consume_streammethod. If we have a message in the queue, we extract the message_id, token, and message. Then we create a new instance of the Message class, add the message to the cache, and then get the last 4 messages. We set it as input to the GPT model querymethod.
Once we get a response, we then add the response to the cache using the add_message_to_cachemethod, then delete the message from the queue.
How to Update the Chat Client with the AI Response
So far, we are sending a chat message from the client to the message_channel (which is received by the worker that queries the AI model) to get a response.
Next, we need to send this response to the client. As long as the socket connection is still open, the client should be able to receive the response.
If the connection is closed, the client can always get a response from the chat history using the refresh_tokenendpoint.
In worker.src.rediscreate a new file named producer.py, and add a Producerclass similar to what we had on the chat web server:
class Producer: def __init__(self, redis_client): self.redis_client = redis_client async def add_to_stream(self, data: dict, stream_channel) -> bool: msg_id = await self.redis_client.xadd(name=stream_channel, id="*", fields=data) print(f"Message id { msg_id} added to { stream_channel} stream") return msg_idNext, in the main.pyfile, update the main function to initialize the producer, create a stream data, and send the response to a response_channelusing the add_to_streammethod:
from src.redis.config import Redisimport asynciofrom src.model.gptj import GPTfrom src.redis.cache import Cachefrom src.redis.config import Redisfrom src.redis.stream import StreamConsumerimport osfrom src.schema.chat import Messagefrom src.redis.producer import Producerredis = Redis()async def main(): json_client = redis.create_rejson_connection() redis_client = await redis.create_connection() consumer = StreamConsumer(redis_client) cache = Cache(json_client) producer = Producer(redis_client) print("Stream consumer started") print("Stream waiting for new messages") while True: response = await consumer.consume_stream(stream_channel="message_channel", count=1, block=0) if response: for stream, messages in response: # Get message from stream, and extract token, message data and message id for message in messages: message_id = message[0] token = [k.decode('utf-8') for k, v in message[1].items()][0] message = [v.decode('utf-8') for k, v in message[1].items()][0] # Create a new message instance and add to cache, specifying the source as human msg = Message(msg=message) await cache.add_message_to_cache(token=token, source="human", message_data=msg.dict()) # Get chat history from cache data = await cache.get_chat_history(token=token) # Clean message input and send to query message_data = data['messages'][-4:] input = ["" + i['msg'] for i in message_data] input = " ".join(input) res = GPT().query(input=input) msg = Message( msg=res ) stream_data = { } stream_data[str(token)] = str(msg.dict()) await producer.add_to_stream(stream_data, "response_channel") await cache.add_message_to_cache(token=token, source="bot", message_data=msg.dict()) # Delete messaage from queue after it has been processed await consumer.delete_message(stream_channel="message_channel", message_id=message_id)if __name__ == "__main__": asyncio.run(main())Next, we need to let the client know when we receive responses from the worker in the /chatsocket endpoint. We do this by listening to the response stream. We do not need to include a while loop here as the socket will be listening as long as the connection is open.
Note that we also need to check which client the response is for by adding logic to check if the token connected is equal to the token in the response. Then we delete the message in the response queue once it's been read.
In server.src.rediscreate a new file named stream.py and add our StreamConsumerclass like this:
from .config import Redisclass StreamConsumer: def __init__(self, redis_client): self.redis_client = redis_client async def consume_stream(self, count: int, block: int, stream_channel): response = await self.redis_client.xread( streams={ stream_channel: '0-0'}, count=count, block=block) return response async def delete_message(self, stream_channel, message_id): await self.redis_client.xdel(stream_channel, message_id)Next, update the /chatsocket endpoint like so:
from ..redis.stream import [email protected]("/chat")async def websocket_endpoint(websocket: WebSocket, token: str = Depends(get_token)): await manager.connect(websocket) redis_client = await redis.create_connection() producer = Producer(redis_client) json_client = redis.create_rejson_connection() consumer = StreamConsumer(redis_client) try: while True: data = await websocket.receive_text() stream_data = { } stream_data[str(token)] = str(data) await producer.add_to_stream(stream_data, "message_channel") response = await consumer.consume_stream(stream_channel="response_channel", block=0) print(response) for stream, messages in response: for message in messages: response_token = [k.decode('utf-8') for k, v in message[1].items()][0] if token == response_token: response_message = [v.decode('utf-8') for k, v in message[1].items()][0] print(message[0].decode('utf-8')) print(token) print(response_token) await manager.send_personal_message(response_message, websocket) await consumer.delete_message(stream_channel="response_channel", message_id=message[0].decode('utf-8')) except WebSocketDisconnect: manager.disconnect(websocket)Refresh Token
Finally, we need to update the /refresh_tokenendpoint to get the chat history from the Redis database using our Cacheclass.
In server.src.redis, add a cache.pyfile and add the code below:
from rejson import Pathclass Cache: def __init__(self, json_client): self.json_client = json_client async def get_chat_history(self, token: str): data = self.json_client.jsonget( str(token), Path.rootPath()) return dataNext, in server.src.routes.chat.pyimport the Cacheclass and update the /tokenendpoint to the below:
from ..redis.cache import [email protected]("/refresh_token")async def refresh_token(request: Request, token: str): json_client = redis.create_rejson_connection() cache = Cache(json_client) data = await cache.get_chat_history(token) if data == None: raise HTTPException( status_code=400, detail="Session expired or does not exist") else: return dataNow, when we send a GET request to the /refresh_tokenendpoint with any token, the endpoint will fetch the data from the Redis database.
If the token has not timed out, the data will be sent to the user. Or it'll send a 400 response if the token is not found.
How to Test the Chat with multiple Clients in Postman
Finally, we will test the chat system by creating multiple chat sessions in Postman, connecting multiple clients in Postman, and chatting with the bot on the clients.
Lastly, we will try to get the chat history for the clients and hopefully get a proper response.
Recap
Let's have a quick recap as to what we have achieved with our chat system. The chat client creates a token for each chat session with a client. This token is used to identify each client, and each message sent by clients connected to or web server is queued in a Redis channel (message_chanel), identified by the token.
Our worker environment reads from this channel. It does not have any clue who the client is (except that it's a unique token) and uses the message in the queue to send requests to the Huggingface inference API.
When it gets a response, the response is added to a response channel and the chat history is updated. The client listening to the response_channel immediately sends the response to the client once it receives a response with its token.
If the socket is still open, this response is sent. If the socket is closed, we are certain that the response is preserved because the response is added to the chat history. The client can get the history, even if a page refresh happens or in the event of a lost connection.
Congratulations on getting this far! You have been able to build a working chat system.
In follow-up articles, I will focus on building a chat user interface for the client, creating unit and functional tests, fine-tuning our worker environment for faster response time with WebSockets and asynchronous requests, and ultimately deploying the chat application on AWS.
This Article is part of a series on building full-stack intelligent chatbots with tools like Python, React, Huggingface, Redis, and so on. You can follow the full series on my blog: blog.stephensanwo.dev - AI ChatBot Series
**You can download the full repository on My Github Repository
I wrote this tutorial in collaboration with Redis. Need help getting started with Redis? Try the following resources:
- Try Redis Cloud free of charge
- Watch this video on the benefits of Redis Cloud over other Redis providers
- Redis Developer Hub - tools, guides, and tutorials about Redis
- RedisInsight Desktop GUI