Learn Linux for Beginners: From Basics to Advanced Techniques [Full Book]
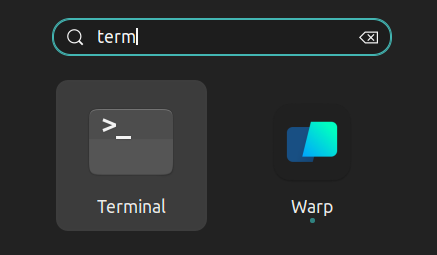
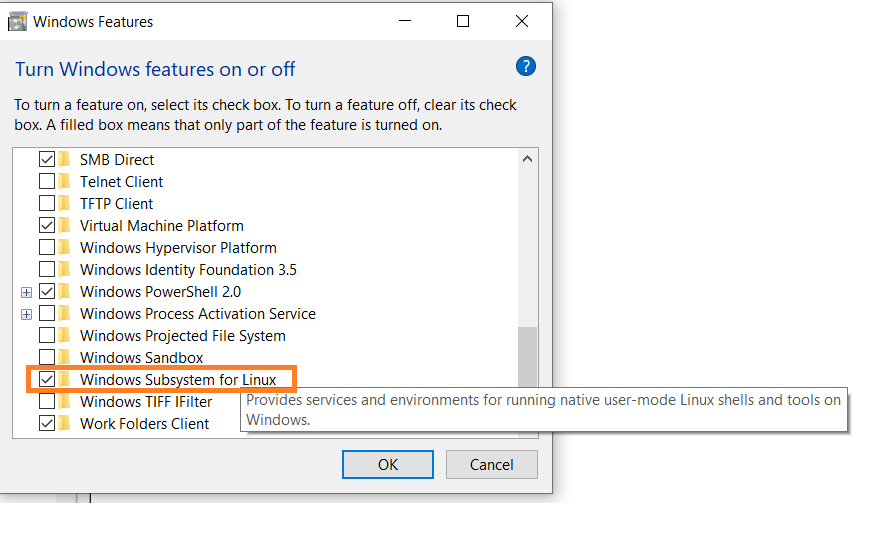
Learning Linux is one of the most valuable skills in the tech industry. It can help you get things done faster and more efficiently. Many of the world's powerful servers and supercomputers run on Linux. While empowering you in your current role, learning Linux can also help you transition into other tech careers like DevOps, Cybersecurity, and Cloud Computing. In this handbook, you'll learn the basics of the Linux command line, and then transition to more advanced topics like shell scripting and system administration. Whether you are new to Linux or have been using it for years, this book has something for you. Important Note: All examples in this book are demonstrated in Ubuntu 22.04.2 LTS (Jammy Jellyfish). Most command line tools are more or less the same in other distributions. However, some GUI applications and commands may differ if you are working on another Linux distribution. Part 1: Introduction to Linux Part 2: Introduction to Bash Shell and System Commands 2.1. Getting Started with the Bash shell 2.2. Command Structure 2.3. Bash Commands and Keyboard Shortcuts 2.4. Identifying Yourself: The Part 3: Understanding Your Linux System Part 4: Managing Files From the Command line 4.1. The Linux File-system Hierarchy 4.2. Navigating the Linux File-system 4.3. Managing Files and Directories 4.5. Basic Commands for Viewing Files Part 5: The Essentials of Text Editing in Linux 5.1. Mastering Vim: The Complete Guide 5.2. Mastering Nano Part 6: Bash Scripting 6.1. Definition of Bash scripting 6.2. Advantages of Bash Scripting 6.3. Overview of Bash Shell and Command Line Interface 6.4. How to Create and Execute Bash scripts 6.5. Bash Scripting Basics Part 7: Managing Software Packages in Linux 7.1. Packages and Package Management 7.2. Installing a Package via Command Line 7.3. Installing a Package via an Advanced Graphical Method – Synaptic 7.4. Installing downloaded packages from a website Part 8: Advanced Linux Topics 8.1. User Management 8.2 Connecting to Remote Servers via SSH 8.3. Advanced Log Parsing and Analysis 8.4. Managing Linux Processes via Command Line 8.5. Standard Input and Output Streams in Linux 8.6 Automation in Linux – Automate Tasks with Cron Jobs 8.7. Linux Networking Basics 8.8. Linux Troubleshooting: Tools and Techniques 8.9. General Troubleshooting Strategy for Servers 8.10 Diagnosing Hardware Problems Conclusion Linux is an open-source operating system that is based on the Unix operating system. It was created by Linus Torvalds in 1991. Open source means that the source code of the operating system is available to the public. This allows anyone to modify the original code, customise it, and distribute the new operating system to potential users. In today's data center landscape, Linux and Microsoft Windows stand out as the primary contenders, with Linux having a major share. Here are several compelling reasons to learn Linux: Given the prevalence of Linux hosting, there is a high chance that your application will be hosted on Linux. So learning Linux as a developer becomes increasingly valuable. With cloud computing becoming the norm, chances are high that your cloud instances will rely on Linux. Linux serves as the foundation for many operating systems for the Internet of Things (IoT) and mobile applications. In IT, there are many opportunities for those skilled in Linux. First, what is open source? Open source software is software whose source code is freely accessible, allowing anyone to utilize, modify, and distribute it. Whenever source code is created, it is automatically considered copyrighted, and its distribution is governed by the copyright holder through software licenses. In contrast to open source, proprietary or closed-source software restricts access to its source code. Only the creators can view, modify, or distribute it. Linux is primarily open source, which means that its source code is freely available. Anyone can view, modify, and distribute it. Developers from anywhere in the world can contribute to its improvement. This lays the foundation of collaboration which is an important aspect of open source software. This collaborative approach has led to the widespread adoption of Linux across servers, desktops, embedded systems, and mobile devices. The most interesting aspect of Linux being open source is that anyone can tailor the operating system to their specific needs without being restricted by proprietary limitations. Chrome OS used by Chromebooks is based on Linux. Android, that powers many smartphones globally, is also based on Linux. What is a Linux Kernel? The kernel is the central component of an operating system that manages the computer and its hardware operations. It handles memory operations and CPU time. The kernel acts as a bridge between applications and the hardware-level data processing using inter-process communication and system calls. The kernel loads into memory first when an operating system starts and remains there until the system shuts down. It is responsible for tasks like disk management, task management, and memory management. If you are curious about what the Linux kernel looks like, here is the GitHub link. By this point, you know that you can re-use the Linux kernel code, modify it, and create a new kernel. You can further combine different utilities and software to create a completely new operating system. A Linux distribution or distro is a version of the Linux operating system that includes the Linux kernel, system utilities, and other software. Being open source, a Linux distribution is a collaborative effort involving multiple independent open-source development communities. What does it mean that a distribution is derived?When you say that a distribution is "derived" from another, the newer distro is built upon the base or foundation of the original distro. This derivation can include using the same package management system (more on this later), kernel version, and sometimes the same configuration tools. Today, there are thousands of Linux distributions to choose from, offering differing goals and criteria for selecting and supporting the software provided by their distribution. Distributions vary from one to the other, but they generally have several common characteristics: A distribution consists of a Linux kernel. It supports user space programs. A distribution may be small and single-purpose or include thousands of open-source programs. Some means of installing and updating the distribution and its components should be provided. If you view the Linux Distributions Timeline, you'll see two major distros: Slackware and Debian. Several distributions are derived from them. For example, Ubuntu and Kali are derived from Debian. What are the advantages of derivation?There are various advantages of derivation. Derived distributions can leverage the stability, security, and large software repositories of the parent distribution. When building on an existing foundation, developers can drive their focus and effort entirely on the specialized features of the new distribution. Users of derived distributions can benefit from the documentation, community support, and resources already available for the parent distribution. Some popular Linux distributions are: Ubuntu: One of the most widely used and popular Linux distributions. It is user-friendly and recommended for beginners. Learn more about Ubuntu here. Linux Mint: Based on Ubuntu, Linux Mint provides a user-friendly experience with a focus on multimedia support. Learn more about Linux Mint here. Arch Linux: Popular among experienced users, Arch is a lightweight and flexible distribution aimed at users who prefer a DIY approach. Learn more about Arch Linux here. Manjaro: Based on Arch Linux, Manjaro provides a user-friendly experience with pre-installed software and easy system management tools. Learn more about Manjaro here. Kali Linux: Kali Linux provides a comprehensive suite of security tools and is mostly focused on cybersecurity and hacking. Learn more about Kali Linux here. The best way to learn is to apply the concepts as you go. In this section, we'll learn how to install Linux on your machine so you can follow along. You'll also learn how to access Linux on a Windows machine. I recommend that you follow any one of the methods mentioned in this section to get access to Linux so you may follow along. Installing Linux as the primary OS is the most efficient way to use Linux, as you can use the full power of your machine. In this section, you will learn how to install Ubuntu, which is one of the most popular Linux distributions. I have left out other distributions for now, as I want to keep things simple. You can always explore other distributions once you are comfortable with Ubuntu. Step 1 – Download the Ubuntu iso:Go to the official website and download the iso file. Make sure to select a stable release that is labeled "LTS". LTS stands for Long Term Support which means you can get free security and maintenance updates for a long time (usually 5 years). Step 2 – Create a bootable pendrive:There are a number of softwares that can create a bootable pendrive. I recommend using Rufus, as it is quite easy to use. You can download it from here. Step 3 – Boot from the pendrive:Once your bootable pendrive is ready, insert it and boot from the pendrive. The boot menu depends on your laptop. You can google the boot menu for your laptop model. Step 4 – Follow the prompts.Once, the boot process starts, select The process will take some time. Once the GUI appears, you can select the language, and keyboard layout and continue. Enter your login and name. Remember the credentials as you will need them to log in to your system and access full privileges. Wait for the installation to complete. Step 5 – Restart:Click on restart now and remove the pen drive. Step 6 – Login:Login with the credentials you entered earlier. And there you go! Now you can install apps and customize your desktop. For advanced installation, you can explore the following topics: Disk partitioning. Setting swap memory for enabling hibernation. Accessing the terminal An important part of this handbook is learning about the terminal where you'll run all the commands and see the magic happen. You can search for the terminal by pressing the "windows" key and typing "terminal". You can pin the Terminal in the dock where other apps are located for easy access. 💡 The shortcut for opening the terminal is You can also open the terminal from inside a folder. Right click where you are and click on "Open in Terminal". This will open the terminal in the same path. Sometimes you might need to run both Linux and Windows side by side. Luckily, there are some ways you can get the best of both worlds without getting different computers for each operating system. In this section, you'll explore a few ways to use Linux on a Windows machine. Some of them are browser-based or cloud-based and do not need any OS installation before using them. Option 1: "Dual-boot" Linux + WindowsWith dual boot, you can install Linux alongside Windows on your computer, allowing you to choose which operating system to use at startup. This requires partitioning your hard drive and installing Linux on a separate partition. With this approach, you can only use one operating system at a time. Option 2: Use Windows Subsystem for Linux (WSL)Windows Subsystem for Linux provides a compatibility layer that lets you run Linux binary executables natively on Windows. Using WSL has some advantages. The setup for WSL is simple and not time-consuming. It is lightweight compared to VMs where you have to allocate resources from the host machine. You don't need to install any ISO or virtual disc image for Linux machines which tend to be heavy files. You can use Windows and Linux side by side. How to install WSL2 First, enable the Windows Subsystem for Linux option in settings. Go to Start. Search for "Turn Windows features on or off." Check the option "Windows Subsystem for Linux" if it isn't already. Next, open your command prompt and provide the installation commands. Open Command Prompt as an administrator: Run the command below: This is the output: Note: By default, Ubuntu will be installed. After restarting, you might see a window like this: Once installation of Ubuntu is complete, you'll be prompted to enter your username and password. And, that's it! You are ready to use Ubuntu. Launch Ubuntu by searching from the start menu. And here we have your Ubuntu instance launched. Option 3: Use a Virtual Machine (VM) A virtual machine (VM) is a software emulation of a physical computer system. It allows you to run multiple operating systems and applications on a single physical machine simultaneously. You can use virtualization software such as Oracle VirtualBox or VMware to create a virtual machine running Linux within your Windows environment. This allows you to run Linux as a guest operating system alongside Windows. VM software provides options to allocate and manage hardware resources for each VM, including CPU cores, memory, disk space, and network bandwidth. You can adjust these allocations based on the requirements of the guest operating systems and applications. Here are some of the common options available for virtualization: Oracle virtual box Multipass VMware workstation player Option 4: Use a Browser-based Solution Browser-based solutions are particularly useful for quick testing, learning, or accessing Linux environments from devices that don't have Linux installed. You can either use online code editors or web-based terminals to access Linux. Note that you usually don't have full administration privileges in these cases. Online code editors offer editors with built-in Linux terminals. While their primary purpose is coding, you can also utilize the Linux terminal to execute commands and perform tasks. Replit is an example of an online code editor, where you can write your code and access the Linux shell at the same time. Online Linux terminals allow you to access a Linux command-line interface directly from your browser. These terminals provide a web-based interface to a Linux shell, enabling you to execute commands and work with Linux utilities. One such example is JSLinux. The screenshot below shows a ready-to-use Linux environment: Option 5: Use a Cloud-based Solution Instead of running Linux directly on your Windows machine, you can consider using cloud-based Linux environments or virtual private servers (VPS) to access and work with Linux remotely. Services like Amazon EC2, Microsoft Azure, or DigitalOcean provide Linux instances that you can connect to from your Windows computer. Note that some of these services offer free tiers, but they are not usually free in the long run. The Linux command line is provided by a program called the shell. Over the years, the shell program has evolved to cater to various options. Different users can be configured to use different shells. But, most users prefer to stick with the current default shell. The default shell for many Linux distros is the GNU Bourne-Again Shell ( To find out your current shell, open your terminal and enter the following command: Command breakdown: The The In my setup, the output is Bash is very powerful as it can simplify certain operations that are hard to accomplish efficiently with a GUI (or Graphical User Interface). Remember that most servers do not have a GUI, and it is best to learn to use the powers of a command line interface (CLI). Terminal vs Shell The terms "terminal" and "shell" are often used interchangeably, but they refer to different parts of the command-line interface. The terminal is the interface you use to interact with the shell. The shell is the command interpreter that processes and executes your commands. You'll learn more about shells in Part 6 of the handbook. When a shell is used interactively, it displays a If the shell is running as A command is a program that performs a specific operation. Once you have access to the shell, you can enter any command after the Generally, Linux commands follow this syntax: Here is the breakdown of the above syntax: Options and arguments are not required for all commands. Some commands can be run without any options or arguments, while others might require one or both to function correctly. You can always refer to the command's manual to check the options and arguments it supports. 💡Tip:You can view a command's manual using the You can access the manual page for Manual pages are a great and quick way to access the documentation. I highly recommend going through man pages for the commands that you use the most. When you are in the terminal, you can speed up your tasks by using shortcuts. Here are some of the most common terminal shortcuts: You can get the username you are logged in with by using the Just after the This is the output I got. You can get detailed system information from the When you provide the In the output above, The The architecture of the CPU (for example, x86_64) CPU op-mode(s) (for example, 32-bit, 64-bit) Byte Order (for example, Little Endian) CPU(s) (number of CPUs), and so on Let's try it out: That was a whole lot of information, but useful too! Remember you can always skim the relevant information using specific flags. See the command manual with All files in Linux are stored in a file-system. It follows an inverted-tree-like structure because the root is at the topmost part. The The image below shows the complete file system hierarchy. Each directory servers a specific purpose. Note that this is not an exhaustive list and different distributions may have different configurations. Here is a table that shows the purpose of each directory: 💡 Tip:You can learn more about the file system using the You can check your file system using the This list is not exhaustive and different distributions and systems may be configured differently. The absolute path is the full path from the root directory to the file or directory. It always starts with a The relative path, on the other hand, is the path from the current directory to the destination file or directory. It does not start with a It is easy to lose your way in the Linux file system, especially if you are new to the command line. You can locate your current directory using the Here is an example: The command to change directories is You can use a relative path or an absolute path. For example, if you want to navigate the below file structure (following the red lines): and you are standing at "home", the command would be like this: Some other commonly used When working with files and directories, you might want to copy, move, remove, and create new files and directories. Here are some commands that can help you with that. 💡Tip:You can differentiate between a file and folder by looking at the first letter in the output of You can create an empty directory using the You can also create directories recursively using the The The file names can be chained together if you want to create multiple files in a single command. You can use the 🛑 Note that you should use the To copy files in Linux, use the This command copies a file named The This command copies a file named The Syntax to move files: Example:Move a file named To move a directory and its contents: Renaming files and folders in Linux is also done with the Syntax to rename files: Example:Rename a file from Rename a directory from The Below is the basic syntax of the Where, Suppose we need to find files that contain "style" in their name. We'll use this command: Now let's say we want to find files with a particular extension like A dot at the beginning of the filename represents hidden files. They are normally hidden but can be viewed with We can modify the List and find hidden files Above you can see a list of hidden files in my home directory. Log files usually have the extension Similarly, we can search for configuration files like this: We can search for character block files by providing Similarly, we can find device block files by using In the example below, we are finding the folders using the An incredibly helpful use of the Here, we are listing files whose size exceeds Other units include: Just replace with the relevant unit. By using the For example, -mtime +10means you are looking for a file modified 10 days ago. -mtime -10means less than 10 days. -mtime 10If you skip + or – it means exactly 10 days. The Here is the basic syntax of the The simplest way to use For example, if you want to view the contents of a file named This will display all the contents of the file on the terminal at once. While The syntax of the The The syntax of the For both commands, you can use the To move backward you can use the Sometimes you might need to view just the last few lines of a file instead of the entire file. The For example, If you want to display a different number of lines, you can use the 💡Tip:Another usage of the Just like For example, To change the number of lines displayed, you can use the You can count words, lines and characters in a file using the For example, running In the output above, So, the command Comparing and finding differences between two files is a common task in Linux. You can compare two files right within the command line using the The basic syntax of the Here are two files, In the above output: In the output: The lines that are the same in both files are displayed side by side. Lines that are different are shown with a Text editing skills using the command line are one of the most crucial skills in Linux. In this section, you will learn how to use two popular text editors in Linux: Vim and Nano. I suggest that you master any one text editor of your choice and stick to it. It will save you time and make you more productive. Vim and nano are safe choices as they are present on most Linux distributions. Vim is a popular text editing tool for the command line. Vim comes with its advantages: it is powerful, customizable, and fast. Here are some reasons why you should consider learning Vim: Most servers are accessed via a CLI, so in system administration, you don't necessarily have the luxury of a GUI. But Vim has got your back – it'll always be there. Vim uses a keyboard-centric approach, as it is designed to be used without a mouse, which can significantly speed up editing tasks once you have learned the keyboard shortcuts. This also makes it faster than GUI tools. Some Linux utilities, for example editing cron jobs, work in the same editing format as Vim. Vim is suitable for all – beginners and advanced users. Vim supports complex string searches, highlighting searches, and much more. Through plugins, Vim provides extended capabilities to developers and system admins that includes code completion, syntax highlighting, file management, version control, and more. Vim has two variations: Vim ( Start using Vim with this command: In the early days of the CLI, the keyboards didn't have arrow keys. Hence, navigation was done using the set of available keys, Being keyboard-centric, using Note: Although arrow keys would work totally fine, you can still experiment with 💡Tip:To remember the You need to know the 3 operating modes of Vim and how to switch between them. Keystrokes behave differently in each command mode. The three modes are as follows: Command mode. Edit mode. Visual mode. Command Mode.When you start Vim, you land in the command mode by default. This mode allows you to access other modes. ⚠ To switch to other modes, you need to be present in the command mode first Edit Mode This mode allows you to make changes to the file. To enter edit mode, press Visual mode This mode allows you to work on a single character, a block of text, or lines of text. Let's break it down into simple steps. Remember, use the below combinations when in command mode. The visual mode comes in handy when you need to copy and paste or edit lines in bulk. Extended command mode. The extended command mode allows you to perform advanced operations like searching, setting line numbers, and highlighting text. We'll cover extended mode in the next section. How to stay on track? If you forget your current mode, just press 1. How to copy and paste in Vim Copy-paste is known as 'yank' and 'put' in Linux terms. To copy-paste, follow these steps: Select text in visual mode. Press Move your cursor to the required position and press 2. How to search for text in Vim Any series of strings can be searched with Vim using the In the command mode, type Let's search a few strings: 3. How to exit Vim First, move to command mode (by pressing escape twice) and then use these flags: Exit without saving → Exit and save → Note: All these shortcuts work in the command mode only. Basic Navigation Editing Searching and Replacing Exiting Multiple Windows Nano is a user-friendly text editor that is easy to use and is perfect for beginners. It is pre-installed on most Linux distributions. To create a new file using Nano, use the following command: To start editing an existing file with Nano, use the following command: Let's study the most important key bindings in Nano. You'll use the key bindings to perform various operations like saving, exiting, copying, pasting, and more. Write to a file and save Once you open Nano using the Exit nano You can exit Nano by pressing Copying and pasting To select a region, use To copy the selected text, press Cutting and pasting Select the region with Navigation Use Use Viewing line numbers When you open a file with Searching You can search for a specific line number with You can also initiate search for a string with General Editing Navigation Search and Replace Miscellaneous A bash script is a file containing a sequence of commands that are executed by the bash program line by line. It allows you to perform a series of actions, such as navigating to a specific directory, creating a folder, and launching a process using the command line. By saving commands in a script, you can repeat the same sequence of steps multiple times and execute them by running the script. Bash scripting is a powerful and versatile tool for automating system administration tasks, managing system resources, and performing other routine tasks in Unix/Linux systems. Some advantages of shell scripting are: Automation: Shell scripts allow you to automate repetitive tasks and processes, saving time and reducing the risk of errors that can occur with manual execution. Portability: Shell scripts can be run on various platforms and operating systems, including Unix, Linux, macOS, and even Windows through the use of emulators or virtual machines. Flexibility: Shell scripts are highly customizable and can be easily modified to suit specific requirements. They can also be combined with other programming languages or utilities to create more powerful scripts. Accessibility: Shell scripts are easy to write and don't require any special tools or software. They can be edited using any text editor, and most operating systems have a built-in shell interpreter. Integration: Shell scripts can be integrated with other tools and applications, such as databases, web servers, and cloud services, allowing for more complex automation and system management tasks. Debugging: Shell scripts are easy to debug, and most shells have built-in debugging and error-reporting tools that can help identify and fix issues quickly. The terms "shell" and "bash" are often used interchangeably. But there is a subtle difference between the two. The term "shell" refers to a program that provides a command-line interface for interacting with an operating system. Bash (Bourne-Again SHell) is one of the most commonly used Unix/Linux shells and is the default shell in many Linux distributions. Till now, the commands that you have been entering were basically being entered in a "shell". Although Bash is a type of shell, there are other shells available as well, such as Korn shell (ksh), C shell (csh), and Z shell (zsh). Each shell has its own syntax and set of features, but they all share the common purpose of providing a command-line interface for interacting with the operating system. You can determine your shell type using the In summary, while "shell" is a broad term that refers to any program that provides a command-line interface, "Bash" is a specific type of shell that is widely used in Unix/Linux systems. Note: In this section, we will be using the "bash" shell. Script naming conventions By naming convention, bash scripts end with Adding the Shebang Bash scripts start with a Below is an example of the shebang statement. You can find your bash shell path (which may vary from the above) using the command: Creating your first bash script Our first script prompts the user to enter a path. In return, its contents will be listed. Create a file named Add the following commands in your file and save it: Let's take a deeper look at the script line by line. I am displaying the same script again, but this time with line numbers. Line #1: The shebang ( Line #2: The Line #4: We want the user to enter a valid path. Line #5: The line #8: The Executing the bash script To make the script executable, assign execution rights to your user using this command: Here, You can run the script using any of the mentioned methods: Let's see it running in action 🚀 Comments start with a Comments are very helpful in documenting the code, and it is a good practice to add them to help others understand the code. These are examples of : Variables let you store data. You can use variables to read, access, and manipulate data throughout your script. There are no data types in Bash. In Bash, a variable is capable of storing numeric values, individual characters, or strings of characters. In Bash, you can use and set the variable values in the following ways: 2. Assign the value based on the output obtained from a program or command, using command substitution. Note that This assigns the value of To access the variable value, append Above, you can see an example of assigning and printing variable values. In Bash scripting, the following are the variable naming conventions: Variable names should start with a letter or an underscore ( Variable names can contain letters, numbers, and underscores ( Variable names are case-sensitive. Variable names should not contain spaces or special characters. Use descriptive names that reflect the purpose of the variable. Avoid using reserved keywords, such as Here are some examples of valid variable names in Bash: And here are some examples of invalid variable names: Following these naming conventions helps make Bash scripts more readable and easier to maintain. In this section, we'll discuss some methods to provide input to our scripts. We can read the user input using the 2. Reading from a file This code reads each line from a file named 3. Command line arguments In a bash script or function, This script takes a name as a command-line argument and prints a personalized greeting. We have supplied Output: Here we'll discuss some methods to receive output from the scripts. This prints the text "Hello, World!" to the terminal. 2. Writing to a file: This writes the text "This is some text." to a file named 3. Appending to a file: This appends the text "More text." to the end of the file 4. Redirecting output: This lists the files in the current directory and writes the output to a file named You'll learn about output redirection in detail in section 8.5. Expressions that produce a boolean result, either true or false, are called conditions. There are several ways to evaluate conditions, including Syntax: We can use logical operators such as AND This statement checks if both conditions are Let's see an example of a Bash script that uses The script first prompts the user to enter a number. Then, it uses an Here, the script checks if the number is less than Finally, if the number is neither greater than Seeing it in action 🚀 While loop While loops check for a condition and loop until the condition remains In the example below, For loop The In the example below, the loop will iterate 5 times. Case statements In Bash, case statements are used to compare a given value against a list of patterns and execute a block of code based on the first pattern that matches. The syntax for a case statement in Bash is as follows: Here, "expression" is the value that we want to compare, and "pattern1", "pattern2", "pattern3", and so on are the patterns that we want to compare it against. The double semicolon ";;" separates each block of code to execute for each pattern. The asterisk "*" represents the default case, which executes if none of the specified patterns match the expression. Let's see an example: In this example, since the value of If the value of Linux comes with several built-in programs. But you might need to install new programs based on your needs. You might also need to upgrade the existing applications. A package is a collection of files that are bundled together. These files are essential for a particular program to run. These files contain the program's executable files, libraries, and other resources. In addition to the files required for the program to run, packages also contain installation scripts, which copy the files to where they are needed. A program may contain many files and dependencies. With packages, it is easier to manage all the files and dependencies at once. Programmers write source code in a programming language. This source code is then compiled into machine code that the computer can understand. The compiled code is called binary code. When you download a package, you can either get the source codeor the binary code.The source code is the human-readable code that can be compiled into binary code. The binary code is the compiled code that the computer can understand. Source packages can be used with any type of machine if the source code is compiled properly. Binary, on the other hand, is compiled code that is specific to a particular type of machine or architecture. You can find the architecture of your machine using the Programs often share files. Instead of including these files in each package, a separate package can provide them for all programs. To install a program that needs these files, you must also install the package containing them. This is called a package dependency. Specifying dependencies makes packages smaller and simpler by reducing duplicates. When you install a program, its dependencies must also be installed. Most required dependencies are usually already installed, but a few extra ones might be needed. So, don't be surprised if several other packages are installed along with your chosen package. These are the necessary dependencies. Linux offers a comprehensive package management system for installing, upgrading, configuring, and removing software. With package management, you can get access to an organized base of thousands of software packages along with having the ability to resolve dependencies and check for software updates. Packages can be managed using either command-line utilities that can be easily automated by system administrators, or through a graphical interface. ⚠️ Package management is different for different distros. Here, we are using Ubuntu. Installing software is a bit different in Linux as compared to Windows and Mac. Linux uses repositories to store software packages. A repository is a collection of software packages that are available for installation via a package manager. A package manager also stores an index of all of the packages available from a repo. Sometimes the index is rebuilt to ensure that it is up to date and to know which packages have been upgraded or added to the channel since it last checked. The generic process of downloading software from a repo looks something like this: If we talk specifically about Ubuntu, Index is fetched using Required files/ dependencies requested according to index using Packages and dependencies installed locally. Update dependencies and packages when required using On Debian-based distros, you can file the list of repos (repositories) in The To view the logs of the installation using Following are the uses of the For example, to install the The package list index is a list of all the packages available in the repositories. To update the local package list index, you can use the following command: Installed packages on your system can get updates containing bug fixes, security patches, and new features. To upgrade the packages, you can use the following command: To remove a package, like If you are not comfortable with the command line, you can use a GUI application to install packages. You can achieve the same results as the command line, but with a graphical interface. Synaptic is a GUI package management application that helps in listing the installed packages, their status, pending updates, and so on. It offers custom filters to help you narrow down the search results. You can also right-click on a package and view further details like the dependencies, maintainer, size, and the installed files. You may want to install a package you have downloaded from a website, rather than from a software repository. These packages are called Using Note: Replace "directory" with the directory where the package is stored and "package_name" with the filename of the package. Alternatively, you can right-click, select "Open With Other Application," and choose a GUI app of your choice. 💡 Tip:In Ubuntu, you can see a list of installed packages with There can be multiple users with varying levels of access in a system. In Linux, the root user has the highest level of access and can perform any operation on the system. Regular users have limited access and can only perform operations they have been granted permission to do. A user account provides separation between different people and programs that can run commands. Humans identify users by a name, as names are easy to work with. But the system identifies users by a unique number called the user ID (UID). When human users log in using the provided username, they have to use a password to authorize themselves. User accounts form the foundations of system security. File ownership is also associated with user accounts and it enforces access control to the files. Every process has an associated user account that provides a layer of control for the admins. There are three main types of user accounts: Superuser: The superuser has complete access to the system. The name of the superuser is System user: The system user has user accounts that are used to run system services. These accounts are used to run system services and are not meant for human interaction. Regular user: Regular users are human users who have access to the system. The To view the basic information of another user, pass the username as an argument to the To view user-related information for processes, use the By default, systems use the Here is a line from the The Username: Password: User ID (UID): Group ID (GID): User Info: Home directory: Shell: A group is a collection of user accounts that share access and resources. Groups have group names to identify them. The system identifies groups by a unique number called the group ID (GID). By default, the information about groups is stored in the Here is an entry from the Here is the breakdown of the fields in the given entry: Group name: Password: Group ID (GID): Group members: In this specific entry, the group name is The groups are further divided into 'primary'and 'supplementary'groups. Primary Group: Each user is assigned one primary group by default. This group usually has the same name as the user and is created when the user account is made. Files and directories created by the user are typically owned by this primary group. Supplementary Groups: These are extra groups a user can belong to in addition to their primary group. Users can be members of multiple supplementary groups. These groups let a user have permissions for resources shared among those groups. They help provide access to shared resources without affecting the system’s file permissions and keeping the security intact. While a user must belong to one primary group, belonging to supplementary groups is optional. File ownership can be viewed using the Let's have a closer look into the Modedefines two things: File type:File type defines the type of the file. For regular files that contain simple data it is blank Permission classes:The next set of characters define the permissions for user, group, and others respectively. 💡Tip:Directory ownership can be viewed using the The Read: For regular files, read permissions allow the file to be opened and read only. Users can't modify the file. Similarly for directories, read permissions allow the listing of directory content without any modification in the directory. Write: When files have write permissions, the user can modify (edit, delete) the file and save it. For folders, write permissions enable a user to modify its contents (create, delete, and rename the files inside it), and modify the contents of files that the user has write permissions to. Examples of permissions in Linux Now that we know how to read permissions, let's see some examples. Execute: For files, execute permissions allows the user to run an executable script. For directories, the user can access them, and access details about files in the directory. Now that we know the basics of ownerships and permissions, let's see how we can modify permissions using the Syntax of Where, We can change permissions using two modes: Symbolic mode: this method uses symbols like Absolute mode: this method represents permissions as 3-digit octal numbers ranging from 0-7. Now, let's see them in detail. The table below summarize the user representation: We can use mathematical operators to add, remove, and assign permissions. The table below shows the summary: Example: Suppose I have a script and I want to make it executable for the owner of the file Current file permissions are as follows: Let's split the permissions like this: To add execution rights ( Output: Now, we can see that the execution permissions have been added for owner Additional examples for changing permissions via symbolic method: Removing Removing Assigning Absolute mode uses numbers to represent permissions and mathematical operators to modify them. The below table shows how we can assign relevant permissions: Permissions can be revoked using subtraction. The below table shows how you can remove relevant permissions. Example: This is how we performed the calculation: Note that this is the same as To remove execution from This would be the same as Next, we will learn how to change the ownership of a file. You can change the ownership of a file or folder using the Syntax of Let's transfer the ownership from user Command to change ownership: Output: We can also use You can change ownership recursively for contents in a directory. The example below changes the ownership of the In case we only need to change the group owner, we can use You can switch between users using the The superuser or the root user has the highest level of access on a Linux system. The root user can perform any operation on the system. The root user can access all files and directories, install and remove software, and modify or override system configurations. With great power comes great responsibility. If the root user is compromised, someone can gain complete control over the system. It is advised to use the root user account only when necessary. If you omit the username, the Another variation of the To run commands as the Running commands with Also, In Ubuntu, you can find the audit logs here: For a user that does not have access to The command used to add a new user is: This command sets up a user's home directory and creates a private group designated by the user's username. Currently, the account lacks a valid password, preventing the user from logging in until a password is created. The Here are some examples of the Change a user's login name: Change a user's home directory: Add a user to a supplementary group: Change a user's shell: Lock a user's account: Unlock a user's account: Set an expiration date for a user account: Change a user's user ID (UID): Change a user's primary group: Remove a user from a supplementary group: The The The Accessing remote servers is one of the essential tasks for system administrators. You can connect to different servers or access databases through your local machine and execute commands, all using SSH. What is the SSH protocol? SSH stands for Secure Shell. It is a cryptographic network protocol that allows secure communication between two systems. The default port for SSH is The two participants while communicating via SSH are: The server: the machine that you want access to. The client: The system that you are accessing the server from. Connection to a server follows these steps: Initiate Connection: The client sends a connection request to the server. Exchange of Keys: The server sends its public key to the client. Both agree on the encryption methods to use. Session Key Generation: The client and server use the Diffie-Hellman key exchange to create a shared session key. Client Authentication: The client logs in to the server using a password, private key, or another method. Secure Communication: After authentication, the client and server communicate securely with encryption. How to connect to a remote server using SSH? The Here, we are talking about how the client would make a connection to the server. Prior to connecting to a server, you need to have the following information: The IP address or the domain name of the server. The username and password of the server. The port number that you have access to in the server. The basic syntax of the For example, if your username is After that, you'll be prompted to enter the secret password. Your screen will look similar to this: Now you can execute the relevant commands on the server ⚠️ The default port for ssh is Log files, when configured, are generated by your system for a variety of useful reasons. They can be used to track system events, monitor system performance, and troubleshoot issues. They are specifically useful for system administrators where they can track application errors, network events, and user activity. Here is an example of a log file: A log file usually contains the following columns: Timestamp: The date and time when the event occurred. Log Level: The severity of the event (INFO, DEBUG, WARN, ERROR). Component: The component of the system that generated the event (Startup, Config, Database, User, Security, Network, Email, API, Session, Shutdown). Message: A description of the event that occurred. Additional Information: Additional information related to the event. In real-time systems, log files tend to be thousands of lines long and are generated every second. They can be very wordy depending on the configuration. Every column in a log file is a piece of information that can be used to track down issues. This makes log files difficult to read and understand manually. This is where log parsing comes in. Log parsing is the process of extracting useful information from log files. It involves breaking down the log files into smaller, more manageable pieces, and extracting the relevant information. The filtered information can also be useful for creating alerts, reports, and dashboards. In this section, you will explore some techniques for parsing log files in Linux. Grep is a built-in bash utility. It stands for "global regular expression print". Grep is used to match strings in files. Here are some common uses of Search for a specific string in a file: This command searches for "search_string" in the file named Search recursively in directories: This command searches for " Ignore case while searching: This command performs a case-insensitive search for "search_string" in the file named Display line numbers with matching lines: This command shows the line numbers along with the matching lines in the file named Count the number of matching lines: This command counts the number of lines that contain "search_string" in the file named Invert match to display lines that do not match: This command displays all lines that do not contain "search_string" in the file named Search for a whole word: This command searches for the whole word "word" in the file named Use extended regular expressions: This command allows the use of extended regular expressions for more complex pattern matching in the file named 💡 Tip:If there are multiple files in a folder, you can use the below command to find the list of files containing the desired strings. Basic syntax of The basic syntax of Here, 1. Substitution: The For example, to change all instances of "error" to "warning" in the log file 2. Printing lines containing a specific pattern: Using For instance, to find all lines containing "ERROR": 3. Deleting lines containing a specific pattern: You can delete lines from the output that match a specific pattern: For example, to remove all lines containing "DEBUG": 4. Extracting specific fields from a log line: You can use regular expressions to extract parts of lines. Suppose each log line starts with a date in the format "YYYY-MM-DD". You could extract just the date from each line: Basic syntax of The basic syntax of Here, In the coming examples, you'll use this log file as an example: The fields in This prints all lines that contain "ERROR". This will extract the first two fields from each line, which in this case would be the date and time. The output will be a summary of the number of occurrences of each log level. This command will extract all lines where the 3rd field is "INFO". 💡 Tip:The default separator in The The basic syntax of the cut command is: Some commonly used options for the cut command: For example, the command below would extract the first field (separated by a space) from each line of the log file: Examples of using Assume you have a log file structured as follows, where fields are space-separated: This command uses a space as a delimiter and selects the second field, which is the time component of each log entry. This command extracts the fourth field, which is the IP address from each log entry. This extracts the third field which contains the log level. The output of other commands can be piped to the This command first filters lines that include "ERROR", then extracts the date and time from these lines. It is possible to extract multiple fields at once by specifying a range or a comma-separated list of fields: The above command extracts the first three fields from each log entry that are date, time, and log level. Sorting and removing duplicates are common operations when working with log files. The Basic syntax of sort The Some key options for the sort command: The The syntax of Some key options for the Let's assume the following example log entries for these demonstrations: This sorts the log entries alphabetically, which effectively sorts them by date if the date is the first field. This command sorts the log file and pipes it to Sorts the log entries and then counts each unique line. According to the output, the line This command shows lines that are unique. Sorts the entries based on the second field, which is the log level. A process is a running instance of a program. A process consists of: An address space of the allocated memory. Process states. Properties such as ownership, security attributes, and resource usage. A process also has an environment that consists of: Local and global variables The current scheduling context Allocated system resources, such as network ports or file descriptors. When you run the In Ubuntu, all processes originate from the initial system process called The A parent process duplicates its own address space (fork) to create a new (child) process structure. Each new process is assigned a unique process ID (PID) for tracking and security purposes. The PID and the parent's process ID (PPID) are part of the new process environment. Any process can create a child process. Through the fork routine, a child process inherits security identities, previous and current file descriptors, port and resource privileges, environment variables, and program code. A child process may then execute its own program code. Typically, a parent process sleeps while the child process runs, setting a request (wait) to be notified when the child completes. Upon exiting, the child process has already closed or discarded its resources and environment. The only remaining resource, known as a zombie, is an entry in the process table. The parent, signaled awake when the child exits, cleans the process table of the child's entry, thus freeing the last resource of the child process. The parent process then continues executing its own program code. Processes in Linux assume different states during their lifecycle. The state of a process indicates what the process is currently doing and how it is interacting with the system. The processes transition between states based on their execution status and the system's scheduling algorithm. The processes in a Linux system can be in one of the following states: The processes transition between these states in the following ways: You can use the The output above shows a snapshot of the currently running processes on the system. Each row represents a process with the following columns: In this section, you'll learn how you can control jobs by running them in the background or foreground. A job is a process that is started by a shell. When you run a command in the terminal, it is considered a job. A job can run in the foreground or the background. To demonstrate control, you'll first create 3 processes and then run them in the background. After that, you'll list the processes and alternate them between the foreground and background. You'll see how to put them to sleep or exit completely. Open a terminal and start three long-running processes. Use the The Use the The output should look something like this: To bring a background job to the foreground, use the This will bring job While the job is running in the foreground, you can suspend it and move it back to the background by pressing A suspended job will look like this: Now use the In this exercise, you: Started three background processes using sleep commands. Used jobs to display the list of background jobs. Brought a job to the foreground with Suspended the job with Used jobs again to verify the status of the background jobs. Now you know how to control jobs. It is possible to terminate an unresponsive or unwanted process using the A number of options are available with the Here are some examples of the Kill a process by PID (Process ID): This command sends the default Kill a process by name: This command sends the default Forcefully kill a process: This command sends the Send a specific signal to a process: This command sends the Kill all processes owned by a specific user: This command sends the default These examples demonstrate various ways to use the Here is the information about the Reading an input and writing an output is an essential part of understanding the command line and shell scripting. In Linux, every process has three default streams: Standard Input ( The file descriptor for Standard Output ( Standard Error ( Redirection:You can redirect the error and output streams to files or other commands. For example: In the last command, So, Pipelines: You can use pipes ( Cron is a powerful utility for job scheduling that is available in Unix-like operating systems. By configuring cron, you can set up automated jobs to run on a daily, weekly, monthly, or other specific time basis. The automation capabilities provided by cron play a crucial role in Linux system administration. The By using a specific syntax, you can configure a cron job to schedule scripts or other commands to run automatically. What are cron jobs in Linux? Any task that you schedule through crons is called a cron job. Now, let's see how cron jobs work. In order to use cron jobs, an admin needs to allow cron jobs to be added for users in the If you get a prompt like this, it means you don't have permission to use cron. To allow John to use crons, include his name in Users can also be denied access to cron job access by entering their usernames in the file First, to use cron jobs, you'll need to check the status of the cron service. If cron is not installed, you can easily download it through the package manager. Just use this to check: Crontabs use the following flags for adding and listing cron jobs: When you list crons and they exist, you'll see something like this: In the above example, Below is a summary of the cron job syntax: Below are some examples of scheduling cron jobs. It's okay if you are unable to grasp this all at once. You can practice and generate cron schedules with the crontab guru website. In this section, we will look at an example of how to schedule a simple script with a cron job. 2. Make the script executable by giving it execution rights. 3. Add the script in the crontab using Here, we have scheduled it to run per minute. 4. Check the output of the file How to troubleshoot crons Crons are really helpful, but they might not always work as intended. Fortunately, there are some effective methods you can use to troubleshoot them. 1. Check the schedule. First, you can try verifying the schedule that's set for the cron. You can do that with the syntax you saw in the above sections. 2. Check cron logs. First, you need to check if the cron has run at the intended time or not. In Ubuntu, you can verify this from the cron logs located at If there is an entry in these logs at the correct time, it means the cron has run according to the schedule you set. Below are the logs of our cron job example. Note the first column which shows the timestamp. The path of the script is also mentioned at the end of the line. Line #1, 3, and 5 show that the script ran as intended. 3. Redirect cron output to a file. You can redirect a cron's output to a file and check the file for any possible errors. Linux offers a number of commands to view network related information. In this section we will briefly discuss some of the commands. The The output of the These interfaces can be physical or virtual devices. To extract IPv4 and IPv6 addresses, you can use View network activity with The Here are some examples of using the Display all listening and non-listening sockets: Show only listening ports: Display network statistics: Show routing table: Display TCP connections: Display UDP connections: Show network interfaces: Display PID and program names for connections: Show statistics for a specific protocol (for example, TCP): Display extended information: You can stop the response with The As an example, you can use The To use Once installed, start the service with Verify the status with Once the status is active, the system will start collecting various stats that you can use to access and analyze historical data. We'll see that in detail soon. The syntax of the For example, Here are some common use cases and examples of how to use the To check memory usage (free and used), use: This command displays memory statistics every second three times. To view swap space utilization statistics, use: This command helps monitor the swap usage, which is crucial for systems running out of physical memory. To report activity for block devices and block device partitions: This command provides detailed stats about data transfers to and from block devices, and is useful for diagnosing I/O bottlenecks. To view network statistics, like number of packets received (transmitted) by the network interface: This displays network statistics every second for three seconds, helping in monitoring network traffic. Recall that previously we installed the Enable data collection:Edit the Change Configure data collection interval:Edit the cron job configuration to set the data collection interval. By default, it collects data every 10 minutes. You can adjust the interval by modifying the cron job schedule. The relevant files will go to the View historical data:Use the To view data from a specific date: Replace In the below command, To observe real-time interrupts per second served by the CPU, use this command: This command helps in monitoring how frequently the CPU is handling interrupts, which can be crucial for real-time performance tuning. These examples illustrate how you can use Why do we need to understand monitoring? System monitoring is an important aspect of system administration. Critical applications demand a high level of proactiveness to prevent failure and reduce the outage impact. Linux offers very powerful tools to gauge system health. In this section, you'll learn about the various methods available to check your system's health and identify the bottlenecks. System reboots may occur which can sometimes mess up some configurations. To check how long the machine has been up, use the command: Load average is the system load over the last 1, 5, and 15 minutes. A quick glance indicates whether the system load appears to be increasing or decreasing over time. Note: Ideal CPU queue is Per-CPU load can be calculated by dividing load average with the total number of CPUs available. To find the number of CPUs, use the command If the load average seems to increase and does not come down, the CPUs are overloaded. There is some process that is stuck or there is a memory leakage. Sometimes, high memory utilization might be causing problems. To check the available memory and the memory in use, use the To ensure the system is healthy, don't forget about the disk space. To list all the available mount points and their respective used percentage, use the below command. Ideally, utilized disk spaces should not exceed 80%. The Process states can be monitored to see any stuck process with a high memory or CPU usage. We saw previously that the Real time monitoring gives a window into the realtime system state. One utility you can use to do this is the The top command displays a dynamic view of the system's processes, displaying a summary header followed by a process or thread list. Unlike its static counterpart With You can also kill processes using System and application logs carry tons of information about what the system is going through. They contain useful information and error codes that point towards errors. If you search for error codes in logs, issue identification and rectification time can be greatly reduced. The network aspect should not be ignored as network glitches are common and may impact the system and traffic flows. Common network issues include port exhaustion, port choking, unreleased resources, and so on. To identify such issues, we need to understand port states. Some of the port states are explained briefly here: Let's explore how we can analyze port-related information in Linux. Port ranges:Port ranges are defined in the system, and range can be increased/decreased accordingly. In the below snippet, the range is from The error reported in logs in such cases can be In system monitoring, we need to ensure that the outgoing and incoming communication is intact. One helpful command is Packets can also be captured at runtime using It is always a good practice to gather certain stats that would be useful for identifying the root cause later. Usually, after system reboot or services restart, we loose the earlier system snapshot and logs. Below are some of the methods to capture system snapshot. Before making any changes, copy log files to another location. This is crucial for understanding what condition the system was in during time of issue. Sometimes log files are the only window to look into past system states as other runtime stats are lost. Tcpdump is a command-line utility that allows you to capture and analyze incoming and outgoing network traffic. It is mostly used to help troubleshoot network issues. If you feel that system traffic is being impacted, take Once Troubleshooting unexpected issues is a part of the learning process. Sometimes, you may notice frequent segmentation faults ( In this section, we will discuss how to diagnose and rule out hardware issues related to memory, CPU, system sensors, power supply, and more. Determine Available RAM If you feel your system is getting slow and taking longer to finish tasks, check your system's available memory. This will ensure there is enough available memory including the swap memory. The command to check available memory is In the above output, look at the "available" column in the "Mem" row. This shows how much RAM is free for use. Another way to check the memory in real time is to use the When you are in Alternately, press If you see the memory consumed near to Run a stress test on your hardware The Here's how to use it effectively: First, install Determine the amount of RAM to test and the number of passes you’d like your RAM to go through. In the command below, If all tests pass, your RAM is likely error-free. If errors are reported, your RAM might be faulty and could require replacement or further inspection. You can always run the test again with a different amount of RAM or test passes. Note that, you shouldn't test too much memory at once, as your system also needs memory for running processes. If you have more RAM than can be tested at once, test in smaller segments sequentially. Below is a snippet of the Below is a snippet of the output if a test fails. Notice the If errors persist across all test loops, it strongly suggests hardware issues, not transient software glitches. Overheating can cause unexpected errors and crashes. To diagnose overheating issues, you can use a command line utility Here's how you can identify and monitor your system temperature using First, install Detect the available sensors on your system: Follow the prompts and answer “YES” to detect the available sensors on your system. Once the available sensors are detected, you can view the temperature of your system using the In the output below, you can see the temperature reading at the edge of the GPU, which is 41.0 degrees Celsius. You can also see other pieces of information like voltage supplied, power consumption and voltage supplied. Using Disk errors can also cause application crashes. To identify disk issues, you can run disk check using First, install Run a quick health check using the command below and replace Here is the result I got when I ran the command on my disk You can also run a detailed test: The detailed test provides a full report, including: Temperature Power-on hours Error counts Wear leveling (for SSDs), and more. Faulty CPUs can also lead to a number of performance issues. To test your CPU, you can use the Install Run a CPU stress test: In the above command, If the system crashes during this test, the CPU may be faulty. You can check system logs for hardware-related errors using the command: In the logs, look for messages about: Memory faults. I/O errors. Hardware timeouts. Here is what errors in the log file can look like: Thank you for reading the book until the end. If you found it helpful, consider sharing it with others. This book doesn't end here, though. I will continue to improve it and add new materials in the future. If you found any issues or if you would like to suggest any improvements, feel free to open a PR/ Issue. Stay Connected and Continue Your Learning Journey! Your journey with Linux doesn't have to end here. Stay connected and take your skills to the next level: Follow Me on Social Media: X: I share useful short form content there. My DMs are always open. LinkedIn: I share articles and posts on tech there. Leave a recommendation on LinkedIn and endorse me on relevant skills. Get access to exclusive content: For one-on-one help and exclusive content go here. My articles and books, like this one, are part of my mission to increase accessibility to quality content for everyone. This book will also be open to translation in other languages. Each piece takes a lot of time and effort to write. This book will be free, forever. If you've enjoyed my work and want to keep me motivated, consider buying me a coffee. Thank you once again and happy learning!whoamiCommandPart 1: Introduction to Linux
1.1. Getting Started with Linux
What is Linux?
Why should you learn about Linux?
What does it mean that Linux is an open-source operating system?

What is a Linux distribution?
How to install and access Linux
Install Linux as the primary OS
try or install ubuntu.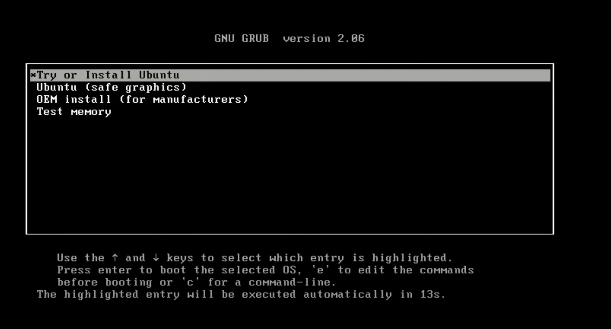

ctrl+alt+t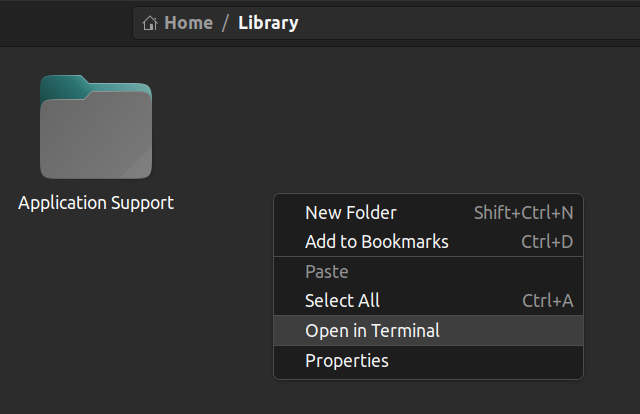
How to use Linux on a Windows machine

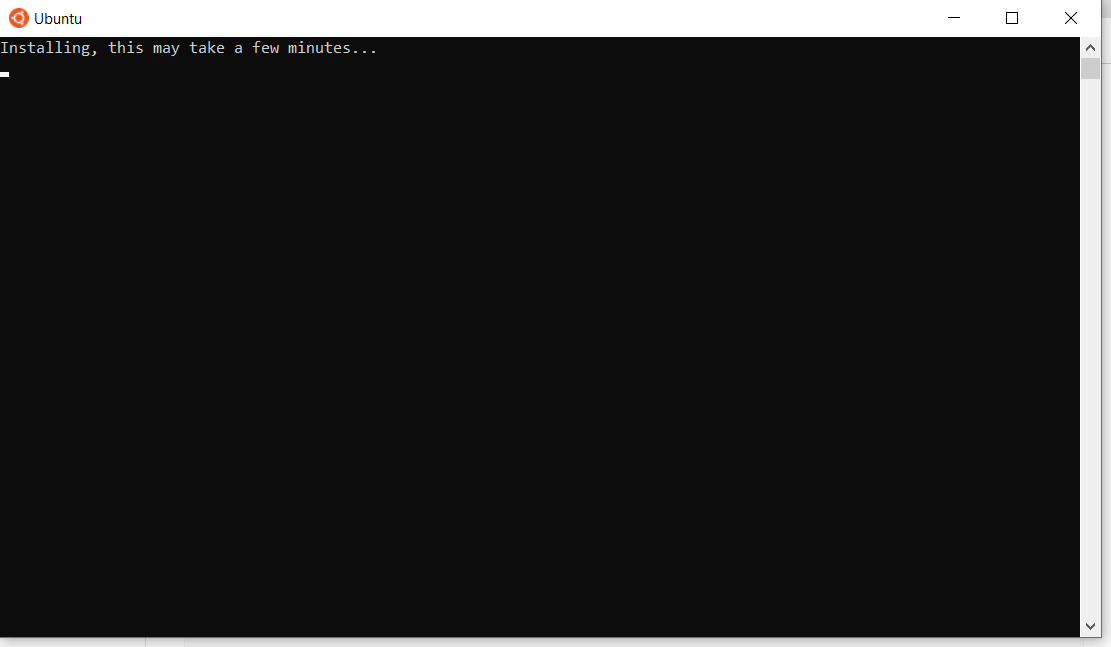
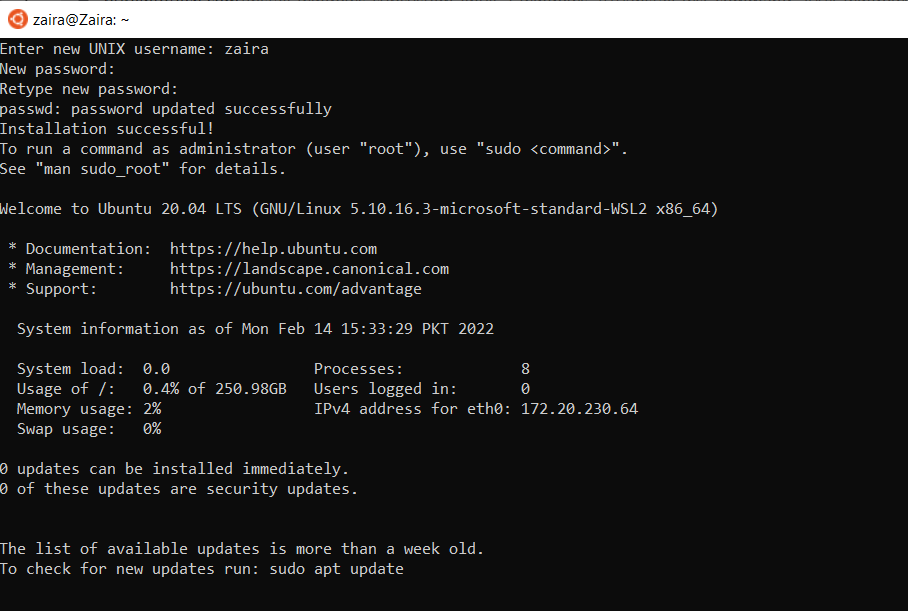
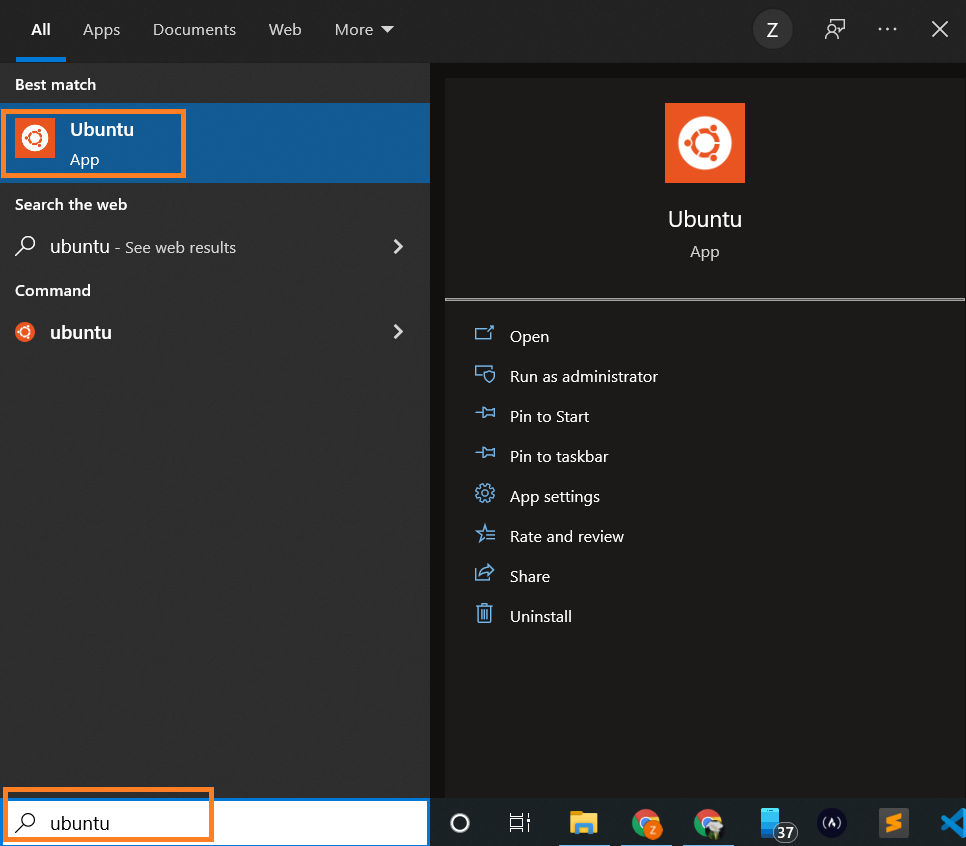
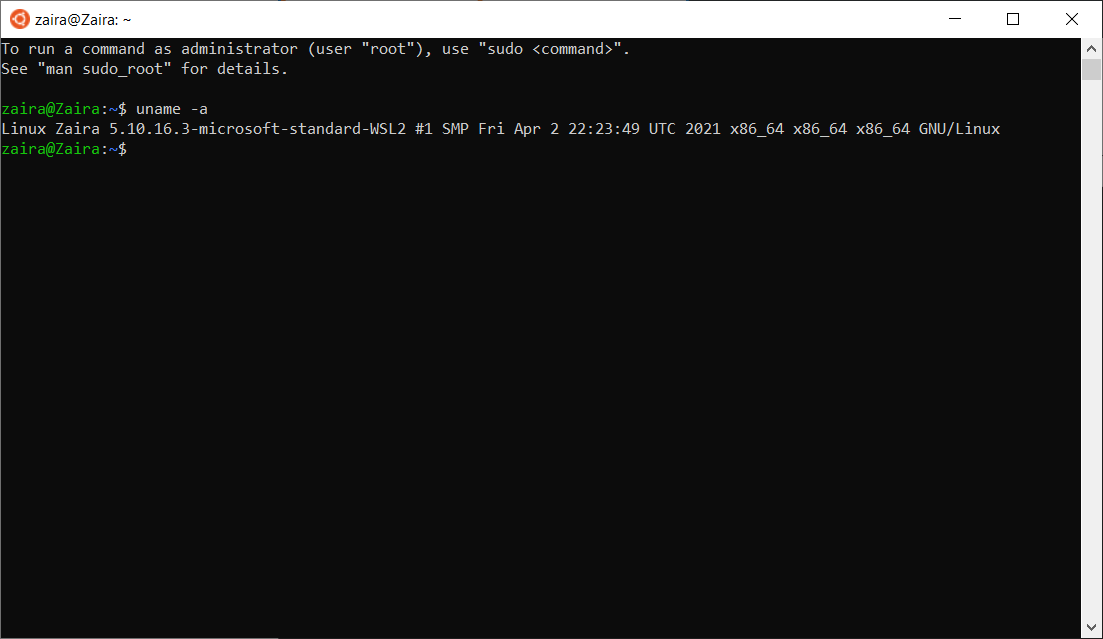
wsl --install

Online code editors

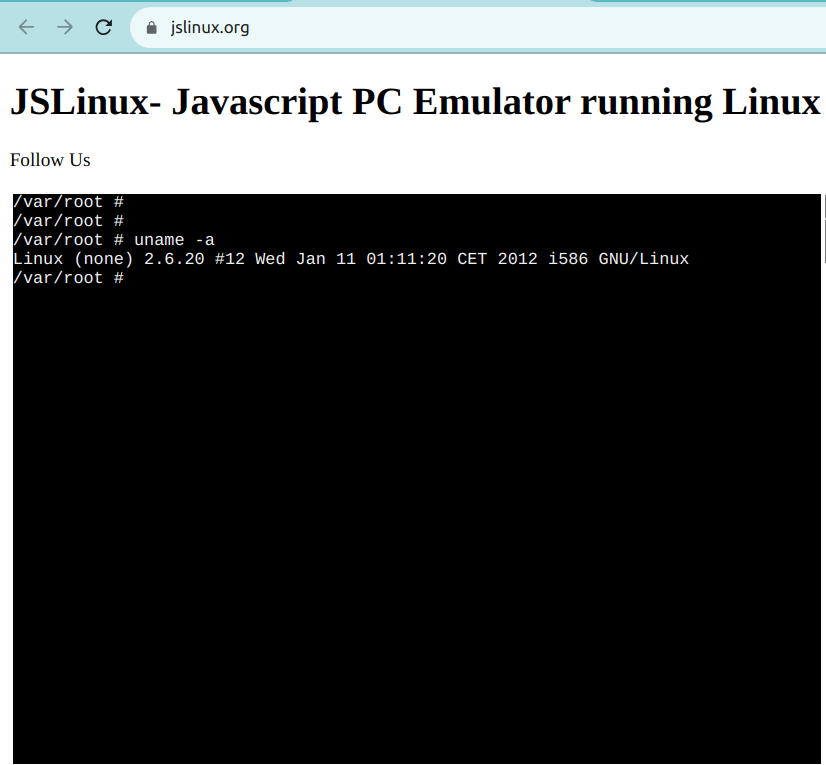
Web-based Linux terminals:
Part 2: Introduction to Bash Shell and System Commands
2.1. Getting Started with the Bash shell
Introduction to the bash shell
bash). Bash is succeeded by the Bourne shell (sh).echo $SHELLechocommand is used to print on the terminal.$SHELLis a special variable that holds the name of the current shell./bin/bash. This means that I am using the bash shell.# outputecho $SHELL/bin/bashWhat is a prompt?
$when it is waiting for a command from the user. This is called the shell prompt.[username@host ~]$root(you'll learn more about the root user later on), the prompt is changed to #.[root@host ~]#2.2. Command Structure
$sign and see the output on the terminal.command [options] [arguments]command: This is the name of the command you want to execute. ls(list), cp(copy), and rm(remove) are common Linux commands.[options]: Options, or flags, often preceded by a hyphen (-) or double hyphen (--), modify the behavior of the command. They can change how the command operates. For example, ls -auses the -aoption to display hidden files in the current directory.[arguments]: Arguments are the inputs for the commands that require one. These could be filenames, user names, or other data that the command will act upon. For example, in the command cat access.log, catis the command and access.logis the input. As a result, the catcommand displays the contents of the access.logfile.mancommand.lswith man ls, and it'll look like this: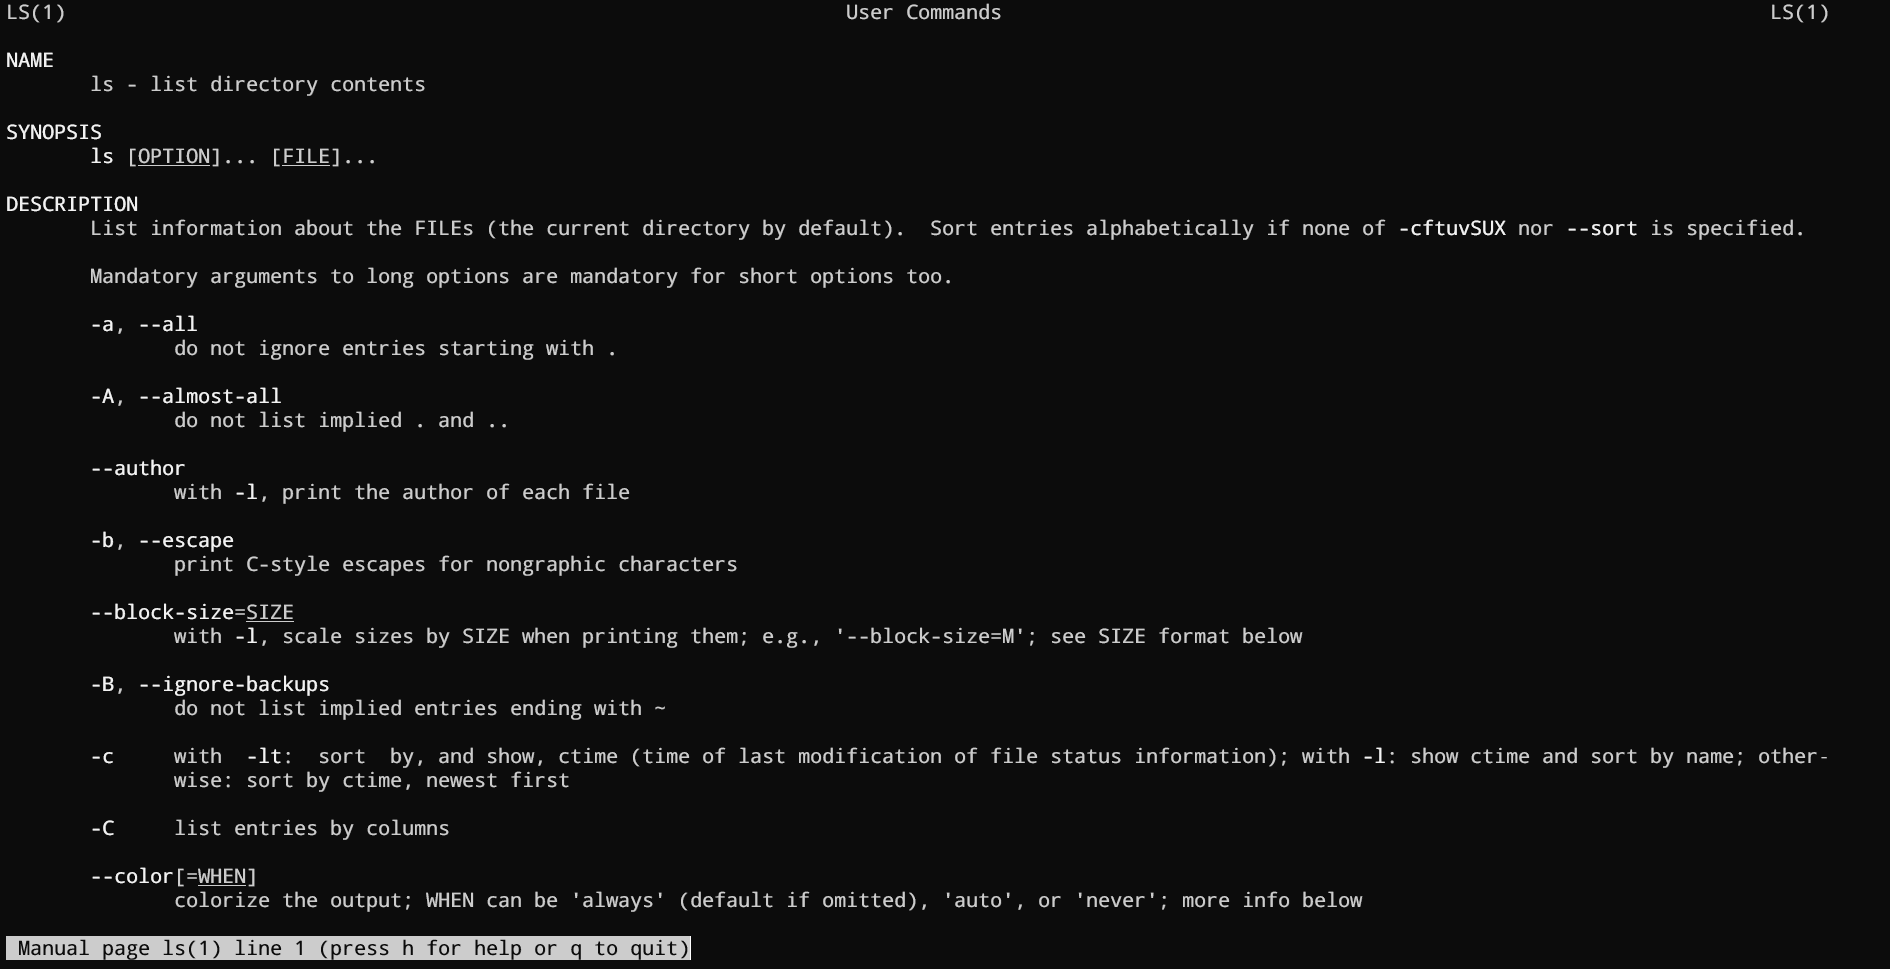
2.3. Bash Commands and Keyboard Shortcuts
Operation Shortcut Look for the previous command Up Arrow Jump to the beginning of the previous word Ctrl+LeftArrow Clear characters from the cursor to the end of the command line Ctrl+K Complete commands, file names, and options Pressing Tab Jumps to the beginning of the command line Ctrl+A Displays the list of previous commands history 2.4. Identifying Yourself: The
whoamiCommandwhoamicommand. This command is useful when you are switching between different users and want to confirm the current user.$sign, type whoamiand press enter.whoamizaira@zaira-ThinkPad:~$ whoamizairaPart 3: Understanding Your Linux System
3.1. Discovering Your OS and Specs
Print system information using the
unameCommandunamecommand.-aoption, it prints all the system information.uname -a# outputLinux zaira 6.5.0-21-generic #21~22.04.1-Ubuntu SMP PREEMPT_DYNAMIC Fri Feb 9 13:32:52 UTC 2 x86_64 x86_64 x86_64 GNU/LinuxLinux: Indicates the operating system.zaira: Represents the hostname of the machine.6.5.0-21-generic #21~22.04.1-Ubuntu SMP PREEMPT_DYNAMIC Fri Feb 9 13:32:52 UTC 2: Provides information about the kernel version, build date, and some additional details.x86_64 x86_64 x86_64: Indicates the architecture of the system.GNU/Linux: Represents the operating system type.Find details of the CPU architecture using the
lscpuCommandlscpucommand in Linux is used to display information about the CPU architecture. When you run lscpuin the terminal, it provides details such as:lscpu# outputArchitecture: x86_64 CPU op-mode(s): 32-bit, 64-bit Address sizes: 48 bits physical, 48 bits virtual Byte Order: Little EndianCPU(s): 12 On-line CPU(s) list: 0-11Vendor ID: AuthenticAMD Model name: AMD Ryzen 5 5500U with Radeon Graphics Thread(s) per core: 2 Core(s) per socket: 6 Socket(s): 1 Stepping: 1 CPU max MHz: 4056.0000 CPU min MHz: 400.0000man lscpu.Part 4: Managing Files From the Command line
4.1. The Linux File-system Hierarchy
/is the root directory and the starting point of the file system. The root directory contains all other directories and files on the system. The /character also serves as a directory separator between path names. For example, /home/aliceforms a complete path.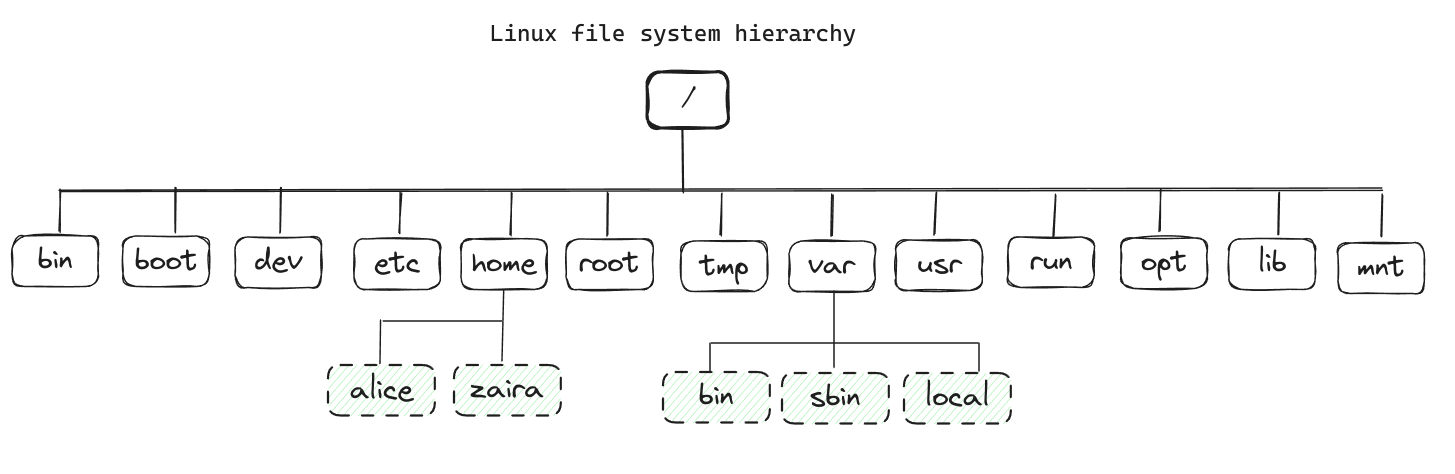
Location Purpose /bin Essential command binaries /boot Static files of the boot loader, needed in order to start the boot process. /etc Host-specific system configuration /home User home directories /root Home directory for the administrative root user /lib Essential shared libraries and kernel modules /mnt Mount point for mounting a filesystem temporarily /opt Add-on application software packages /usr Installed software and shared libraries /var Variable data that is also persistent between boots /tmp Temporary files that are accessible to all users man hiercommand.tree -d -L 1command. You can modify the -Lflag to change the depth of the tree.tree -d -L 1# output.├── bin -> usr/bin├── boot├── cdrom├── data├── dev├── etc├── home├── lib -> usr/lib├── lib32 -> usr/lib32├── lib64 -> usr/lib64├── libx32 -> usr/libx32├── lost+found├── media├── mnt├── opt├── proc├── root├── run├── sbin -> usr/sbin├── snap├── srv├── sys├── tmp├── usr└── var25 directories4.2. Navigating the Linux File-system
Absolute path vs relative path
/. For example, /home/john/documents./. For example, documents/work/project.Locating your current directory using the
pwdcommandpwdcommand.pwd# output/home/zaira/scripts/python/free-mem.pyChanging directories using the
cdcommandcdand it stands for "change directory". You can use the cdcommand to navigate to a different directory.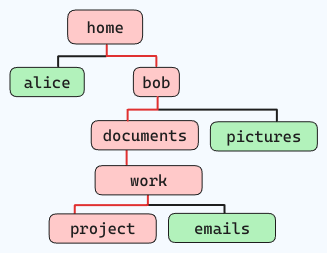
cd home/bob/documents/work/projectcdshortcuts are:Command Description cd ..Go back one directory cd ../..Go back two directories cdor cd ~Go to the home directory cd -Go to the previous path 4.3. Managing Files and Directories
ls -l. A'-'represents a file and a 'd'represents a folder.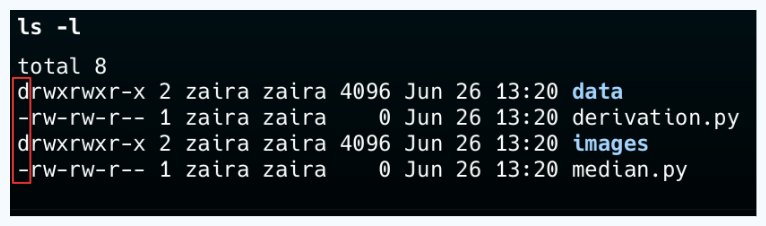
Creating new directories using the
mkdircommandmkdircommand.# creates an empty directory named "foo" in the current foldermkdir foo-poption.mkdir -p tools/index/helper-scripts# output of tree.└── tools └── index └── helper-scripts3 directories, 0 filesCreating new files using the
touchcommandtouchcommand creates an empty file. You can use it like this:# creates empty file "file.txt" in the current foldertouch file.txt# creates empty files "file1.txt", "file2.txt", and "file3.txt" in the current foldertouch file1.txt file2.txt file3.txtRemoving files and directories using the
rmand rmdircommandrmcommand to remove both files and non-empty directories.Command Description rm file.txtRemoves the file file.txtrm -r directoryRemoves the directory directoryand its contentsrm -f file.txtRemoves the file file.txtwithout prompting for confirmationrmdirdirectoryRemoves an empty directory -fflag with caution as you won't be asked before deleting a file. Also, be careful when running rmcommands in the rootfolder as it might result in deleting important system files.Copying files using the
cpcommandcpcommand.cp source_file destination_of_filefile1.txtto a new file location /home/adam/logs.cp file1.txt /home/adam/logscpcommand also creates a copy of one file with the provided name.file1.txtto another file named file2.txtin the same folder.cp file1.txt file2.txtMoving and renaming files and folders using the
mvcommandmvcommand is used to move files and folders from one directory to the other.mv source_file destination_directoryfile1.txtto a directory named backup:mv file1.txt backup/mv dir1/ backup/mvcommand.mv old_name new_namefile1.txtto file2.txt:mv file1.txt file2.txtdir1to dir2:mv dir1 dir24.4. Locating Files and Folders Using the
findCommandfindcommand lets you efficiently search for files, folders, and character and block devices.findcommand:find /path/ -type f -name file-to-search/pathis the path where the file is expected to be found. This is the starting point for searching files. The path can also be/or .which represents the root and current directory, respectively.-typerepresents the file descriptors. They can be any of the below:f– Regular filesuch as text files, images, and hidden files.d– Directory. These are the folders under consideration.l– Symbolic link. Symbolic links point to files and are similar to shortcuts.c– Character devices. Files that are used to access character devices are called character device files. Drivers communicate with character devices by sending and receiving single characters (bytes, octets). Examples include keyboards, sound cards, and the mouse.b– Block devices. Files that are used to access block devices are called block device files. Drivers communicate with block devices by sending and receiving entire blocks of data. Examples include USB and CD-ROM-nameis the name of the file type that you want to search.How to search files by name or extension
find . -type f -name "style*"#output./style.css./styles.css.html. We'll modify the command like this:find . -type f -name "*.html"# output./services.html./blob.html./index.htmlHow to search hidden files
ls -ain the current directory.findcommand as shown below to search for hidden files:find . -type f -name ".*"ls -la# folder contentstotal 5drwxrwxr-x 2 zaira zaira 4096 Mar 26 14:17 .drwxr-x--- 61 zaira zaira 4096 Mar 26 14:12 ..-rw-rw-r-- 1 zaira zaira 0 Mar 26 14:17 .bash_history-rw-rw-r-- 1 zaira zaira 0 Mar 26 14:17 .bash_logout-rw-rw-r-- 1 zaira zaira 0 Mar 26 14:17 .bashrcfind . -type f -name ".*"# find output./.bash_logout./.bashrc./.bash_historyHow to search log files and configuration files
.log, and we can find them like this:find . -type f -name "*.log"find . -type f -name "*.conf"How to search other files by type
cto -type:find / -type cb:find / -type bHow to search directories
-type dflag.ls -l# list folder contentsdrwxrwxr-x 2 zaira zaira 4096 Mar 26 14:22 hosts-rw-rw-r-- 1 zaira zaira 0 Mar 26 14:23 hosts.txtdrwxrwxr-x 2 zaira zaira 4096 Mar 26 14:22 imagesdrwxrwxr-x 2 zaira zaira 4096 Mar 26 14:23 styledrwxrwxr-x 2 zaira zaira 4096 Mar 26 14:22 webp find . -type d # find directory output../webp./images./style./hostsHow to search files by size
findcommand is to list files based on a particular size.find / -size +250M250MB.G: GigaBytes.M: MegaBytes.K: KiloBytesc: bytes.find <directory> -type f -size +N<Unit Type>How to search files by modification time
-mtimeflag, you can filter files and folders based on the modification time.find /path -name "*.txt" -mtime -104.5. Basic Commands for Viewing Files
Concatenate and display files using the
catcommandcatcommand in Linux is used to display the contents of a file. It can also be used to concatenate files and create new files.catcommand:cat [options] [file]catis without any options or arguments. This will display the contents of the file on the terminal.file.txt, you can use the following command:cat file.txtViewing text files interactively using
lessand morecatdisplays the entire file at once, lessand moreallow you to view the contents of a file interactively. This is useful when you want to scroll through a large file or search for specific content.lesscommand is:less [options] [file]morecommand is similar to lessbut has fewer features. It is used to display the contents of a file one screen at a time.morecommand is:more [options] [file]spacebarto scroll one page down, the Enterkey to scroll one line down, and the qkey to exit the viewer.bkey, and to move forward you can use the fkey.Displaying the last part of files using
tailtailcommand in Linux is used to display the last part of a file.tail file.txtwill display the last 10 lines of the file file.txtby default.-noption followed by the number of lines you want to display.# Display the last 50 lines of the file file.txttail -n 50 file.txttailis its follow-along (-f) option. This option enables you to view the contents of a file as they are being written. This is a useful utility for viewing and monitoring log files in real-time.Displaying the beginning of files using
headtaildisplays the last part of a file, you can use the headcommand in Linux to display the beginning of a file.head file.txtwill display the first 10 lines of the file file.txtby default.-noption followed by the number of lines you want to display.Counting words, lines, and characters using
wcwccommand.wc syslog.loggave me the following output:1669 9623 64367 syslog.log1669represents the number of lines in the file syslog.log.9623represents the number of words in the file syslog.log.64367represents the number of characters in the file syslog.log.wc syslog.logcounted 1669lines, 9623words, and 64367characters in the file syslog.log.Comparing files line by line using
diffdiffcommand.diffcommand is:diff [options] file1 file2hello.pyand also-hello.py, that we will compare using the diffcommand:# contents of hello.pydef greet(name): return f"Hello, { name}!"user = input("Enter your name: ")print(greet(user))# contents of also-hello.pymore also-hello.pydef greet(name): return fHello, { name}!user = input(Enter your name: )print(greet(user))print("Nice to meet you")diff -q hello.py also-hello.py# OutputFiles hello.py and also-hello.py differ-uflag to see a unified output:diff -u hello.py also-hello.py--- hello.py 2024-05-24 18:31:29.891690478 +0500+++ also-hello.py 2024-05-24 18:32:17.207921795 +0500@@ -3,4 +3,5 @@ user = input(Enter your name: ) print(greet(user))+print("Nice to meet you")--- hello.py 2024-05-24 18:31:29.891690478 +0500indicates the file being compared and its timestamp.+++ also-hello.py 2024-05-24 18:32:17.207921795 +0500indicates the other file being compared and its timestamp.@@ -3,4 +3,5 @@shows the line numbers where the changes occur. In this case, it indicates that lines 3 to 4 in the original file have changed to lines 3 to 5 in the modified file.user = input(Enter your name: )is a line from the original file.print(greet(user))is another line from the original file.+print("Nice to meet you")is the additional line in the modified file.-yflag:diff -y hello.py also-hello.py# Outputdef greet(name): def greet(name): return fHello, { name}! return fHello, { name}!user = input(Enter your name: ) user = input(Enter your name: )print(greet(user)) print(greet(user)) > print("Nice to meet you")>symbol indicating the line is only present in one of the files.Part 5: The Essentials of Text Editing in Linux
5.1. Mastering Vim: The Complete Guide
Introduction to Vim
vim) and Vim tiny (vi). Vim tiny is a smaller version of Vim that lacks some features of Vim.How to start using
vimvim your-file.txtyour-file.txtcan either be a new file or an existing file that you want to edit.Navigating Vim: Mastering movement and command modes
hjklbeing one of them.hjklkeys can greatly speed up text editing tasks.hjklkeys to navigate. Some people find this this way of navigation efficient.hjklsequence, use this: hang back, jump down, kick up, leap forward.
The three Vim modes
Iwhile in command mode. Note the '-- INSERT'switch at the end of the screen.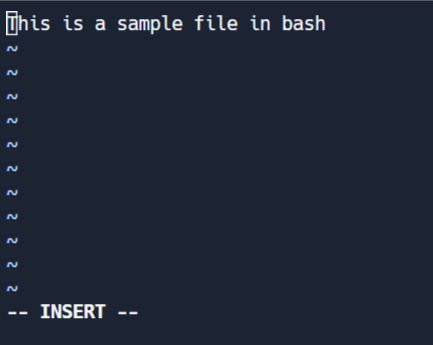
Shift + V→ Select multiple lines.Ctrl + V→ Block modeV→ Character mode
ESCtwice and you will be back in Command Mode.Editing Efficiently in Vim: Copy/pasting and searching
'y'to copy/ yank.'p'./in command mode. To search, use /string-to-match.:set hlsand press enter. Search using /string-to-match. This will highlight the searches.
:q!:wq!Shortcuts in Vim: Making Editing Faster
h: Move leftj: Move downk: Move upl: Move right0: Move to the beginning of the line$: Move to the end of the linegg: Move to the beginning of the fileG: Move to the end of the fileCtrl+d: Move half-page downCtrl+u: Move half-page upi: Enter insert mode before the cursorI: Enter insert mode at the beginning of the linea: Enter insert mode after the cursorA: Enter insert mode at the end of the lineo: Open a new line below the current line and enter insert modeO: Open a new line above the current line and enter insert modex: Delete the character under the cursordd: Delete the current lineyy: Yank (copy) the current line (use this in visual mode)p: Paste below the cursorP: Paste above the cursor/: Search for a pattern which will take you to its next occurrence?: Search for a pattern that will take you to its previous occurrencen: Repeat the last search in the same directionN: Repeat the last search in the opposite direction:%s/old/new/g: Replace all occurrences of oldwith newin the file:w: Save the file but don't exit:q: Quit Vim (fails if there are unsaved changes):wqor :x: Save and quit:q!: Quit without saving:splitor :sp: Split the window horizontally:vsplitor :vsp: Split the window verticallyCtrl+w followed by h/j/k/l: Navigate between split windows5.2. Mastering Nano
Getting started with Nano: The user-friendly text editor
nanonano filenameList of key bindings in Nano
nanocommand, you can start writing text. To save the file, press Ctrl+O. You'll be prompted to enter the file name. Press Enterto save the file.Ctrl+X. If you have unsaved changes, Nano will prompt you to save the changes before exiting.ALT+A. A marker will show. Use arrows to select the text. Once selected, exit the marker with with ALT+^.Ctrl+K. To paste the copied text, press Ctrl+U.ALT+A. Once selected, cut the text with Ctrl+K. To paste the cut text, press Ctrl+U.Alt \to move to the beginning of the file.Alt /to move to the end of the file.nano -l filename, you can view line numbers on the left side of the file.ALt + G. Enter the line number to the prompt and press Enter.CTRL + Wand press Enter. If you want to search backwards, you can press Alt+Wafter initiating the search with Ctrl+W.Summary of keybindings in Nano
Ctrl+X: Exit Nano (prompting to save if changes are made)Ctrl+O: Save the fileCtrl+R: Read a file into the current fileCtrl+G: Display the help textCtrl+K: Cut the current line and store it in the cutbufferCtrl+U: Paste the contents of the cutbuffer into the current lineAlt+6: Copy the current line and store it in the cutbufferCtrl+J: Justify the current paragraphCtrl+A: Move to the beginning of the lineCtrl+E: Move to the end of the lineCtrl+C: Display the current line number and file informationCtrl+_(Ctrl+Shift+-): Go to a specific line (and optionally, column) numberCtrl+Y: Scroll up one pageCtrl+V: Scroll down one pageCtrl+W: Search for a string (then Enterto search again)Alt+W: Repeat the last search but in the opposite directionCtrl+\: Search and replaceCtrl+T: Invoke the spell checker, if availableCtrl+D: Delete the character under the cursor (does not cut it)Ctrl+L: Refresh (redraw) the current screenAlt+U: Undo the last operationAlt+E: Redo the last undone operationPart 6: Bash Scripting
6.1. Definition of Bash scripting
6.2. Advantages of Bash Scripting
6.3. Overview of Bash Shell and Command Line Interface
pscommand:ps# output: PID TTY TIME CMD 20506 pts/0 00:00:00 bash <--- the shell type 20931 pts/0 00:00:00 ps6.4. How to Create and Execute Bash scripts
.sh. However, bash scripts can run perfectly fine without the shextension.shebang. Shebang is a combination of bash #and bang !followed by the bash shell path. This is the first line of the script. Shebang tells the shell to execute it via bash shell. Shebang is simply an absolute path to the bash interpreter.#!/bin/bashwhich bashrun_all.shusing any editor of your choice.vim run_all.sh#!/bin/bashecho "Today is " `date`echo -e "\nenter the path to directory"read the_pathecho -e "\n you path has the following files and folders: "ls $the_path1 #!/bin/bash 2 echo "Today is " `date` 3 4 echo -e "\nenter the path to directory" 5 read the_path 6 7 echo -e "\n you path has the following files and folders: " 8 ls $the_path#!/bin/bash) points toward the bash shell path.echocommand displays the current date and time on the terminal. Note that the dateis in backticks.readcommand reads the input and stores it in the variable the_path.lscommand takes the variable with the stored path and displays the current files and folders.chmod u+x run_all.shchmodmodifies the ownership of a file for the current user :u.+xadds the execution rights to the current user. This means that the user who is the owner can now run the script.run_all.shis the file we wish to run.sh run_all.shbash run_all.sh./run_all.sh
6.5. Bash Scripting Basics
Comments in bash scripting
#in bash scripting. This means that any line that begins with a #is a comment and will be ignored by the interpreter.# This is an example comment# Both of these lines will be ignored by the interpreterVariables and data types in Bash
country=Netherlands$is required to access an existing variable's value.same_country=$countrycountryto the new variable same_country.$to the variable name.country=Netherlandsecho $country# outputNetherlandsnew_country=$countryecho $new_country# outputNetherlandsVariable naming conventions
_)._).if, then, else, fi, and so on as variable names.namecount_varmyVarMY_VAR# invalid variable names2ndvar (variable name starts with a number)my var (variable name contains a space)my-var (variable name contains a hyphen)Input and output in Bash scripts
Gathering input
readcommand.#!/bin/bashecho "What's your name?"read entered_nameecho -e "\nWelcome to bash tutorial" $entered_name
input.txtand prints it to the terminal. We'll study while loops later in this section.while read linedo echo $linedone < input.txt$1denotes the initial argument passed, $2denotes the second argument passed, and so forth.#!/bin/bashecho "Hello, $1!"Zairaas our argument to the script.
Displaying output
echo "Hello, World!"echo "This is some text." > output.txtoutput.txt. Note that the >operator overwrites a file if it already has some content.echo "More text." >> output.txtoutput.txt.ls > files.txtfiles.txt. You can redirect output of any command to a file this way.Conditional statements (if/else)
if, if-else, if-elif-else, and nested conditionals.if [[ condition ]];then statementelif [[ condition ]]; then statement else do this by defaultfiSyntax of bash conditional statements
-aand OR -oto make comparisons that have more significance.if [ $a -gt 60 -a $b -lt 100 ]true: ais greater than 60AND bis less than 100.if, if-else, and if-elif-elsestatements to determine if a user-inputted number is positive, negative, or zero:#!/bin/bash# Script to determine if a number is positive, negative, or zeroecho "Please enter a number: "read numif [ $num -gt 0 ]; then echo "$num is positive"elif [ $num -lt 0 ]; then echo "$num is negative"else echo "$num is zero"fiifstatement to check if the number is greater than 0. If it is, the script outputs that the number is positive. If the number is not greater than 0, the script moves on to the next statement, which is an if-elifstatement.0. If it is, the script outputs that the number is negative.0nor less than 0, the script uses an elsestatement to output that the number is zero.
Looping and branching in Bash
true. We need to provide a counter statement that increments the counter to control loop execution.(( i += 1 ))is the counter statement that increments the value of i. The loop will run exactly 10 times.#!/bin/bashi=1while [[ $i -le 10 ]] ; do echo "$i" (( i += 1 ))done
forloop, just like the whileloop, allows you to execute statements a specific number of times. Each loop differs in its syntax and usage.#!/bin/bashfor i in { 1..5}do echo $idone
case expression in pattern1) # code to execute if expression matches pattern1 ;; pattern2) # code to execute if expression matches pattern2 ;; pattern3) # code to execute if expression matches pattern3 ;; *) # code to execute if none of the above patterns match expression ;;esacfruit="apple"case $fruit in "apple") echo "This is a red fruit." ;; "banana") echo "This is a yellow fruit." ;; "orange") echo "This is an orange fruit." ;; *) echo "Unknown fruit." ;;esacfruitis apple, the first pattern matches, and the block of code that echoes This is a red fruit.is executed. If the value of fruitwere instead banana, the second pattern would match and the block of code that echoes This is a yellow fruit.would execute, and so on.fruitdoes not match any of the specified patterns, the default case is executed, which echoes Unknown fruit.Part 7: Managing Software Packages in Linux
7.1. Packages and Package Management
What is a package?
What is the difference between source and binary?
uname -mcommand.uname -m# outputx86_64Package dependencies
Package managers
Software channels/repositories
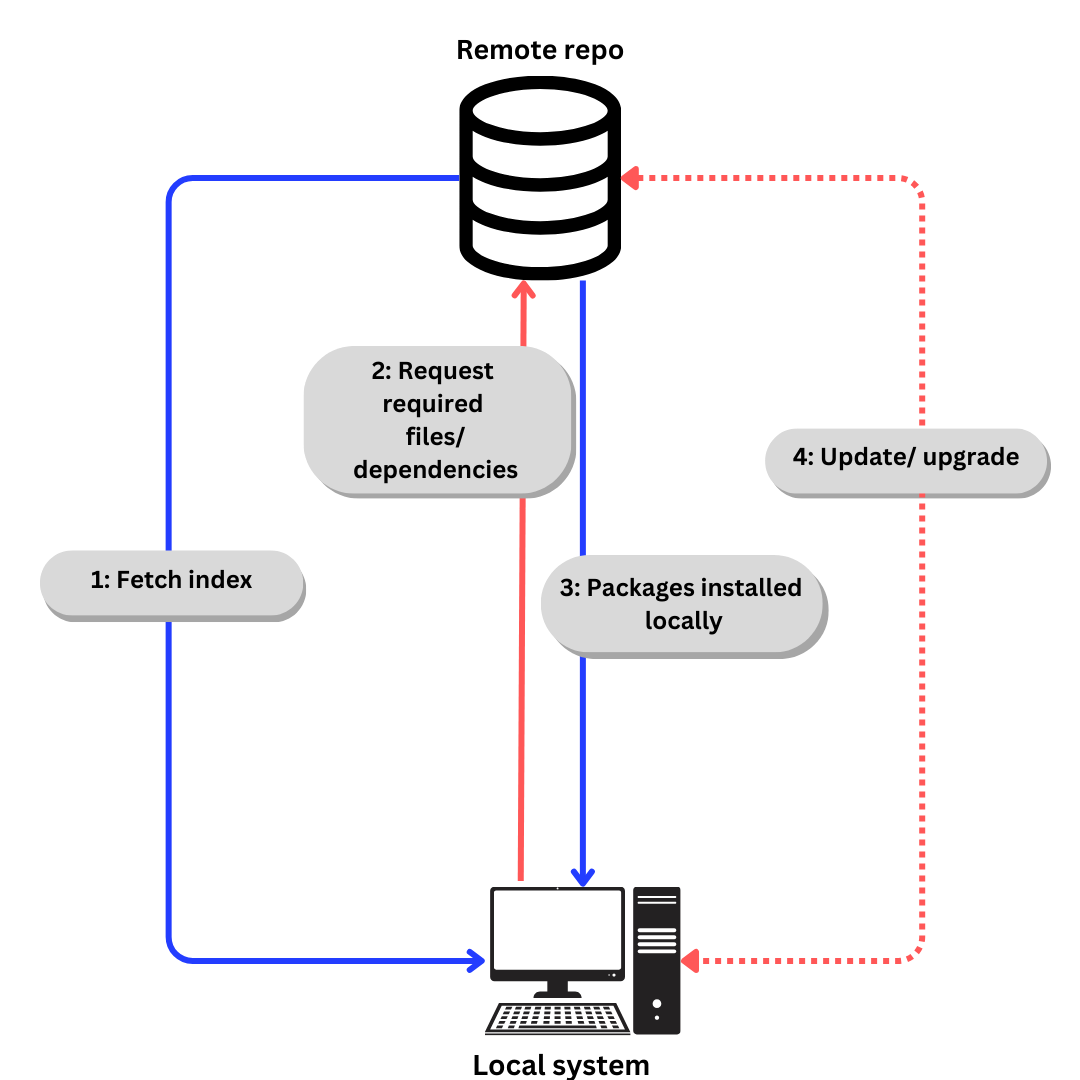
apt update.(aptis explained in next section).apt installapt updateand apt upgrade/etc/apt/sources.list.7.2. Installing a Package via Command Line
aptcommand is a powerful command-line tool, which works with Ubuntu’s "Advanced Packaging Tool (APT)".apt, along with the commands bundled with it, provides the means to install new software packages, upgrade existing software packages, update the package list index, and even upgrade the entire Ubuntu system.apt, you can view the /var/log/dpkg.logfile.aptcommand:Installing packages
htoppackage, you can use the following command:sudo apt install htopUpdating the package list index
sudo apt updateUpgrading the packages
sudo apt upgradeRemoving packages
htop, you can use the following command:sudo apt remove htop7.3. Installing a Package via an Advanced Graphical Method – Synaptic
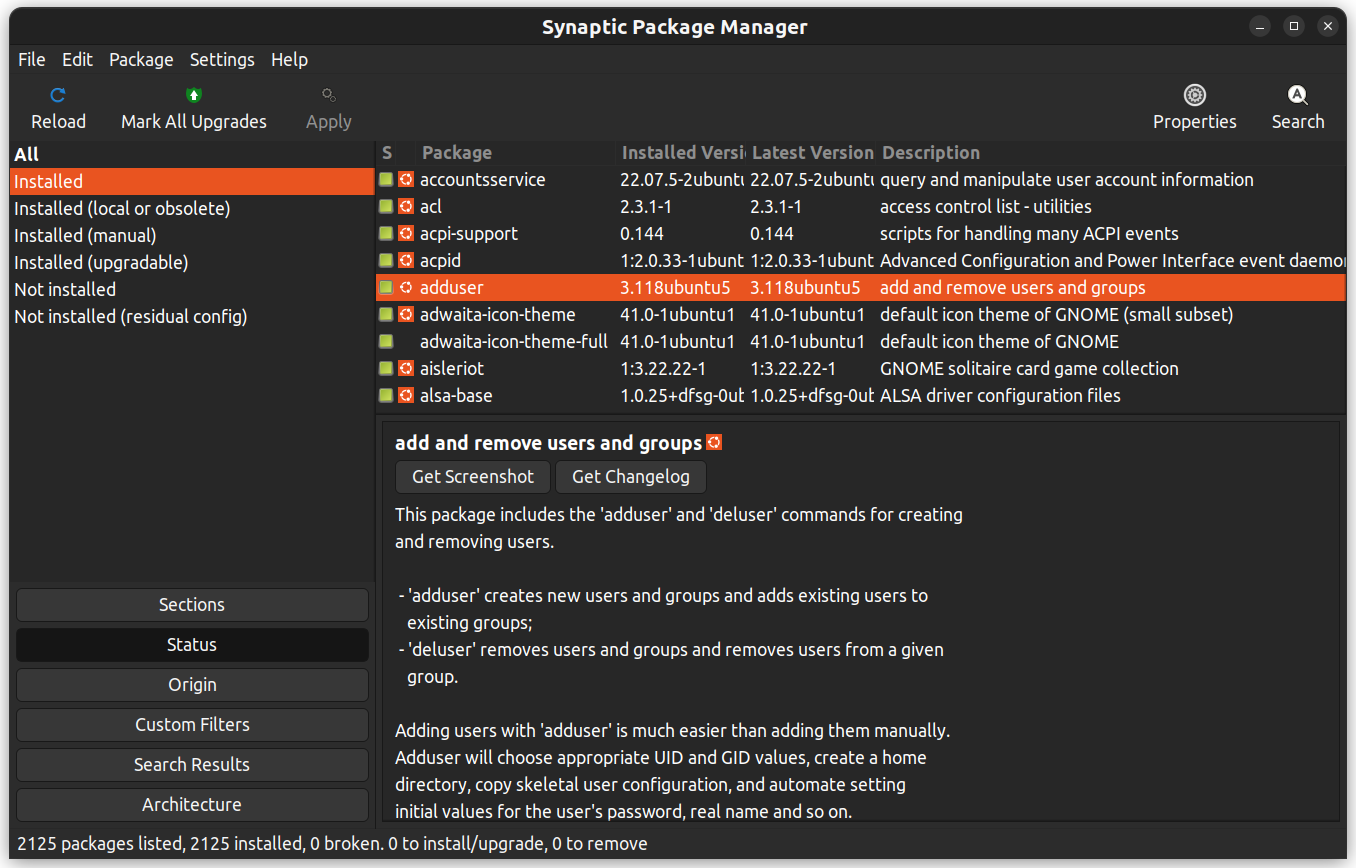
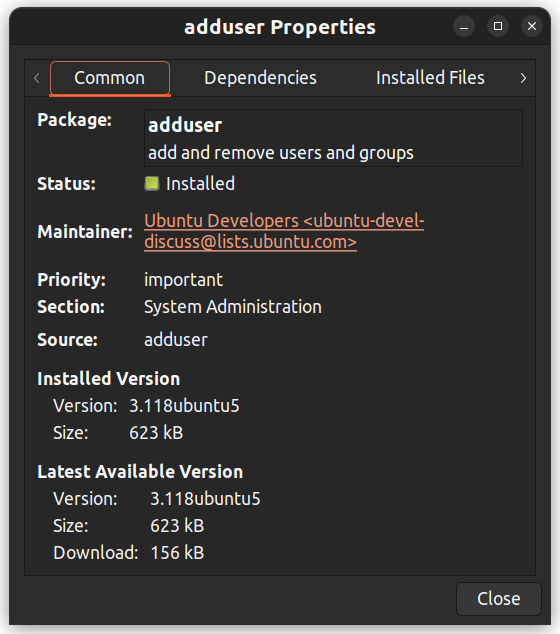
7.4. Installing downloaded packages from a website
.debfiles.dpkgto install packages:dpkgis a command-line tool used to install packages. To install a package with dpkg, open the Terminal and type the following:cd directorysudo dpkg -i package_name.deb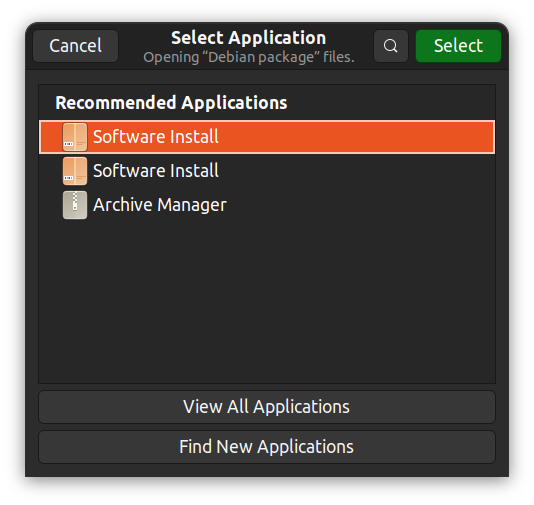
dpkg --list.Part 8: Advanced Linux Topics
8.1. User Management
What is a user?
root. It has a UIDof 0.idcommand displays the user ID and group ID of the current user.iduid=1000(john) gid=1000(john) groups=1000(john),4(adm),24(cdrom),27(sudo),30(dip)... output truncatedidcommand.id usernamepscommand with the -uflag.ps -u# OutputUSER PID %CPU %MEM VSZ RSS TTY STAT START TIME COMMANDroot 1 0.0 0.1 16968 3920 ? Ss 18:45 0:00 /sbin/init splashroot 2 0.0 0.0 0 0 ? S 18:45 0:00 [kthreadd]/etc/passwdfile to store user information./etc/passwdfile:root:x:0:0:root:/root:/bin/bash/etc/passwdfile contains the following information about each user:root– The username of the user account.x– The password in encrypted format for the user account that is stored in the /etc/shadowfile for security reasons.0– The unique numerical identifier for the user account.0– The primary group identifier for the user account.root– The real name for the user account./root– The home directory for the user account./bin/bash– The default shell for the user account. A system user might use /sbin/nologinif interactive logins are not allowed for that user.What is a group?
/etc/groupfile./etc/groupfile:adm:x:4:syslog,johnadm– The name of the group.x– The password for the group is stored in the /etc/gshadowfile for security reasons. The password is optional and appears empty if not set.4– The unique numerical identifier for the group.syslog,john– The list of usernames that are members of the group. In this case, the group admhas two members: syslogand john.adm, the group ID is 4, and the group has two members: syslogand john. The password field is typically set to xto indicate that the group password is stored in the /etc/gshadowfile.Access control: finding and understanding file permission
ls -lcommand. The first column in the output of the ls -lcommand shows the permissions of the file. Other columns show the owner of the file and the group that the file belongs to.
modecolumn: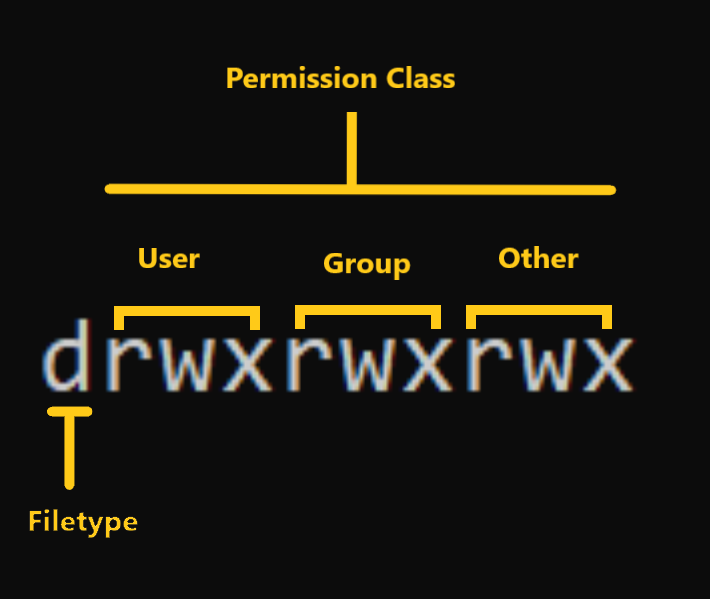
-. For other special file types the symbol is different. For a directory which is a special file, it is d. Special files are treated differently by the OS.
– User: This is the owner of a file and owner of the file belongs to this class.
– Group: The members of the file’s group belong to this class
– Other: Any users that are not part of the user or group classes belong to this class.ls -ldcommand.How to Read Symbolic Permissions or the
rwxpermissionsrwxrepresentation is known as the Symbolic representation of permissions. In the set of permissions,rstands for read. It is indicated in the first character of the triad.wstands for write. It is indicated in the second character of the triad.xstands for execution. It is indicated in the third character of the triad.-rwx------: A file that is only accessible and executable by its owner.-rw-rw-r--: A file that is open to modification by its owner and group but not by others.drwxrwx---: A directory that can be modified by its owner and group.How to Change File Permissions and Ownership in Linux using
chmodand chownchmodcommand.chmod:chmod permissions filenamepermissionscan be read, write, execute or a combination of them.filenameis the name of the file for which the permissions need to change. This parameter can also be a list if files to change permissions in bulk.u, g, oto represent users, groups, and others. Permissions are represented as r, w, xfor read, write, and execute, respectively. You can modify permissions using +, - and =.How to Change Permissions using Symbolic Mode
USER REPRESENTATION DESCRIPTION u user/owner g group o other OPERATOR DESCRIPTION + Adds a permission to a file or directory – Removes the permission \= Sets the permission if not present before. Also overrides the permissions if set earlier. zaira.
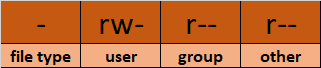
x) to owner (u) using symbolic mode, we can use the command below:chmod u+x mymotd.shzaira.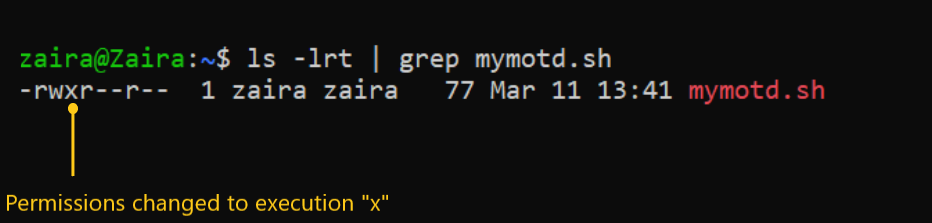
readand writepermission for groupand others: chmod go-rw.readpermissions for others: chmod o-r.writepermission to groupand overriding existing permission: chmod g=w.How to Change Permissions using Absolute Mode
PERMISSION PROVIDE PERMISSION read add 4 write add 2 execute add 1 PERMISSION REVOKE PERMISSION read subtract 4 write subtract 2 execute subtract 1 read(add 4) for user, read(add 4) and execute(add 1) for group, and only execute(add 1) for others.chmod 451 file-name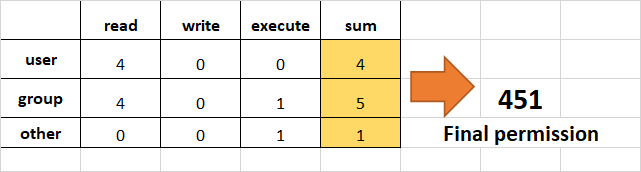
r--r-x--x.executionrights from otherand group.otherand group, subtract 1 from the execute part of last 2 octets.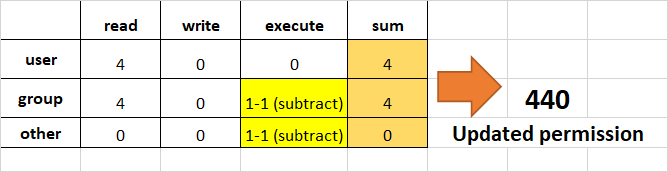
read, writeand executeto user, readand executeto groupand only readto others.rwxr-xr--.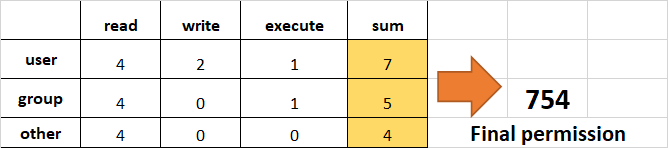
How to Change Ownership using the
chownCommandchowncommand. In some cases, changing ownership requires sudopermissions.chown:chown user filenameHow to change user ownership with
chownzairato user news.chown news mymotd.sh
sudo chown news mymotd.sh.
How to change user and group ownership simultaneously
chownto change user and group simultaneously.chown user:group filenameHow to change directory ownership
/opt/scriptfolder to allow user admin.chown -R admin /opt/scriptHow to change group ownership
chownby preceding the group name by a colon :chown :admins /opt/scriptHow to switch between users
sucommand.[user01@host ~]$ su user02Password:[user02@host ~]$How to gain superuser access
sucommand switches to the root user account by default.[user01@host ~]$ suPassword:[root@host ~]#sucommand is su -. The sucommand switches to the root user account but does not change the environment variables. The su -command switches to the root user account and changes the environment variables to those of the target user.Running commands with sudo
rootuser without switching to the rootuser account, you can use the sudocommand. The sudocommand allows you to run commands with elevated privileges.sudois a safer option rather than running the commands as the rootuser. This is because, only a specific set of users can be granted permission to run commands with sudo. This is defined in the /etc/sudoersfile.sudologs all commands that are run with it, providing an audit trail of who ran which commands and when.cat /var/log/auth.log | grep sudosudo, it gets flagged in logs and prompts a message like this:user01 is not in the sudoers file. This incident will be reported.Managing local user accounts
Creating users from the command line
sudo useradd usernameModifying existing users
usermodcommand is used to modify existing users. Here are some of the common options used with the usermodcommand:usermodcommand in Linux:sudo usermod -l newusername oldusernamesudo usermod -d /new/home/directory -m usernamesudo usermod -aG groupname usernamesudo usermod -s /bin/bash usernamesudo usermod -L usernamesudo usermod -U usernamesudo usermod -e YYYY-MM-DD usernamesudo usermod -u newUID usernamesudo usermod -g newgroup usernamesudo gpasswd -d username groupnameDeleting users
userdelcommand is used to delete a user account and related files from the system.sudo userdel username: removes the user's details from /etc/passwdbut keeps the user's home directory.sudo userdel -r usernamecommand removes the user's details from /etc/passwdand also deletes the user's home directory.Changing user passwords
passwdcommand is used to change a user's password.sudo passwd username: sets the initial password or changes the existing password of username. It is also used to change the password of the currently logged in user.8.2 Connecting to Remote Servers via SSH
22.sshcommand is a built-in utility in Linux and also the default one. It makes accessing servers quite easy and secure.sshcommand is:ssh username@server_ipjohnand the server IP is 192.168.1.10, the command would be:ssh [email protected][email protected]'s password: Welcome to Ubuntu 20.04.2 LTS (GNU/Linux 5.4.0-70-generic x86_64) * Documentation: https://help.ubuntu.com * Management: https://landscape.canonical.com * Support: https://ubuntu.com/advantage System information as of Fri Jun 5 10:17:32 UTC 2024 System load: 0.08 Processes: 122 Usage of /: 12.3% of 19.56GB Users logged in: 1 Memory usage: 53% IP address for eth0: 192.168.1.10 Swap usage: 0%Last login: Fri Jun 5 09:34:56 2024 from 192.168.1.2john@hostname:~$ # start entering commands192.168.1.10.22but it is also vulnerable, as hackers will likely attempt here first. Your server can expose another port and share the access with you. To connect to a different port, use the -pflag.ssh -p port_number username@server_ip8.3. Advanced Log Parsing and Analysis
# sample log file2024-04-25 09:00:00 INFO Startup: Application starting2024-04-25 09:01:00 INFO Config: Configuration loaded successfully2024-04-25 09:02:00 DEBUG Database: Database connection established2024-04-25 09:03:00 INFO User: New user registered (UserID: 1001)2024-04-25 09:04:00 WARN Security: Attempted login with incorrect credentials (UserID: 1001)2024-04-25 09:05:00 ERROR Network: Network timeout on request (ReqID: 456)2024-04-25 09:06:00 INFO Email: Notification email sent (UserID: 1001)2024-04-25 09:07:00 DEBUG API: API call with response time over threshold (Duration: 350ms)2024-04-25 09:08:00 INFO Session: User session ended (UserID: 1001)2024-04-25 09:09:00 INFO Shutdown: Application shutdown initiatedText extraction using
grepgrep:grep "search_string" filenamefilename.grep -r "search_string" /path/to/directorysearch_string"in all files within the specified directory and its subdirectories.grep -i "search_string" filenamefilename.grep -n "search_string" filenamefilename.grep -c "search_string" filenamefilename.grep -v "search_string" filenamefilename.grep -w "word" filenamefilename.grep -E "pattern" filenamefilename.# find the list of files containing the desired stringsgrep -l "String to Match" /path/to/directoryText extraction using
sedsedstands for "stream editor". It processes data stream-wise, meaning it reads data one line at a time. sedallows you to search for patterns and perform actions on the lines that match those patterns.sed:sedis as follows:sed [options] 'command' file_namecommandis used to perform operations like substitution, deletion, insertion, and so on, on the text data. The filename is the name of the file you want to process.sedusage:sflag is used to replace text. The old-textis replaced with new-text:sed 's/old-text/new-text/' filenamesystem.log:sed 's/error/warning/' system.logsedto filter and display lines that match a specific pattern:sed -n '/pattern/p' filenamesed -n '/ERROR/p' system.logsed '/pattern/d' filenamesed '/DEBUG/d' system.logsed -n 's/^\([0-9]\{ 4\}-[0-9]\{ 2\}-[0-9]\{ 2\}\).*/\1/p' system.logText parsing with
awkawkhas the ability to easily split each line into fields. It's well-suited for processing structured text like log files.awkawkis:awk 'pattern { action }' file_namepatternis a condition that must be met for the actionto be performed. If the pattern is omitted, the action is performed on every line.2024-04-25 09:00:00 INFO Startup: Application starting2024-04-25 09:01:00 INFO Config: Configuration loaded successfully2024-04-25 09:02:00 INFO Database: Database connection established2024-04-25 09:03:00 INFO User: New user registered (UserID: 1001)2024-04-25 09:04:00 INFO Security: Attempted login with incorrect credentials (UserID: 1001)2024-04-25 09:05:00 INFO Network: Network timeout on request (ReqID: 456)2024-04-25 09:06:00 INFO Email: Notification email sent (UserID: 1001)2024-04-25 09:07:00 INFO API: API call with response time over threshold (Duration: 350ms)2024-04-25 09:08:00 INFO Session: User session ended (UserID: 1001)2024-04-25 09:09:00 INFO Shutdown: Application shutdown initiated INFOawkawk(separated by spaces by default) can be accessed using $1, $2, $3, and so on.zaira@zaira-ThinkPad:~$ awk '{ print $1 }' sample.log# output2024-04-252024-04-252024-04-252024-04-252024-04-252024-04-252024-04-252024-04-252024-04-252024-04-25zaira@zaira-ThinkPad:~$ awk '{ print $2 }' sample.log# output09:00:0009:01:0009:02:0009:03:0009:04:0009:05:0009:06:0009:07:0009:08:0009:09:00awk '/ERROR/ { print $0 }' logfile.log# output2024-04-25 09:05:00 ERROR Network: Network timeout on request (ReqID: 456)awk '{ print $1, $2 }' logfile.log# output2024-04-25 09:00:002024-04-25 09:01:002024-04-25 09:02:002024-04-25 09:03:002024-04-25 09:04:002024-04-25 09:05:002024-04-25 09:06:002024-04-25 09:07:002024-04-25 09:08:0072024-04-25 09:09:00awk '{ count[$3]++ } END { for (level in count) print level, count[level] }' logfile.log# output 1WARN 1ERROR 1DEBUG 2INFO 6awk '{ $3="INFO"; print }' sample.log# output2024-04-25 09:00:00 INFO Startup: Application starting2024-04-25 09:01:00 INFO Config: Configuration loaded successfully2024-04-25 09:02:00 INFO Database: Database connection established2024-04-25 09:03:00 INFO User: New user registered (UserID: 1001)2024-04-25 09:04:00 INFO Security: Attempted login with incorrect credentials (UserID: 1001)2024-04-25 09:05:00 INFO Network: Network timeout on request (ReqID: 456)2024-04-25 09:06:00 INFO Email: Notification email sent (UserID: 1001)2024-04-25 09:07:00 INFO API: API call with response time over threshold (Duration: 350ms)2024-04-25 09:08:00 INFO Session: User session ended (UserID: 1001)2024-04-25 09:09:00 INFO Shutdown: Application shutdown initiated INFOawkis a space. If your log file uses a different separator, you can specify it using the -Foption. For example, if your log file uses a colon as a separator, you can use awk -F: '{ print $1 }' logfile.logto extract the first field.Parsing log files with
cutcutcommand is a simple yet powerful command used to extract sections of text from each line of input. As log files are structured and each field is delimited by a specific character, such as a space, tab, or a custom delimiter, cutdoes a very good job of extracting those specific fields.cut [options] [file]-d: Specifies a delimiter used as the field separator.-f: Selects the fields to be displayed.-c: Specifies character positions.cut -d ' ' -f 1 logfile.logcutfor log parsing2024-04-25 08:23:01 INFO 192.168.1.10 User logged in successfully.2024-04-25 08:24:15 WARNING 192.168.1.10 Disk usage exceeds 90%.2024-04-25 08:25:02 ERROR 10.0.0.5 Connection timed out....cutcan be used in the following ways:cut -d ' ' -f 2 system.log# Output08:23:0108:24:1508:25:02...cut -d ' ' -f 4 system.log# Output192.168.1.10192.168.1.1010.0.0.5cut -d ' ' -f 3 system.log# OutputINFOWARNINGERRORcutwith other commands:cutcommand. Let's say you want to filter logs before cutting. You can use grepto extract lines containing "ERROR" and then use cutto get specific information from those lines:grep "ERROR" system.log | cut -d ' ' -f 1,2 # Output2024-04-25 08:25:02cut -d ' ' -f 1,2,3 system.log` # Output2024-04-25 08:23:01 INFO2024-04-25 08:24:15 WARNING2024-04-25 08:25:02 ERROR...Parsing log files with
sortand uniqsortand uniqcommands are powerful commands used to sort and remove duplicates from the input, respectively.sortcommand organizes lines of text alphabetically or numerically.sort [options] [file]-n: Sorts the file assuming the contents are numerical.-r: Reverses the order of sort.-k: Specifies a key or column number to sort on.-u: Sorts and removes duplicate lines.uniqcommand is used to filter or count and report repeated lines in a file.uniqis:uniq [options] [input_file] [output_file]uniqcommand are:-c: Prefixes lines by the number of occurrences.-d: Only prints duplicate lines.-u: Only prints unique lines.Examples of using
sortand uniqtogether for log parsing2024-04-25 INFO User logged in successfully.2024-04-25 WARNING Disk usage exceeds 90%.2024-04-26 ERROR Connection timed out.2024-04-25 INFO User logged in successfully.2024-04-26 INFO Scheduled maintenance.2024-04-26 ERROR Connection timed out.sort system.log# Output2024-04-25 INFO User logged in successfully.2024-04-25 INFO User logged in successfully.2024-04-25 WARNING Disk usage exceeds 90%.2024-04-26 ERROR Connection timed out.2024-04-26 ERROR Connection timed out.2024-04-26 INFO Scheduled maintenance.sort system.log | uniq# Output2024-04-25 INFO User logged in successfully.2024-04-25 WARNING Disk usage exceeds 90%.2024-04-26 ERROR Connection timed out.2024-04-26 INFO Scheduled maintenance.uniq, removing duplicate lines.sort system.log | uniq -c# Output2 2024-04-25 INFO User logged in successfully.1 2024-04-25 WARNING Disk usage exceeds 90%.2 2024-04-26 ERROR Connection timed out.1 2024-04-26 INFO Scheduled maintenance.'2024-04-25 INFO User logged in successfully.'appeared 2 times in the file.sort system.log | uniq -u# Output2024-04-25 WARNING Disk usage exceeds 90%.2024-04-26 INFO Scheduled maintenance.sort -k2 system.log# Output2024-04-26 ERROR Connection timed out.2024-04-26 ERROR Connection timed out.2024-04-25 INFO User logged in successfully.2024-04-25 INFO User logged in successfully.2024-04-26 INFO Scheduled maintenance.2024-04-25 WARNING Disk usage exceeds 90%.8.4. Managing Linux Processes via Command Line
ls -lcommand, the operating system creates a new process to execute the command. The process has an ID, a state, and runs until the command completes.Understanding process creation and lifecycle
systemd, which is the first process started by the kernel during boot.systemdprocess has a process ID (PID) of 1and is responsible for initializing the system, starting and managing other processes, and handling system services. All other processes on the system are descendants of systemd.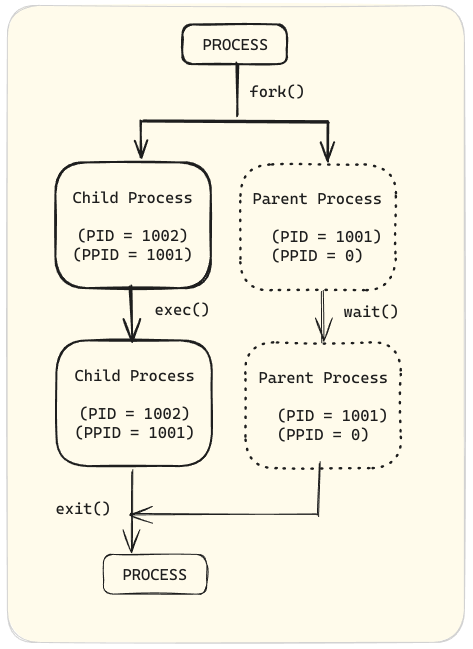
Understanding process states
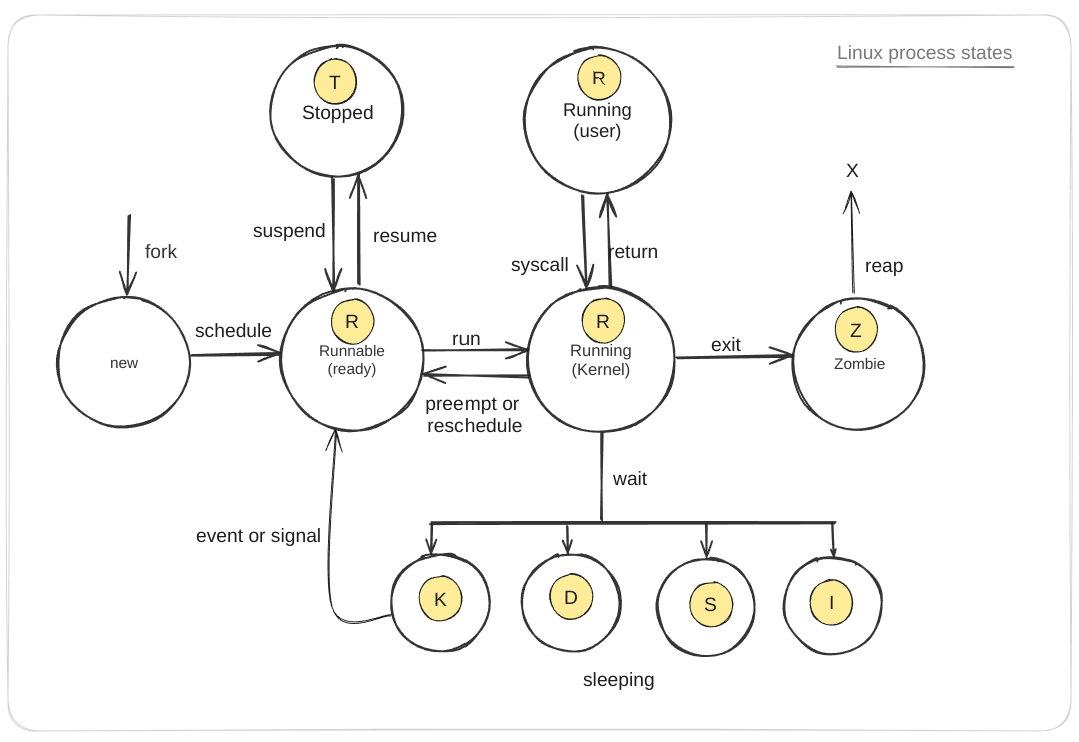
State Description (new) Initial state when a process is created via a fork system call. Runnable (ready) (R) Process is ready to run and waiting to be scheduled on a CPU. Running (user) (R) Process is executing in user mode, running user applications. Running (kernel) (R) Process is executing in kernel mode, handling system calls or hardware interrupts. Sleeping (S) Process is waiting for an event (for example, I/O operation) to complete and can be easily awakened. Sleeping (uninterruptible) (D) Process is in an uninterruptible sleep state, waiting for a specific condition (usually I/O) to complete, and cannot be interrupted by signals. Sleeping (disk sleep) (K) Process is waiting for disk I/O operations to complete. Sleeping (idle) (I) Process is idle, not doing any work, and waiting for an event to occur. Stopped (T) Process execution has been stopped, typically by a signal, and can be resumed later. Zombie (Z) Process has completed execution but still has an entry in the process table, waiting for its parent to read its exit status. Transition Description Fork Creates a new process from a parent process, transitioning from (new) to Runnable (ready) (R). Schedule Scheduler selects a runnable process, transitioning it to Running (user) or Running (kernel) state. Run Process transitions from Runnable (ready) (R) to Running (kernel) (R) when scheduled for execution. Preempt or Reschedule Process can be preempted or rescheduled, moving it back to Runnable (ready) (R) state. Syscall Process makes a system call, transitioning from Running (user) (R) to Running (kernel) (R). Return Process completes a system call and returns to Running (user) (R). Wait Process waits for an event, transitioning from Running (kernel) (R) to one of the Sleeping states (S, D, K, or I). Event or Signal Process is awakened by an event or signal, moving it from a Sleeping state back to Runnable (ready) (R). Suspend Process is suspended, transitioning from Running (kernel) or Runnable (ready) to Stopped (T). Resume Process is resumed, moving from Stopped (T) back to Runnable (ready) (R). Exit Process terminates, transitioning from Running (user) or Running (kernel) to Zombie (Z). Reap Parent process reads the exit status of the zombie process, removing it from the process table. How to view processes
pscommand along with a combination of options to view processes on a Linux system. The pscommand is used to display information about a selection of active processes. For example, ps auxdisplays all processes running on the system.zaira@zaira:~$ ps aux# OutputUSER PID %CPU %MEM VSZ RSS TTY STAT START TIME COMMANDroot 1 0.0 0.0 168140 11352 ? Ss May21 0:18 /sbin/init splashroot 2 0.0 0.0 0 0 ? S May21 0:00 [kthreadd]root 3 0.0 0.0 0 0 ? I< May21 0:00 [rcu_gp]root 4 0.0 0.0 0 0 ? I< May21 0:00 [rcu_par_gp]root 5 0.0 0.0 0 0 ? I< May21 0:00 [slub_flushwq]root 6 0.0 0.0 0 0 ? I< May21 0:00 [netns]root 11 0.0 0.0 0 0 ? I< May21 0:00 [mm_percpu_wq]root 12 0.0 0.0 0 0 ? I May21 0:00 [rcu_tasks_kthread]root 13 0.0 0.0 0 0 ? I May21 0:00 [rcu_tasks_rude_kthread]*... output truncated ....*USER: The user who owns the process.PID: The process ID.%CPU: The CPU usage of the process.%MEM: The memory usage of the process.VSZ: The virtual memory size of the process.RSS: The resident set size, that is the non-swapped physical memory that a task has used.TTY: The controlling terminal of the process. A ?indicates no controlling terminal.STAT: The process state.R: RunningIor S: Interruptible sleep (waiting for an event to complete)D: Uninterruptible sleep (usually IO)T: Stopped (either by a job control signal or because it is being traced)Z: Zombie (terminated but not reaped by its parent)Ss: Session leader. This is a process that has started a session, and it is a leader of a group of processes and can control terminal signals. The first Sindicates the sleeping state, and the second sindicates it is a session leader.START: The starting time or date of the process.TIME: The cumulative CPU time.COMMAND: The command that started the process.Background and foreground processes
sleepcommand, that keeps the process running for a specified number of seconds.# run sleep command for 300, 400, and 500 secondssleep 300 &sleep 400 &sleep 500 &&at the end of each command moves the process to the background.jobscommand to display the list of background jobs.jobsjobs[1] Running sleep 300 &[2]- Running sleep 400 &[3]+ Running sleep 500 &fgcommand followed by the job number. For example, to bring the first job (sleep 300) to the foreground:fg %11to the foreground.Ctrl+Zto suspend the job.zaira@zaira:~$ fg %1sleep 300^Z[1]+ Stopped sleep 300zaira@zaira:~$ jobs# suspended job [1]+ Stopped sleep 300[2] Running sleep 400 &[3]- Running sleep 500 &bgcommand to resume the job with ID 1 in the background.# Press Ctrl+Z to suspend the foreground job# Then, resume it in the backgroundbg %1jobs[1] Running sleep 300 &[2]- Running sleep 400 &[3]+ Running sleep 500 &fg %job_number.Ctrl+Zand moved it back to the background with bg %job_number.Killing processes
killcommand. The killcommand sends a signal to a process ID, asking it to terminate.killcommand.# Options available with killkill -l 1) SIGHUP 2) SIGINT 3) SIGQUIT 4) SIGILL 5) SIGTRAP 6) SIGABRT 7) SIGBUS 8) SIGFPE 9) SIGKILL 10) SIGUSR111) SIGSEGV 12) SIGUSR2 13) SIGPIPE 14) SIGALRM 15) SIGTERM16) SIGSTKFLT 17) SIGCHLD 18) SIGCONT 19) SIGSTOP 20) SIGTSTP21) SIGTTIN 22) SIGTTOU 23) SIGURG 24) ...terminatedkillcommand in Linux:kill 1234SIGTERMsignal to the process with PID 1234, requesting it to terminate.pkill process_nameSIGTERMsignal to all processes with the specified name.kill -9 1234SIGKILLsignal to the process with PID 1234, forcefully terminating it.kill -s SIGSTOP 1234SIGSTOPsignal to the process with PID 1234, stopping it.pkill -u usernameSIGTERMsignal to all processes owned by the specified user.killcommand to manage processes in a Linux environment.killcommand options and signals in a tabular form: This table summarizes the most common killcommand options and signals used in Linux for managing processes.Command / Option Signal Description kill <pid>SIGTERMRequests the process to terminate gracefully (default signal). kill -9 <pid>SIGKILLForces the process to terminate immediately without cleanup. kill -SIGKILL <pid>SIGKILLForces the process to terminate immediately without cleanup. kill -15 <pid>SIGTERMExplicitly sends the SIGTERMsignal to request graceful termination.kill -SIGTERM <pid>SIGTERMExplicitly sends the SIGTERMsignal to request graceful termination.kill -1 <pid>SIGHUPTraditionally means "hang up"; can be used to reload configuration files. kill -SIGHUP <pid>SIGHUPTraditionally means "hang up"; can be used to reload configuration files. kill -2 <pid>SIGINTRequests the process to terminate (same as pressing Ctrl+Cin terminal).kill -SIGINT <pid>SIGINTRequests the process to terminate (same as pressing Ctrl+Cin terminal).kill -3 <pid>SIGQUITCauses the process to terminate and produce a core dump for debugging. kill -SIGQUIT <pid>SIGQUITCauses the process to terminate and produce a core dump for debugging. kill -19 <pid>SIGSTOPPauses the process. kill -SIGSTOP <pid>SIGSTOPPauses the process. kill -18 <pid>SIGCONTResumes a paused process. kill -SIGCONT <pid>SIGCONTResumes a paused process. killall <name>Varies Sends a signal to all processes with the given name. killall -9 <name>SIGKILLForce kills all processes with the given name. pkill <pattern>Varies Sends a signal to processes based on a pattern match. pkill -9 <pattern>SIGKILLForce kills all processes matching the pattern. xkillSIGKILLGraphical utility that allows clicking on a window to kill the corresponding process. 8.5. Standard Input and Output Streams in Linux
stdin): This stream is used for input, typically from the keyboard. When a program reads from stdin, it receives data entered by the user or redirected from a file. A file descriptor is a unique identifier that the operating system assigns to an open file in order to keep track of open files.stdinis 0.stdout): This is the default output stream where a process writes its output. By default, the standard output is the terminal. The output can also be redirected to a file or another program. The file descriptor for stdoutis 1.stderr): This is the default error stream where a process writes its error messages. By default, the standard error is the terminal, allowing error messages to be seen even if stdoutis redirected. The file descriptor for stderris 2.Redirection and Pipelines
# Redirecting stdout to a filels > output.txt# Redirecting stderr to a filels non_existent_directory 2> error.txt# Redirecting both stdout and stderr to a filels non_existent_directory > all_output.txt 2>&1ls non_existent_directory: lists the contents of a directory named non_existent_directory. Since this directory does not exist, lswill generate an error message.> all_output.txt: The >operator redirects the standard output (stdout) of the lscommand to the file all_output.txt. If the file does not exist, it will be created. If it does exist, its contents will be overwritten.2>&1:: Here, 2represents the file descriptor for standard error (stderr). &1represents the file descriptor for standard output (stdout). The &character is used to specify that 1is not the file name but a file descriptor.2>&1means "redirect stderr (2) to wherever stdout (1) is currently going," which in this case is the file all_output.txt. Therefore, both the output (if there were any) and the error message from lswill be written to all_output.txt.|) to pass the output of one command as the input to another:ls | grep image# Outputimage-10.pngimage-11.pngimage-12.pngimage-13.png... Output truncated ...8.6 Automation in Linux – Automate Tasks with Cron Jobs
cronddaemon (a type of computer program that runs in the background) enables cron functionality. The cron reads the crontab(cron tables) for running predefined scripts.How to control access to crons
/etc/cron.allowfile.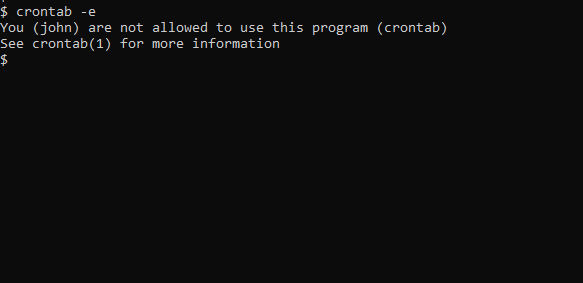
/etc/cron.allow. Create the file if it doesn't exist. This will allow John to create and edit cron jobs.
/etc/cron.d/cron.deny.How to add cron jobs in Linux
# Check cron service on Linux systemsudo systemctl status cron.serviceCron job syntax
crontab -e: edits crontab entries to add, delete, or edit cron jobs.crontab -l: list all the cron jobs for the current user.crontab -u username -l: list another user's crons.crontab -u username -e: edit another user's crons.# Cron job example* * * * * sh /path/to/script.sh*represents minute(s) hour(s) day(s) month(s) weekday(s), respectively. See details of these values below:VALUE DESCRIPTION Minutes 0-59 Command will be executed at the specific minute. Hours 0-23 Command will be executed at the specific hour. Days 1-31 Commands will be executed in these days of the months. Months 1-12 The month in which tasks need to be executed. Weekdays 0-6 Days of the week where commands will run. Here, 0 is Sunday. shrepresents that the script is a bash script and should be run from /bin/bash./path/to/script.shspecifies the path to the script.* * * * * sh /path/to/script/script.sh| | | | | || | | | | Command or Script to Execute | | | | || | | | || | | | || | | | Day of the Week(0-6)| | | || | | Month of the Year(1-12)| | || | Day of the Month(1-31) | || Hour(0-23) |Min(0-59)Cron job examples
SCHEDULE SCHEDULED VALUE 5 0 * 8 *At 00:05 in August. 5 4 * * 6At 04:05 on Saturday. 0 22 * * 1-5At 22:00 on every day-of-week from Monday through Friday. How to set up a cron job
date-script.shwhich prints the system date and time and appends it to a file. The script is shown below:#!/bin/bashecho `date` >> date-out.txtchmod 775 date-script.shcrontab -e.*/1 * * * * /bin/sh /root/date-script.shdate-out.txt. According to the script, the system date should be printed to this file every minute.cat date-out.txt# outputWed 26 Jun 16:59:33 PKT 2024Wed 26 Jun 17:00:01 PKT 2024Wed 26 Jun 17:01:01 PKT 2024Wed 26 Jun 17:02:01 PKT 2024Wed 26 Jun 17:03:01 PKT 2024Wed 26 Jun 17:04:01 PKT 2024Wed 26 Jun 17:05:01 PKT 2024Wed 26 Jun 17:06:01 PKT 2024Wed 26 Jun 17:07:01 PKT 2024/var/log/syslog.1 Jun 26 17:02:01 zaira-ThinkPad CRON[27834]: (zaira) CMD (/bin/sh /home/zaira/date-script.sh)2 Jun 26 17:02:02 zaira-ThinkPad systemd[2094]: Started Tracker metadata extractor.3 Jun 26 17:03:01 zaira-ThinkPad CRON[28255]: (zaira) CMD (/bin/sh /home/zaira/date-script.sh)4 Jun 26 17:03:02 zaira-ThinkPad systemd[2094]: Started Tracker metadata extractor.5 Jun 26 17:04:01 zaira-ThinkPad CRON[28538]: (zaira) CMD (/bin/sh /home/zaira/date-script.sh)# Redirect cron output to a file* * * * * sh /path/to/script.sh &> log_file.log8.7. Linux Networking Basics
View network interfaces with
ifconfigifconfigcommand gives information about network interfaces. Here is an example output:ifconfig# Outputeth0: flags=4163<UP,BROADCAST,RUNNING,MULTICAST> mtu 1500 inet 192.168.1.100 netmask 255.255.255.0 broadcast 192.168.1.255 inet6 fe80::a00:27ff:fe4e:66a1 prefixlen 64 scopeid 0x20<link> ether 08:00:27:4e:66:a1 txqueuelen 1000 (Ethernet) RX packets 1024 bytes 654321 (654.3 KB) RX errors 0 dropped 0 overruns 0 frame 0 TX packets 512 bytes 123456 (123.4 KB) TX errors 0 dropped 0 overruns 0 carrier 0 collisions 0lo: flags=73<UP,LOOPBACK,RUNNING> mtu 65536 inet 127.0.0.1 netmask 255.0.0.0 inet6 ::1 prefixlen 128 scopeid 0x10<host> loop txqueuelen 1000 (Local Loopback) RX packets 256 bytes 20480 (20.4 KB) RX errors 0 dropped 0 overruns 0 frame 0 TX packets 256 bytes 20480 (20.4 KB) TX errors 0 dropped 0 overruns 0 carrier 0 collisions 0ifconfigcommand shows the network interfaces configured on the system, along with details such as IP addresses, MAC addresses, packet statistics, and more.ip -4 addrand ip -6 addr, respectively.netstatnetstatcommand shows network activity and stats by giving the following information:netstatcommand in the command line:netstat -anetstat -lnetstat -snetstat -rnetstat -tnetstat -unetstat -inetstat -pnetstat -stnetstat -eCheck network connectivity between two devices using
pingpingis used to test network connectivity between two devices. It sends ICMP packets to the target device and waits for a response.ping google.compingtests if you get a response back without getting a timeout.ping google.comPING google.com (142.250.181.46) 56(84) bytes of data.64 bytes from fjr04s06-in-f14.1e100.net (142.250.181.46): icmp_seq=1 ttl=60 time=78.3 ms64 bytes from fjr04s06-in-f14.1e100.net (142.250.181.46): icmp_seq=2 ttl=60 time=141 ms64 bytes from fjr04s06-in-f14.1e100.net (142.250.181.46): icmp_seq=3 ttl=60 time=205 ms64 bytes from fjr04s06-in-f14.1e100.net (142.250.181.46): icmp_seq=4 ttl=60 time=100 ms^C--- google.com ping statistics ---4 packets transmitted, 4 received, 0% packet loss, time 3001msrtt min/avg/max/mdev = 78.308/131.053/204.783/48.152 msCtrl + C.Testing endpoints with the
curlcommandcurlcommand stands for "client URL". It is used to transfer data to or from a server. It can also be used to test API endpoints that helps in troubleshooting system and application errors.http://www.official-joke-api.appspot.com/to experiment with the curlcommand.curlcommand without any options uses the GET method by default.curl http://www.official-joke-api.appspot.com/random_joke{ "type":"general","setup":"What did the fish say when it hit the wall?","punchline":"Dam.","id":1}curl -osaves the output to the mentioned file.curl -o random_joke.json http://www.official-joke-api.appspot.com/random_joke# saves the output to random_joke.jsoncurl -Ifetches only the headers.curl -I http://www.official-joke-api.appspot.com/random_jokeHTTP/1.1 200 OKContent-Type: application/json; charset=utf-8Vary: Accept-EncodingX-Powered-By: ExpressAccess-Control-Allow-Origin: *ETag: W/"71-NaOSpKuq8ChoxdHD24M0lrA+JXA"X-Cloud-Trace-Context: 2653a86b36b8b131df37716f8b2dd44fContent-Length: 113Date: Thu, 06 Jun 2024 10:11:50 GMTServer: Google Frontend8.8. Linux Troubleshooting: Tools and Techniques
System activity report with
sarsarcommand in Linux is a powerful tool for collecting, reporting, and saving system activity information. It's part of the sysstatpackage and is widely used for monitoring system performance over time.saryou first need to install syssstatusing sudo apt install sysstat.sudo systemctl start sysstat.sudo systemctl status sysstat.sarcommand is as follows:sar [options] [interval] [count]sar -u 1 3will display CPU utilization statistics every second for three times.sar -u 1 3# OutputLinux 6.5.0-28-generic (zaira-ThinkPad) 04/06/24 _x86_64_ (12 CPU)19:09:26 CPU %user %nice %system %iowait %steal %idle19:09:27 all 3.78 0.00 2.18 0.08 0.00 93.9619:09:28 all 4.02 0.00 2.01 0.08 0.00 93.8919:09:29 all 6.89 0.00 2.10 0.00 0.00 91.01Average: all 4.89 0.00 2.10 0.06 0.00 92.95sarcommand.sarcan be used for a variety of purposes:1. Memory usage
sar -r 1 3Linux 6.5.0-28-generic (zaira-ThinkPad) 04/06/24 _x86_64_ (12 CPU)19:10:46 kbmemfree kbavail kbmemused %memused kbbuffers kbcached kbcommit %commit kbactive kbinact kbdirty19:10:47 4600104 8934352 5502124 36.32 375844 4158352 15532012 65.99 6830564 2481260 26419:10:48 4644668 8978940 5450252 35.98 375852 4165648 15549184 66.06 6776388 2481284 3619:10:49 4646548 8980860 5448328 35.97 375860 4165648 15549224 66.06 6774368 2481292 116Average: 4630440 8964717 5466901 36.09 375852 4163216 15543473 66.04 6793773 2481279 1392. Swap space utilization
sar -S 1 3sar -S 1 3Linux 6.5.0-28-generic (zaira-ThinkPad) 04/06/24 _x86_64_ (12 CPU)19:11:20 kbswpfree kbswpused %swpused kbswpcad %swpcad19:11:21 8388604 0 0.00 0 0.0019:11:22 8388604 0 0.00 0 0.0019:11:23 8388604 0 0.00 0 0.00Average: 8388604 0 0.00 0 0.003. I/O devices load
sar -d 1 35. Network statistics
sar -n DEV 1 3# -n DEV tells sar to report network device interfacessar -n DEV 1 3Linux 6.5.0-28-generic (zaira-ThinkPad) 04/06/24 _x86_64_ (12 CPU)19:12:47 IFACE rxpck/s txpck/s rxkB/s txkB/s rxcmp/s txcmp/s rxmcst/s %ifutil19:12:48 lo 0.00 0.00 0.00 0.00 0.00 0.00 0.00 0.0019:12:48 enp2s0 0.00 0.00 0.00 0.00 0.00 0.00 0.00 0.0019:12:48 wlp3s0 10.00 3.00 1.83 0.37 0.00 0.00 0.00 0.0019:12:48 br-5129d04f972f 0.00 0.00 0.00 0.00 0.00 0.00 0.00 0.00...Average: IFACE rxpck/s txpck/s rxkB/s txkB/s rxcmp/s txcmp/s rxmcst/s %ifutilAverage: lo 0.00 0.00 0.00 0.00 0.00 0.00 0.00 0.00Average: enp2s0 0.00 0.00 0.00 0.00 0.00 0.00 0.00 0.00...output truncated...6. Historical data
sysstatpackage and ran the service. Follow the steps below to enable and access historical data.sysstatconfiguration file to enable data collection.sudo nano /etc/default/sysstatENABLED="false"to ENABLED="true".vim /etc/default/sysstat # # Default settings for /etc/init.d/sysstat, /etc/cron.d/sysstat # and /etc/cron.daily/sysstat files # # Should sadc collect system activity informations? Valid values # are "true" and "false". Please do not put other values, they # will be overwritten by debconf! ENABLED="true"sudo nano /etc/cron.d/sysstat/var/log/sysstatfolder.sarcommand to view historical data. For example, to view CPU usage for the current day:sar -usar -u -f /var/log/sysstat/sa<DD><DD>with the day of the month for which you want to view the data./var/log/sysstat/sa04gives stats for the 4th day of the current month.sar -u -f /var/log/sysstat/sa04Linux 6.5.0-28-generic (zaira-ThinkPad) 04/06/24 _x86_64_ (12 CPU)15:20:49 LINUX RESTART (12 CPU)16:13:30 LINUX RESTART (12 CPU)18:16:00 CPU %user %nice %system %iowait %steal %idle18:16:01 all 0.25 0.00 0.67 0.08 0.00 99.00Average: all 0.25 0.00 0.67 0.08 0.00 99.007. Real-Time CPU Interruptions
sar -I SUM 1 3# OutputLinux 6.5.0-28-generic (zaira-ThinkPad) 04/06/24 _x86_64_ (12 CPU)19:14:22 INTR intr/s19:14:23 sum 5784.0019:14:24 sum 5694.0019:14:25 sum 5795.00Average: sum 5757.67sarto monitor various aspects of system performance. Regular use of sarcan help in identifying system bottlenecks and ensuring that applications keep running efficiently.8.9. General Troubleshooting Strategy for Servers
Find load average and system uptime
uptime. In addition to the uptime, the command also displays load average.[user@host ~]$ uptime 19:15:00 up 1:04, 0 users, load average: 2.92, 4.48, 5.200. This is only possible when there are no waiting queues for the CPU.lscpu.lscpu# outputArchitecture: x86_64 CPU op-mode(s): 32-bit, 64-bit Address sizes: 48 bits physical, 48 bits virtual Byte Order: Little EndianCPU(s): 12 On-line CPU(s) list: 0-11...output omittedCalculating free memory
freecommand.free -mh# output total used free shared buff/cache availableMem: 14Gi 3.5Gi 7.7Gi 109Mi 3.2Gi 10GiSwap: 8.0Gi 0B 8.0GiCalculating disk space
dfcommand provides detailed disk spaces.df -hFilesystem Size Used Avail Use% Mounted ontmpfs 1.5G 2.4M 1.5G 1% /run/dev/nvme0n1p2 103G 34G 65G 35% /tmpfs 7.3G 42M 7.2G 1% /dev/shmtmpfs 5.0M 4.0K 5.0M 1% /run/lockefivarfs 246K 93K 149K 39% /sys/firmware/efi/efivars/dev/nvme0n1p3 130G 47G 77G 39% /home/dev/nvme0n1p1 511M 6.1M 505M 2% /boot/efitmpfs 1.5G 140K 1.5G 1% /run/user/1000Determining process states
pscommand gives useful information about a process. Have a look at the CPUand MEMcolumns.[user@host ~]$ ps auxUSER PID %CPU %MEM VSZ RSS TTY STAT START TIME COMMAND runner 1 0.1 0.0 1535464 15576 ? S 19:18 0:00 /inject/init runner 14 0.0 0.0 21484 3836 pts/0 S 19:21 0:00 bash --norc runner 22 0.0 0.0 37380 3176 pts/0 R+ 19:23 0:00 ps auxReal-time system monitoring
topcommand.ps, topcontinuously refreshes the system stats.top, you can see well-organised details in a compact window. There a number of flags, shortcuts, and highlighting methods that come along with top.top. For that, press kand then enter the process id.Interpreting logs
Network ports analysis
State Description LISTEN Represents ports that are waiting for a connection request from any remote TCP and port. ESTABLISHED Represents connections that are open and data received can be delivered to the destination. TIME WAIT Represents waiting time to ensure acknowledgment of its connection termination request. FIN WAIT2 Represents waiting for a connection termination request from the remote TCP. 15000to 65000, which makes a total of 50000(65000 - 15000) available ports. If utilized ports are reaching or exceeding this limit, then there is an issue.[user@host ~]$ /sbin/sysctl net.ipv4.ip_local_port_rangenet.ipv4.ip_local_port_range = 15000 65000Failed to bind to portor Too many connections.Identifying packet loss
ping. pinghits the destination system and brings the response back. Note the last few lines of statistics that show packet loss percentage and time.# ping destination IP[user@host ~]$ ping 10.13.6.113 PING 10.13.6.141 (10.13.6.141) 56(84) bytes of data. 64 bytes from 10.13.6.113: icmp_seq=1 ttl=128 time=0.652 ms 64 bytes from 10.13.6.113: icmp_seq=2 ttl=128 time=0.593 ms 64 bytes from 10.13.6.113: icmp_seq=3 ttl=128 time=0.478 ms 64 bytes from 10.13.6.113: icmp_seq=4 ttl=128 time=0.384 ms 64 bytes from 10.13.6.113: icmp_seq=5 ttl=128 time=0.432 ms 64 bytes from 10.13.6.113: icmp_seq=6 ttl=128 time=0.747 ms 64 bytes from 10.13.6.113: icmp_seq=7 ttl=128 time=0.379 ms ^C --- 10.13.6.113 ping statistics --- 7 packets transmitted, 7 received,0% packet loss, time 6001ms rtt min/avg/max/mdev = 0.379/0.523/0.747/0.134 mstcpdump. We'll look into it later.Gathering stats for issue post mortem
tcpdumpas follows:sudo tcpdump -i any -w# Where,# -i any captures traffic from all interfaces# -w specifies the output filename# Stop the command after a few mins as the file size may increase# use file extension as .pcaptcpdumpis captured, you can use tools like Wireshark to visually analyze the traffic.8.10 Diagnosing Hardware Problems
SIGSEGV), overheating, or random crashes across unrelated applications. The issue could either be software or hardware related. While software-related issues depend on the specific application itself, hardware issues can be diagnosed with some standard steps.8.10.1 Analyzing Memory Performance
free -mh, where -his for human-readable output and -mis for displaying memory in MB.free -mh total used free shared buff/cache availableMem: 14Gi 5.1Gi 2.4Gi 77Mi 7.3Gi 9.3GiSwap: 4.0Gi 0B 4.0Gitopcommand. There are 2 ways to do this:top, press Shift + Mto sort the processes by memory usage.mto see the memory usage in a progress bar like format:
100%, you might want to consider identifying the process that is consuming the memory and take necessary action. You might also want to consider adding more memory to your system.memtestercommand is a utility used for diagnosing memory-related issues by stressing the memory and checking for faults. It is often used in situations where you suspect faulty RAM might be causing system instability or crashes.memtester.sudo apt install memtester1Gis the amount of RAM to test (1 GB), and 5is the number of test passes:sudo memtester 1G 5memtesteroutput if all tests pass. Notice the ”ok”status for each test.memtester version 4.5.1 (64-bit)Copyright (C) 2001-2020 Charles Cazabon.Licensed under the GNU General Public License version 2 (only).pagesize is 4096pagesizemask is 0xfffffffffffff000want 1024MB (1073741824 bytes)got 1024MB (1073741824 bytes), trying mlock ...locked.Loop 1/5: Stuck Address : ok Random Value : ok Compare XOR : ok Compare SUB : ok Compare MUL : ok Compare DIV : ok Compare OR : ok Compare AND : ok Sequential Increment: ok Solid Bits : ok Block Sequential : ok Checkerboard : ok Bit Spread : ok Bit Flip : ok Walking Ones : ok Walking Zeroes : ok 8-bit Writes : ok 16-bit Writes : ok...FAILUREstatus for each test.memtester version 4.5.1 (64-bit)Copyright (C) 2001-2020 Charles Cazabon.Licensed under the GNU General Public License version 2 (only).pagesize is 4096pagesizemask is 0xfffffffffffff000want 1024MB (1073741824 bytes)got 1024MB (1073741824 bytes), trying mlock ...locked.Loop 1/5: Stuck Address : testing 1FAILURE: possible bad address line at offset 0x25378a58.Skipping to next test... Random Value : FAILURE: 0x4df704aaafdf8848 != 0x4df704aaafdfc848 at offset 0x05379a48. Compare XOR : ok Compare SUB : ok Compare MUL : ok Compare DIV : ok Compare OR : ok Compare AND : ok Sequential Increment: ok Solid Bits : testing 6FAILURE: 0x00000000 != 0x00004000 at offset 0x05379a48. Block Sequential : testing 3FAILURE: 0x303030303030303 != 0x303030303034303 at offset 0x05379a48. Checkerboard : testing 0FAILURE: 0xaaaaaaaaaaaaaaaa != 0xaaaaaaaaaaaaeaaa at offset 0x05379a48. Bit Spread : testing 12FAILURE: 0xffffffffffffafff != 0xffffffffffffefff at offset 0x05379a48. Bit Flip : testing 0FAILURE: 0x00000001 != 0x00004001 at offset 0x05379a48. Walking Ones : ok Walking Zeroes : testing 0FAILURE: 0x00000001 != 0x00001001 at offset 0x053af9f8. 8-bit Writes : -FAILURE: 0x57c7c8ba7d6f5b3b != 0x57c7c8ba7d6f1b3b at offset 0x0537da28. 16-bit Writes : -FAILURE: 0xd7768894fbf79099 != 0xd7768894fbf7d099 at offset 0x05379a48.FAILURE: 0xfffc5633ffefca5d != 0xfffc5633ffefda5d at offset 0x053a5a38....8.10.2 Identifying Overheating Issues
lm-sensors.lm-sensorsallow syou monitor hardware health by reading data from various sensors. It provides information about system temperatures, voltages, and fan speeds.lm-sensors:lm-sensors:sudo apt install lm-sensorssudo sensors-detectsensorscommand:sensorsamdgpu-pci-0400 Adapter: PCI adapter vddgfx: 731.00 mV vddnb: 687.00 mV edge: +41.0°C PPT: 7.00 Wlm-sensorsensures that the system is operating within safe parameters. It helps to detect potential hardware problems early and take corrective actions to prevent hardware damage.8.10.3 Evaluating Hard Drive Health
smartmontools:smartmontools:sudo apt install smartmontools/dev/sdXwith your disk name (check with lsblk).sudo smartctl -H /dev/sdX/dev/nvme0n1:sudo smartctl -H /dev/nvme0n1 smartctl 7.4 2023-08-01 r5530 [x86_64-linux-6.8.0-52-generic] (local build) Copyright (C) 2002-23, Bruce Allen, Christian Franke, www.smartmontools.org === START OF SMART DATA SECTION === SMART overall-health self-assessment test result: PASSEDsudo smartctl -a /dev/nvme0n18.10.4 Conducting a CPU Stress Test
stress-ngutility:stress-ng:sudo apt install stress-ngstress-ng --cpu 4 --timeout 604is the number of CPU cores you’d like to test and 60is the duration in seconds. The command will stress all 4 CPU cores for 60 seconds. Notice the CPU is at 100%load during the test:
8.10.5 Examining System Logs for Errors
systemdis a Linux system manager responsible for booting the system, managing system processes, and handling system services.journalctlis a command to query the systemdjournal logs. It provides detailed logging for system processes, kernel events, user applications, and more.journalctl -k | grep -iE "error|fault|panic".Feb 11 10:15:32 hostname kernel: [Hardware Error]: CPU 0: Machine Check: 0 Bank 4: b200000000070f0fFeb 11 10:15:32 hostname kernel: [Hardware Error]: TSC 0 ADDR fef1c000 MISC 38a0000086 Feb 11 10:15:32 hostname kernel: [Hardware Error]: PROCESSOR 0:306a9 TIME 1613045732 SOCKET 0 APIC 0 microcode 1fFeb 11 10:16:45 hostname kernel: EXT4-fs error (device sda1): ext4_find_entry:1453: inode #2: comm ls: reading directory lblock 0Feb 11 10:17:12 hostname kernel: [drm:drm_atomic_helper_commit_cleanup_done [drm_kms_helper]] *ERROR* [CRTC:36:pipe A] flip_done timed outFeb 11 10:18:05 hostname kernel: Kernel panic - not syncing: Fatal exceptionConclusion
- 最近发表
- 随机阅读
-
- Command Line for Beginners – How to Use the Terminal Like a Pro [Full Handbook]
- Md Tarikul Islam
- AI Paper Review: Chain
- Build a Self
- The GraphQL API Handbook – How to Build, Test, Consume and Document GraphQL APIs
- Md Tarikul Islam
- Mohammed Fahd Abrah
- Build a Self
- Build a Self
- Manish Shivanandhan
- Nikhil Adithyan
- How to Build a Case Converter Tool Using HTML, CSS, and JavaScript
- Best Practices Documentation
- Machine Learning
- Bansidhar Kadiya
- langchain
- How to Build a Browser
- How to Build a Case Converter Tool Using HTML, CSS, and JavaScript
- Machine Learning
- Build a Self
- 搜索
-